Betriebshandbuch
Hotspot — Operator Manual
Guest Wi-Fi with Zedmos firewalls and the Zedmos Console
- Für
- Operators and buyers who set up, run and support guest Wi-Fi
- Gilt für
- Zedmos Console 1.2.20 or later; Zedmos firewall releases after 26.10.125
- Stand
- 2026-10-15
16 KapitelDieses Handbuch ist auf Englisch verfasst. Die Oberfläche selbst ist in jeder Sprache englisch.
Hotspot turns any network behind a Zedmos firewall into a guest Wi-Fi with a sign-in page. Guests join the Wi-Fi, a sign-in window opens on their phone or laptop, and they get online with an account, a printed voucher, a code sent by SMS or WhatsApp, or their hotel room number. You can show ads and ask short surveys on that page, and read the answers.
The firewall does the work: it holds guests at the sign-in page, checks their credentials, counts their time and keeps the records. The console manages many firewalls at once: it shows every hotspot's state, publishes ads and surveys to the firewalls you choose, collects the results, and gives each firewall a real name with a trusted certificate.
This manual follows the order in which you set things up. Each chapter starts with what the feature does, then gives the procedure step by step, then lists every control on the screen.
How to read the pictures. Every picture is a real screen. A blue CONSOLE tag marks the console, a green FIREWALL tag marks the firewall's own web interface, and a phone frame shows what a guest sees. The red numbers in a picture match the numbered steps or the control list next to it. The examples use the organization Example Hotels, the firewall hotel-fw-01, the zone Guest Wi-Fi and the console domain console.example.com. Replace them with your own.
01
What Hotspot does
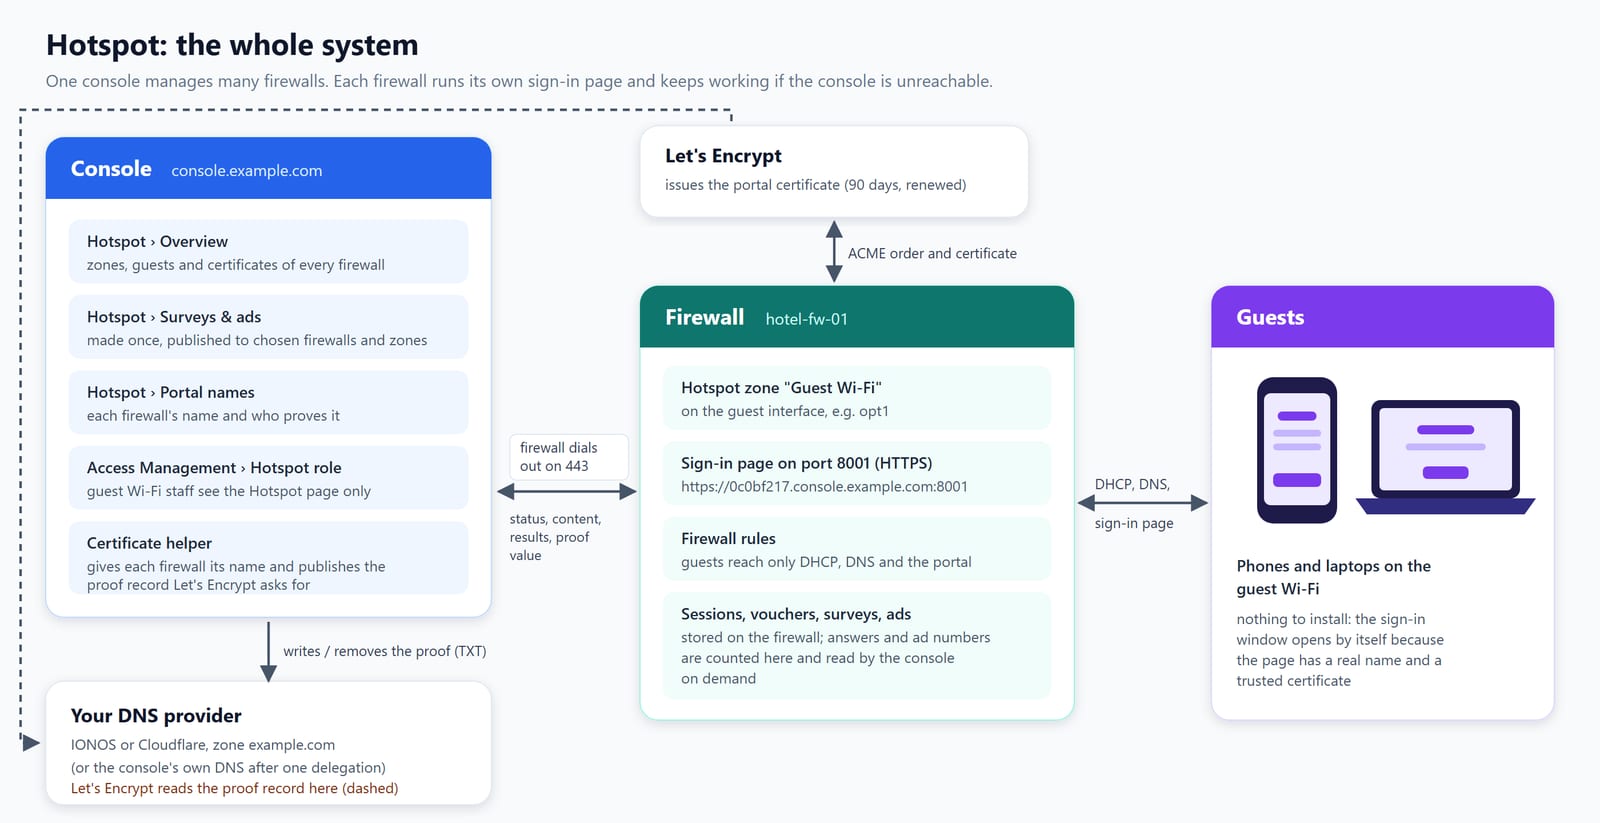
A hotspot has four parts.
- The firewall runs one or more zones. A zone is a guest network, for example the Wi-Fi interface of a hotel. On that interface the firewall lets a device that has not signed in reach only three things: DHCP, DNS and the sign-in page. Everything else is refused until the guest signs in.
- The sign-in page (also called the portal) is served by the firewall itself, on port 8001 over HTTPS. It shows your logo, texts, ads and survey, and the sign-in methods you switched on.
- The console manages many firewalls. It shows their hotspot state,
publishes ads and surveys, collects the results, and gives every firewall a
name such as
0c0bf217.console.example.com. - Let's Encrypt issues a certificate for that name. Because the name and the certificate are real, phones and laptops open the sign-in window by themselves and show a padlock.
The firewall never needs the console to let guests in. If the console is unreachable, guests still sign in, sessions still run and answers are still counted. The console reads the numbers when it is back.
What the firewall does. It holds guests at the portal, checks credentials (local accounts, LDAP, RADIUS, vouchers, SMS or WhatsApp codes, a hotel's property management system), enforces time limits, and stores sessions, vouchers, survey answers and ad numbers.
What the console adds. One page for every hotspot you manage, ads and surveys made once and published to many firewalls and zones, results added up across firewalls, portal names with certificates, and a Hotspot role for staff who should manage the guest Wi-Fi and nothing else.
02
How a guest gets online
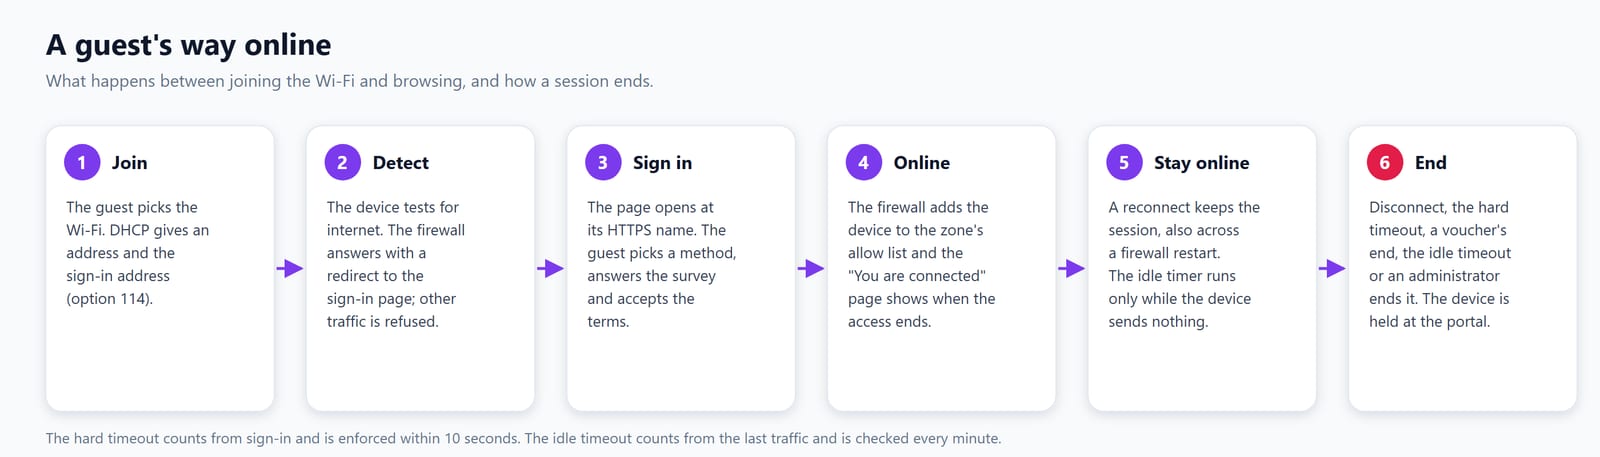
- Join. The guest picks your Wi-Fi. The firewall's DHCP server gives the device an address, the firewall as DNS server, and the address of the sign-in page (DHCP option 114, the standard captive portal option).
- Detect. Every phone and laptop tests for internet when it joins a network. The firewall answers those tests with a redirect to the sign-in page. The device understands that it is behind a sign-in page and opens it in a small window. DNS questions to any server are answered by the firewall, so even a device with a fixed DNS server finds the page.
- Sign in. The page opens at its HTTPS name with a padlock. The guest picks a method, answers the survey if there is one, ticks the terms if you require it, and presses the button.
- Online. The firewall adds the device's address to the zone's allow list. If the guest tapped an ad before signing in, the ad's link opens now.
- Stay online. If the device leaves and comes back, or the firewall restarts, the session continues. The page "You are connected" shows who is signed in and when access ends.
- End. The session ends when the guest presses Disconnect, when the time is up, when the device is idle too long, or when you disconnect it. The device is held at the sign-in page again.
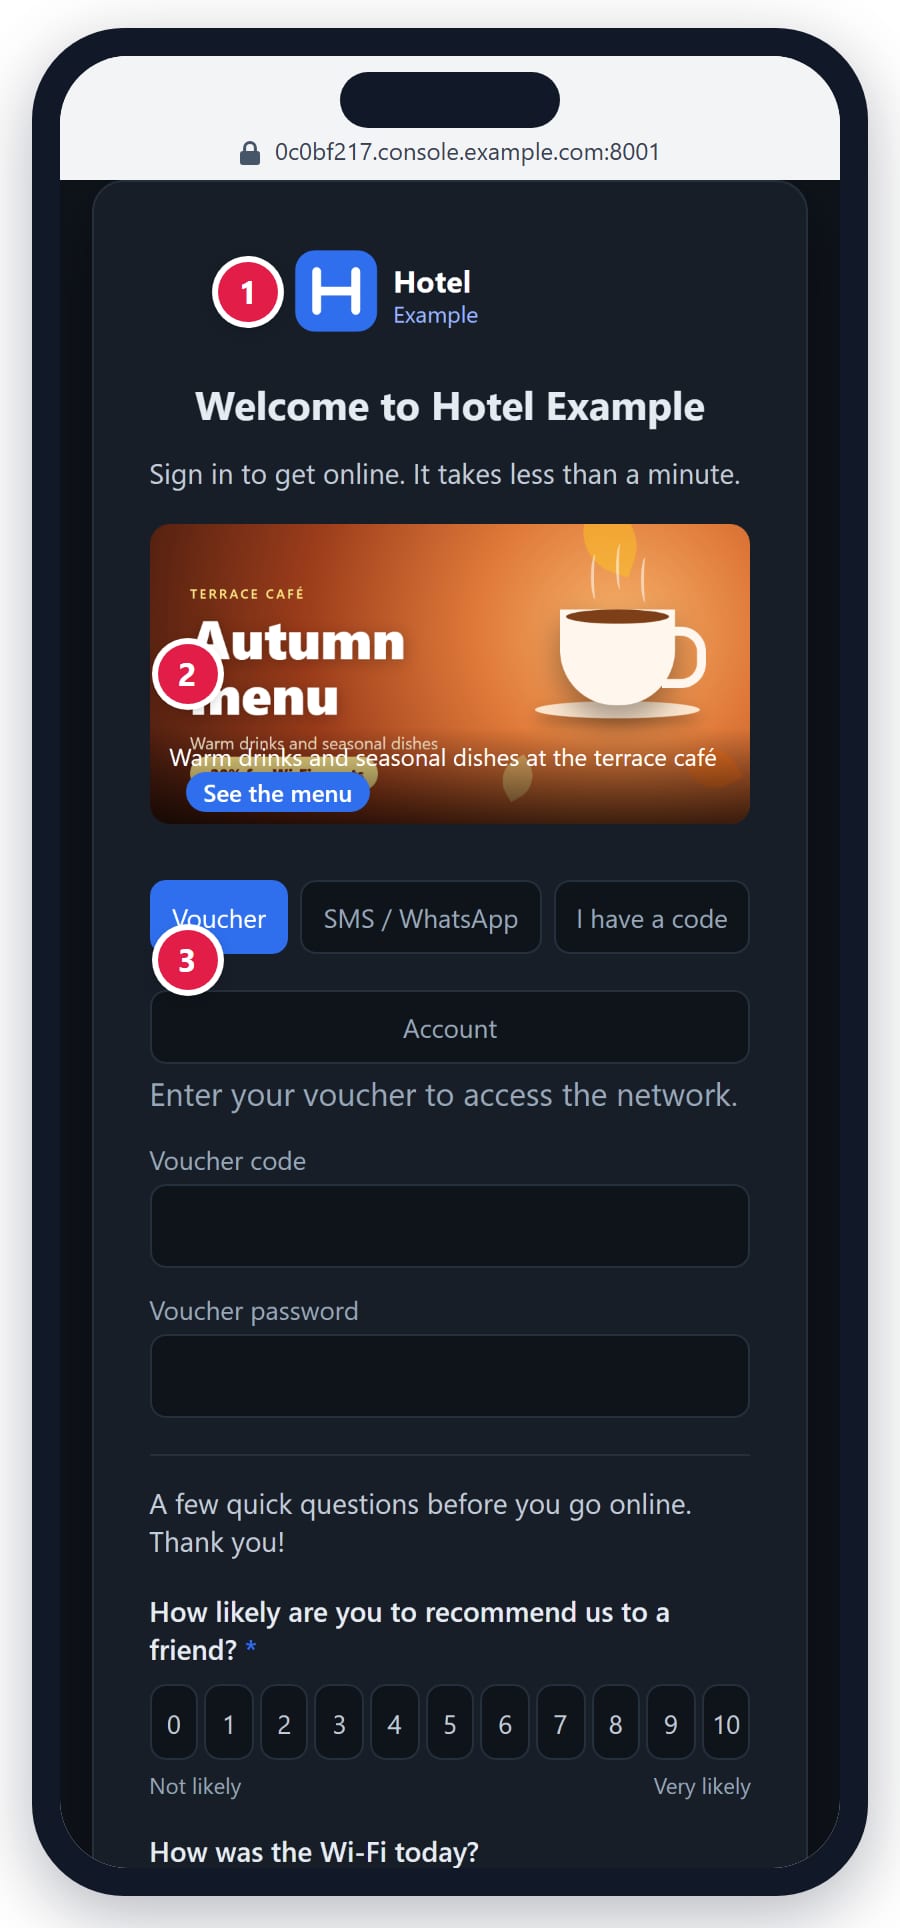
Figure 2.2 — What a guest sees. (1) Your logo, title and welcome text. (2) Slides and ads. (3) One tab per sign-in method.
03
Before you start
Check these points before you set up the first zone. Most hotspot problems come from one of them.
Network
- The guests have their own interface or VLAN on the firewall, for
example
opt1with10.2.2.1/24. Do not put guests on the staff LAN: a zone holds every device on its interface at the sign-in page. - The guest interface has DHCP (Services › Kea DHCP or Dnsmasq) with
the firewall as DNS server. Do not hand out an outside DNS server such as
8.8.8.8. - The Wi-Fi access points put guests on that interface or VLAN, and keep guests from seeing each other (client isolation on the access point).
- The firewall can reach the internet and has NAT for the guest network (automatic outbound NAT does this by default).
Firewall and console
- The firewall runs a release newer than 26.10.125. Older releases run a hotspot, but the console shows them as Update needed and cannot manage them.
- The firewall is connected to the console: on the firewall, under Console and SASE › Console. Without it the firewall has no portal name and serves the page over plain HTTP.
- You know which organization in the console the firewall belongs to. Portal names, ads and surveys are set per organization.
Portal names
- Decide who proves the portal names (chapter 05). If your domain is at IONOS or Cloudflare, use the DNS provider API: no port to open and nothing to delegate.
- Plan large roll-outs: Let's Encrypt issues at most 50 new certificates per registered domain per week. Renewals do not count. For more than 50 new firewalls in a week, roll out in batches.
Sign-in methods (only for the methods you will use)
- Account: local users on the firewall, or an LDAP or RADIUS server added under Access › Servers.
- SMS / WhatsApp: an account with an SMS gateway, Netgsm, Twilio, WhatsApp Business (Meta) or Kareli İletişim, with API access and credit.
- Hotel room: the address of your property management system's guest look-up API, and how it answers a valid room.
- Vouchers: a printer, or a way to hand out codes at the reception.
04
Who may do what: roles in the console
The console has organizations. A firewall belongs to one organization. A user gets access per organization.
| Who | Sees the Hotspot page | Changes hotspot settings | Sees the rest of the console |
|---|---|---|---|
| Console owner | every organization | every organization | yes |
| Member with role owner or admin | yes | yes | yes |
| Member with role viewer | only by opening the page directly | no, read-only | yes |
| User with the Hotspot role | yes | yes, the Hotspot area only | no |
The Hotspot role is for staff who run the guest Wi-Fi: reception, a marketing team, a café manager. It covers surveys, ads, portal names and the hotspot state of the organization's firewalls, and nothing else. A user can hold it in several organizations, next to any other permission.
A user who holds only the Hotspot role sees one link in the console, Hotspot, and their own profile. Every other page sends them back to the Hotspot page.
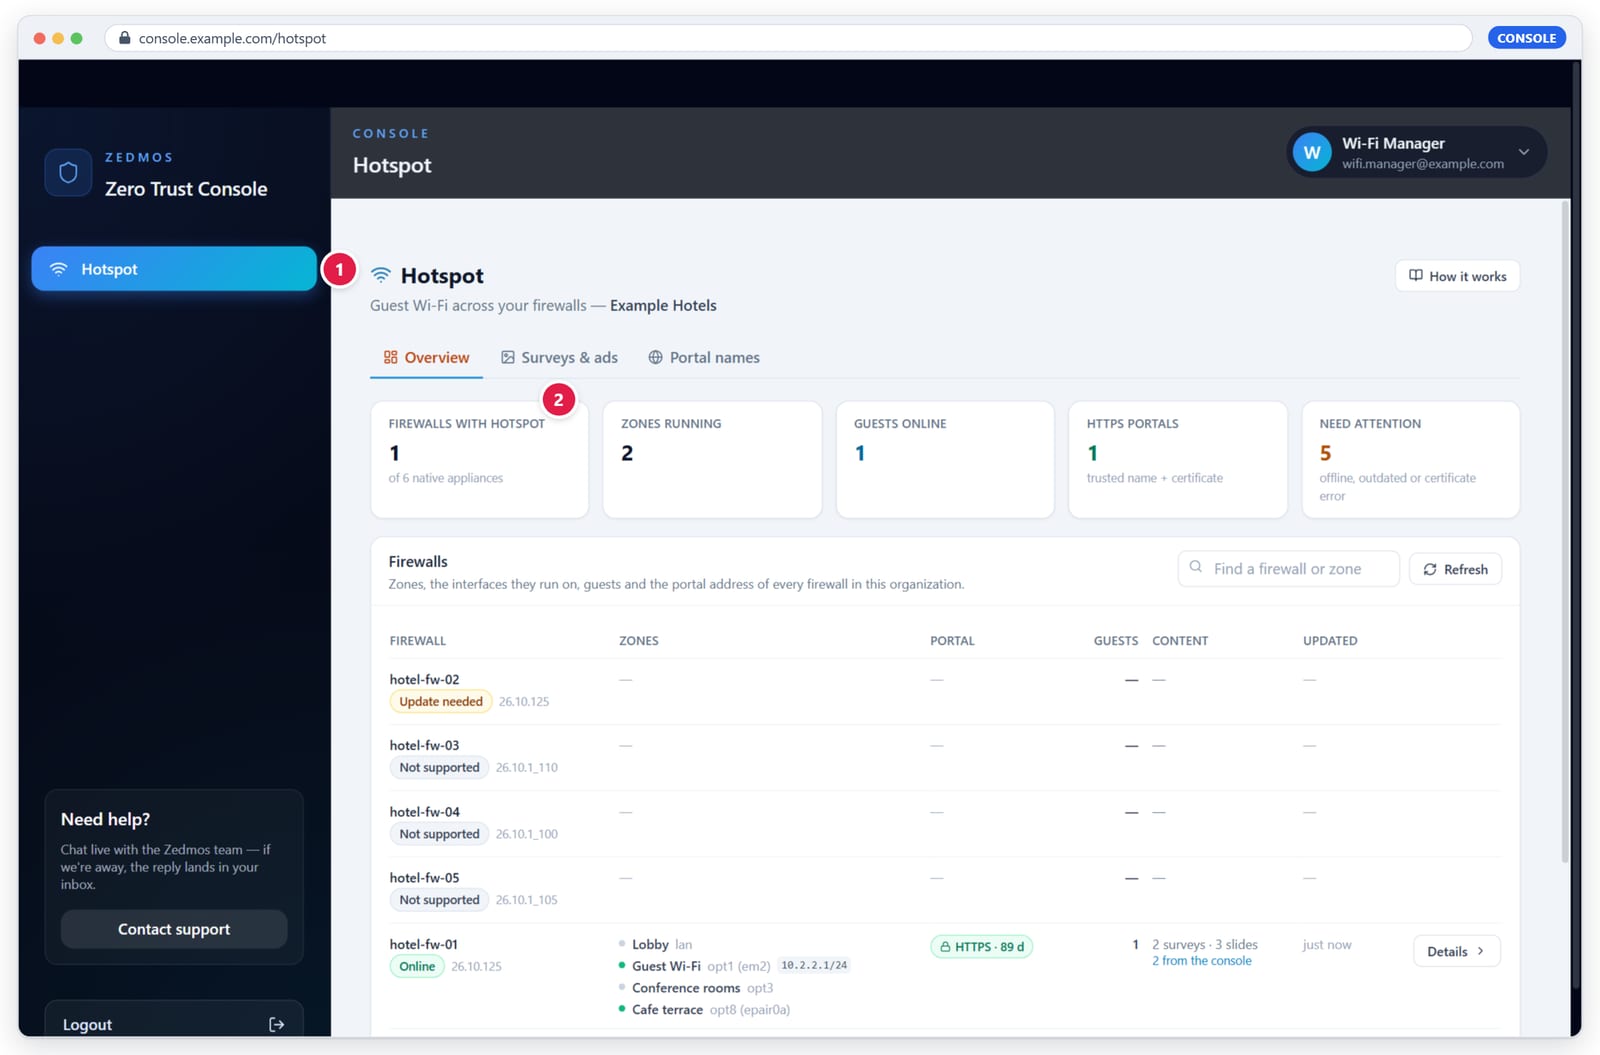
Figure 4.1 — A Hotspot-only user. (1) The sidebar holds only "Hotspot". (2) The three Hotspot tabs are all available.
Procedure: give a user the Hotspot role
- Open Access Management. In the console sidebar, click Access Management.
- Create or edit the user. Click Create user, or the edit icon on an existing user's row.
- Pick the organizations. Under Hotspot role, click each organization whose guest Wi-Fi this user manages. A tick appears on the chip. You can only offer organizations where you are owner or admin.
- Leave Permissions empty for a Hotspot-only user, or add permissions if the user also needs other parts of the console.
- Save. Click Save changes (or Create user).
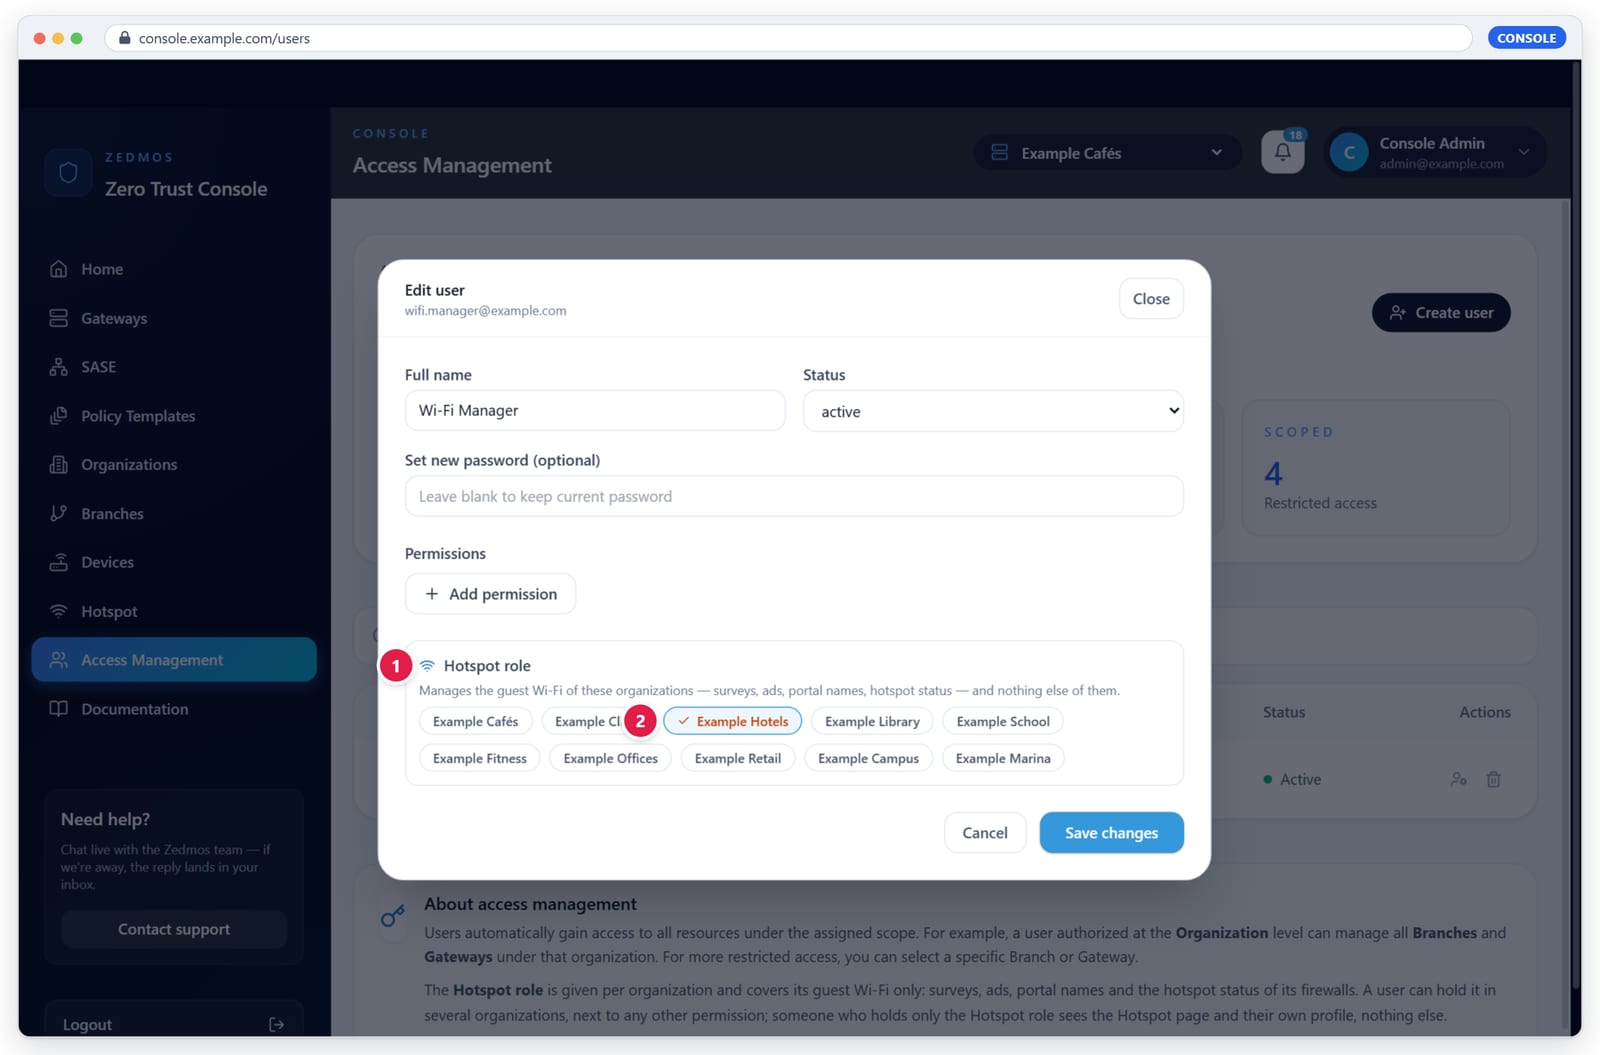
Figure 4.2 — Edit user. (1) The Hotspot role and its explanation. (2) The organization chip, ticked.
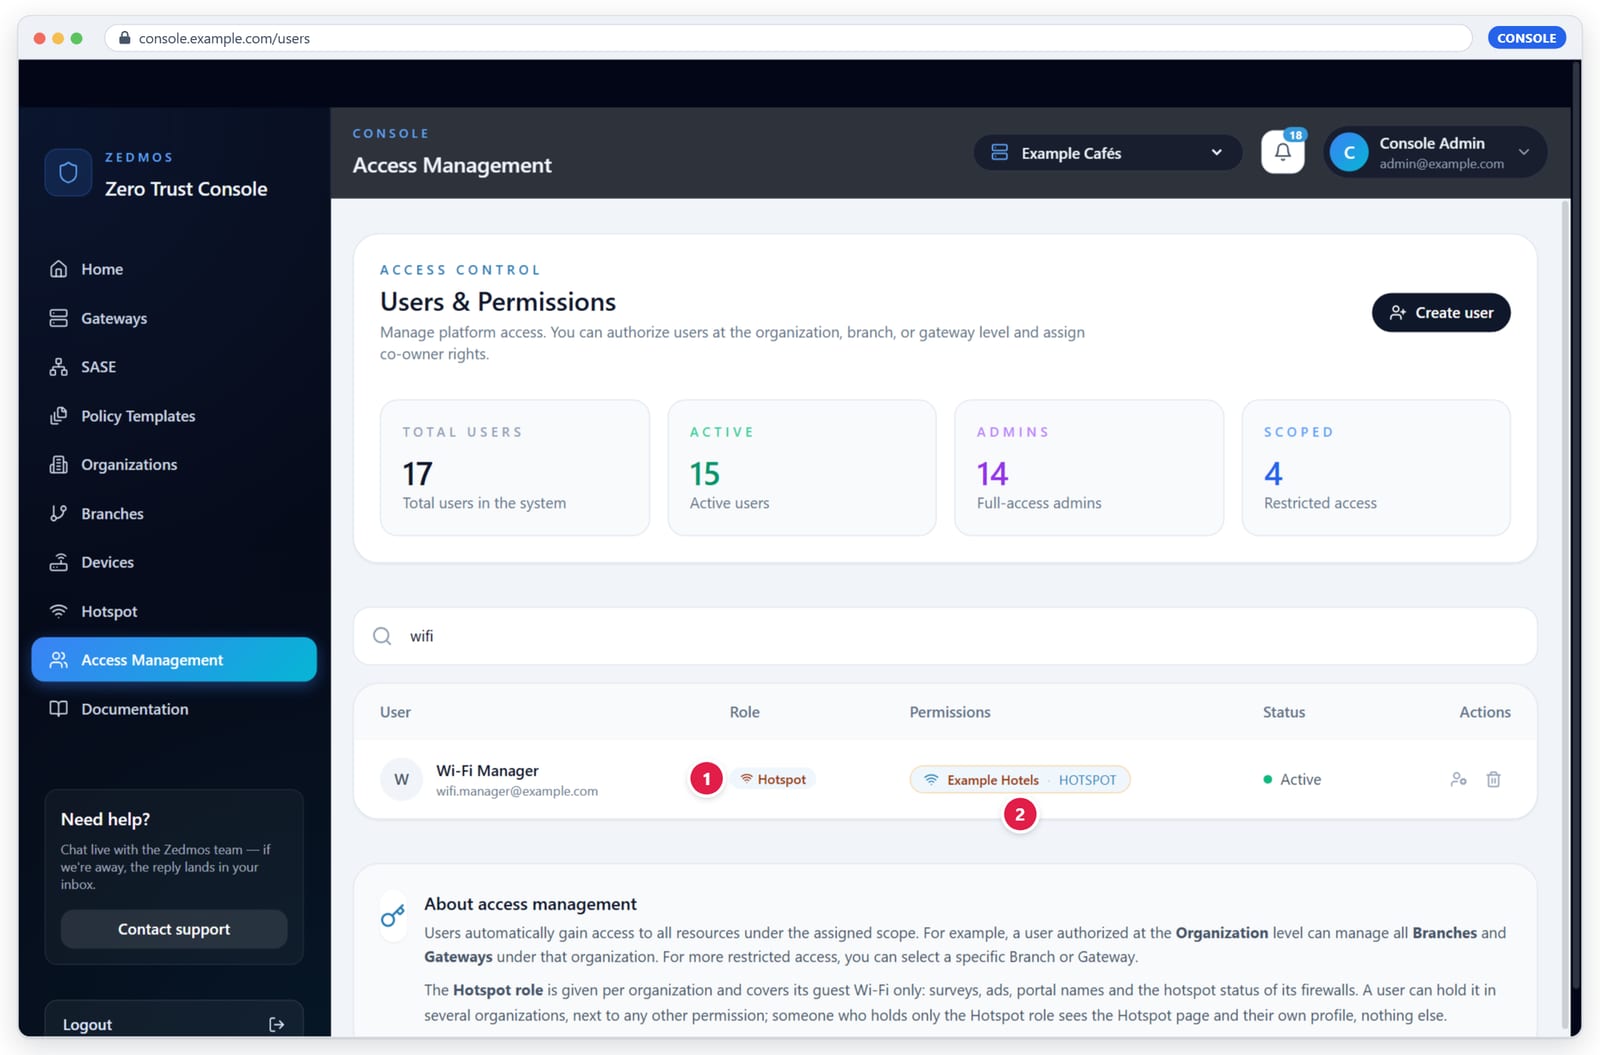
Figure 4.3 — In the user list a Hotspot-only user has the badge Hotspot (1), and each organization shows as "Example Hotels · HOTSPOT" (2). Search for "hotspot" to list everyone who holds the role.
Controls
| Control | Type | What it does |
|---|---|---|
| Hotspot role | chips | One chip per organization you manage. Ticked = the user manages that organization's guest Wi-Fi. |
| Permissions | list | Ordinary access (owner, admin, viewer) to an organization, branch or gateway. Not needed for the Hotspot role. |
| Hotspot | badge | Shown in the Role column when the user holds only the Hotspot role. |
Note. Viewers without the Hotspot role do not see the Hotspot link in the sidebar. Give them the Hotspot role if they should use the page.
05
Portal names, certificates and DNS
A phone opens the sign-in window by itself only when the page has a real name
and a certificate it trusts. On a bare address such as http://10.2.2.1:8000,
Windows shows "Action needed" and an iPhone or Mac may show nothing until the
guest opens a browser.
So every firewall gets a portal name under your console's domain:
<label>.<console domain>
0c0bf217.console.example.com
- The label is 8 characters made from the firewall's hardware ID, so it
is stable and unique. You can replace it with your own, for example
lobbyforlobby.console.example.com. - The firewall serves the page at
https://<name>:8001with a Let's Encrypt certificate. It obtains and renews the certificate by itself. - The name is never published as an address on the internet. A guest's device asks the firewall's own DNS, which answers with the zone's address.
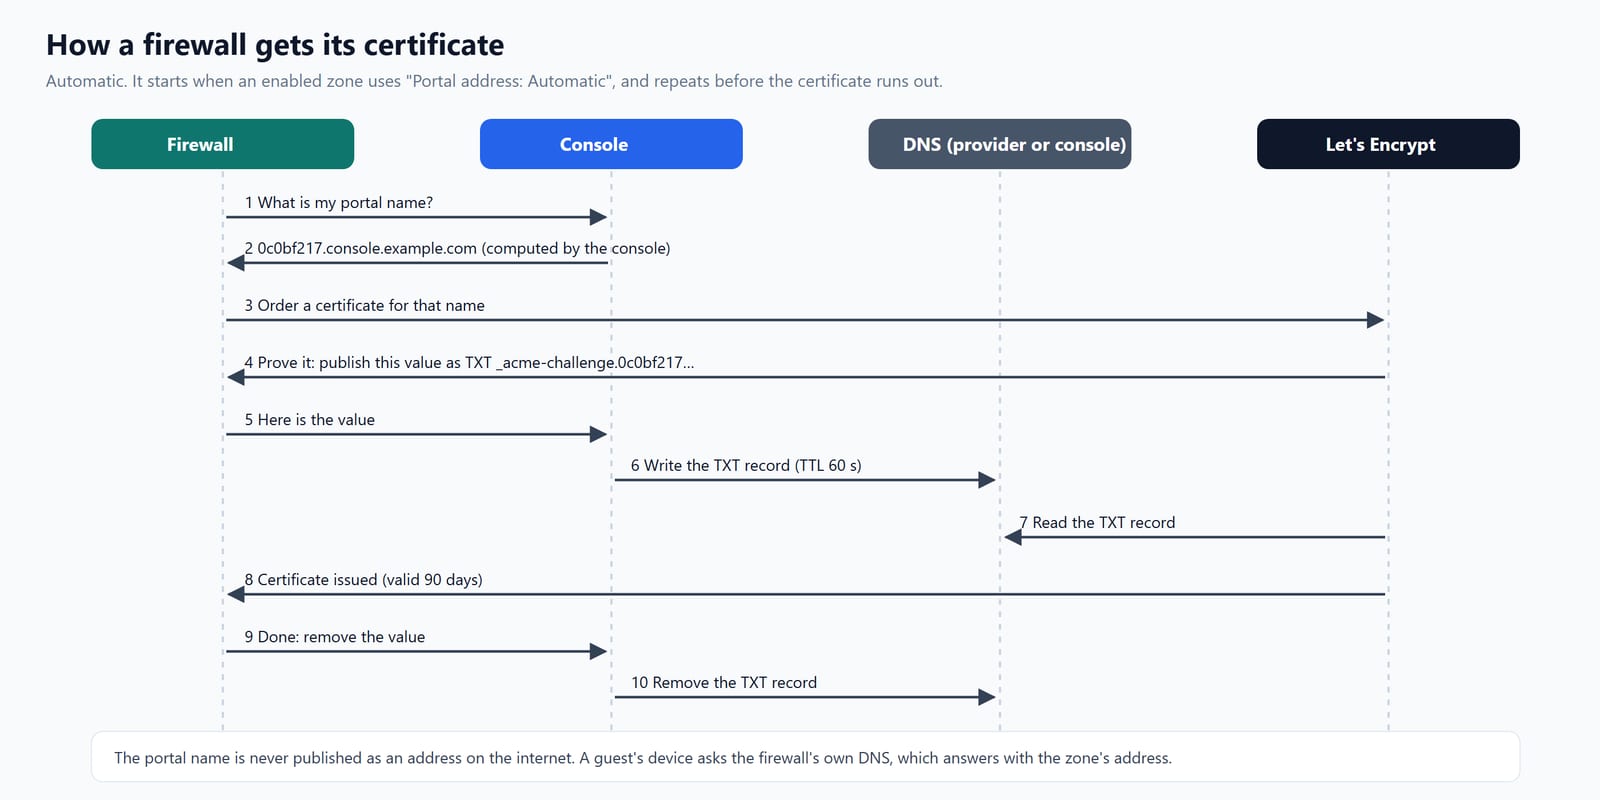
Figure 5.1 — Let's Encrypt asks the firewall to prove the name by publishing a value in DNS. The console publishes it for the firewall and removes it afterwards.
Let's Encrypt checks the name through a DNS record, _acme-challenge.<name>.
Someone must be able to write that record into your domain. That is the one
choice you make, per organization, under Hotspot › Portal names:
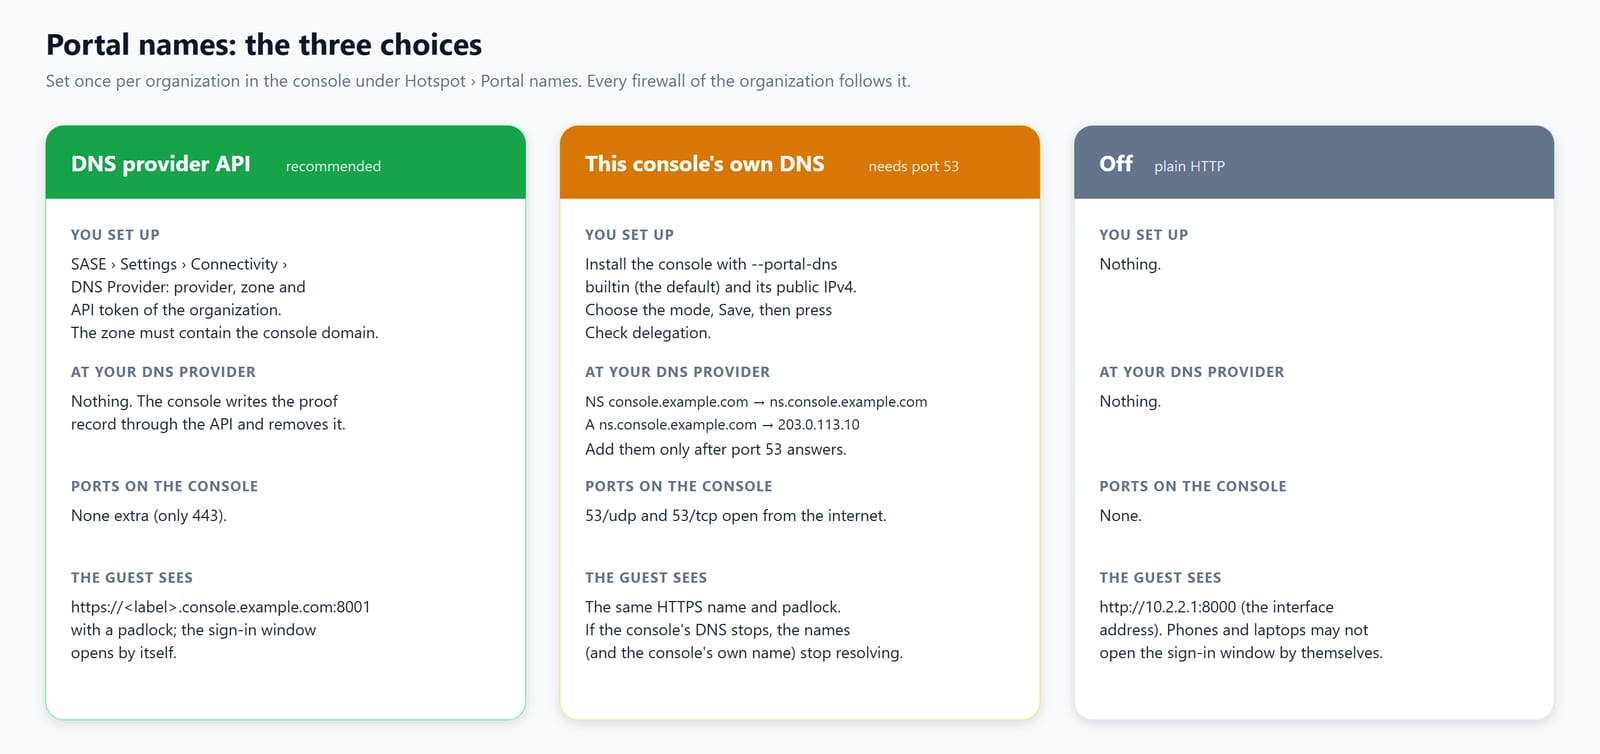
| Choice | What you do | When to choose it |
|---|---|---|
| DNS provider API (recommended) | Store your DNS provider's API token once in the console. | Your domain is at IONOS or Cloudflare. |
| This console's own DNS | Delegate the console domain to the console with two DNS records, and open port 53 on the console. | Your DNS provider has no API, and you can run DNS on the console. |
| Off | Nothing. | Testing, or networks where guests open the page themselves. |
5.1 Procedure: DNS provider API (recommended)
You need: a DNS zone at IONOS or Cloudflare that contains the console
domain, and an API token for it. Example: the console runs at
console.example.com, the zone is example.com.
Create the API token at the provider.
- IONOS: create a key at developer.hosting.ionos.de/keys. The token is the
key's public prefix and its secret joined with a dot:
<publicPrefix>.<secret>. - Cloudflare: create a scoped token at dash.cloudflare.com/profile/api-tokens with Zone:DNS:Edit and Zone:Read on the zone.
- IONOS: create a key at developer.hosting.ionos.de/keys. The token is the
key's public prefix and its secret joined with a dot:
Open the organization's SASE settings. In the console, click SASE, pick the organization in the selector at the top (1), open Settings (2) and then Connectivity (3).
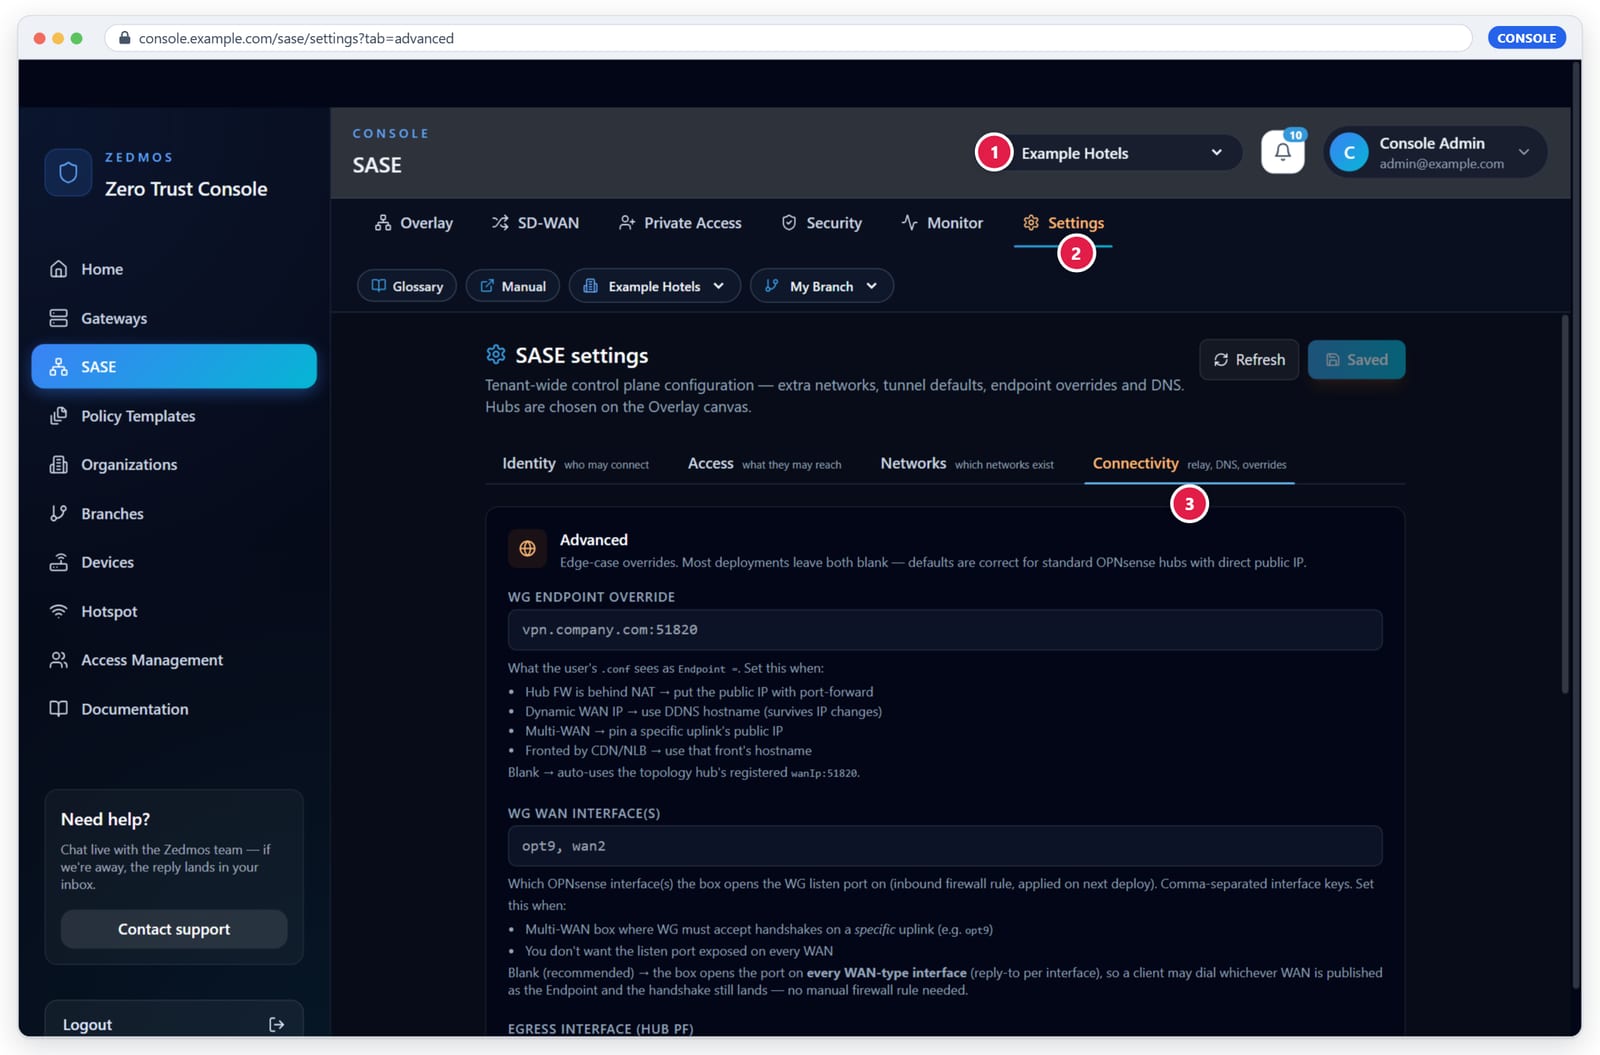
Figure 5.3 — SASE › Settings › Connectivity for the organization Example Hotels.
Configure the DNS provider. Scroll to DNS Provider (1) and click Configure (2).
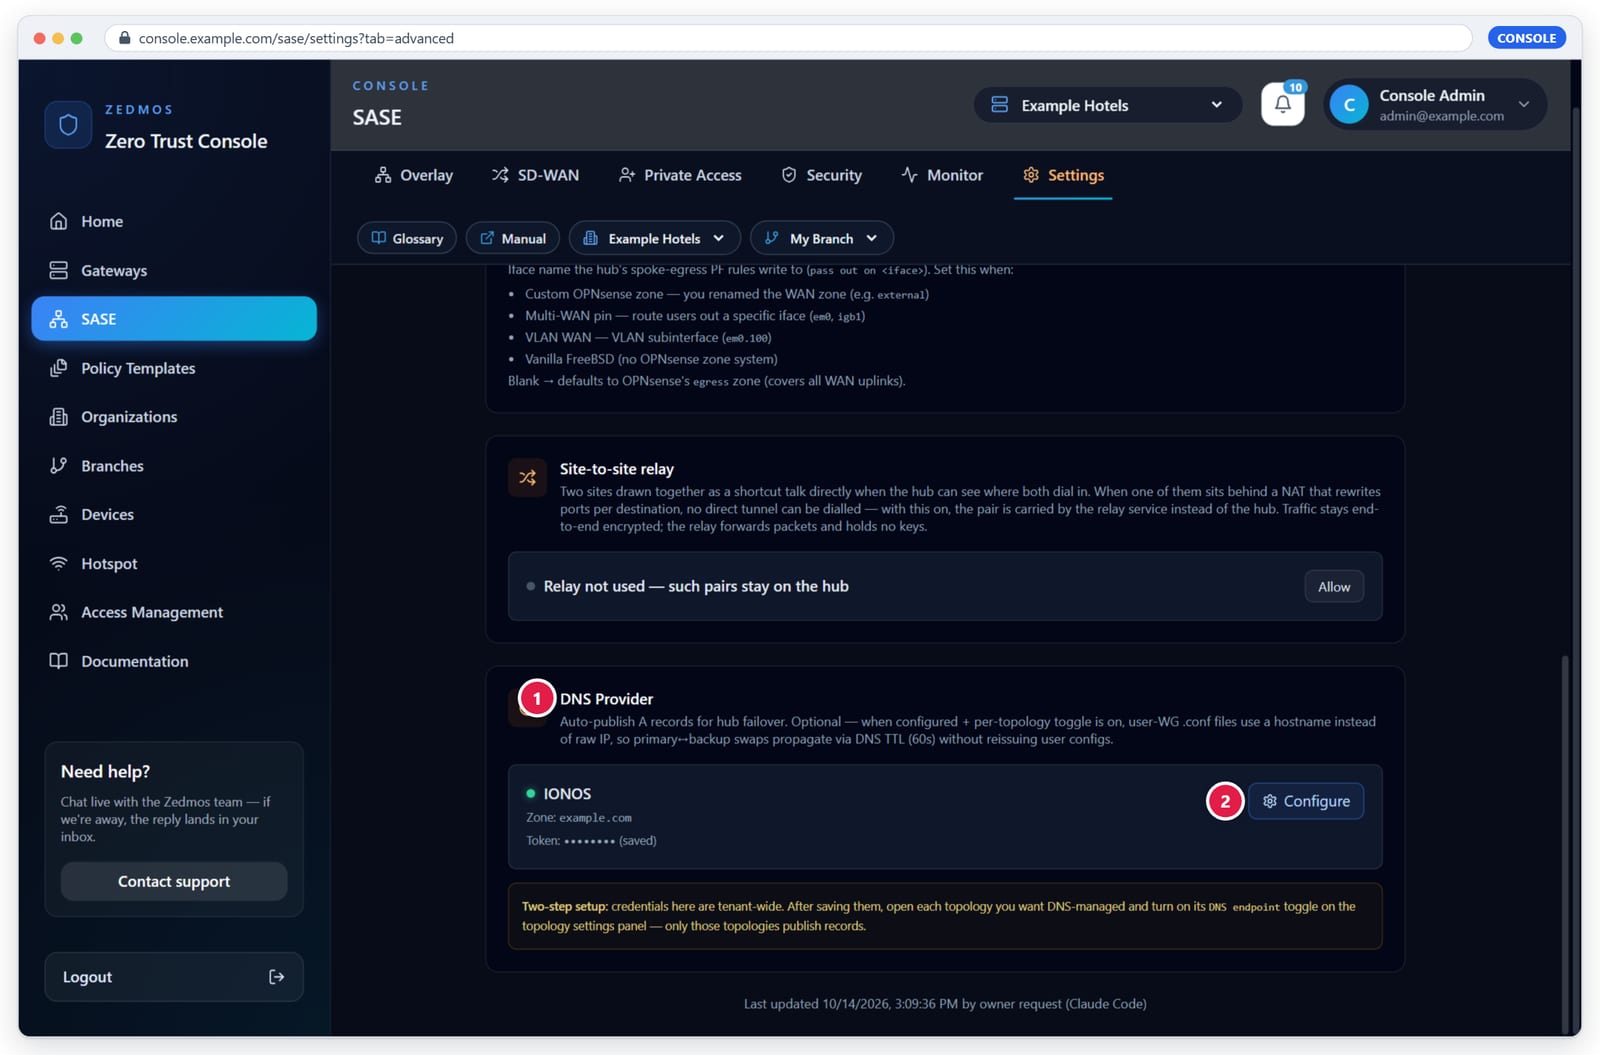
Figure 5.4 — The DNS Provider card. Once saved it shows the provider, the zone and "Token: •••••••• (saved)".
Enter the provider, zone and token. Click IONOS or Cloudflare (1), type the zone, for example
example.com(2), paste the token (3) and click Save (4).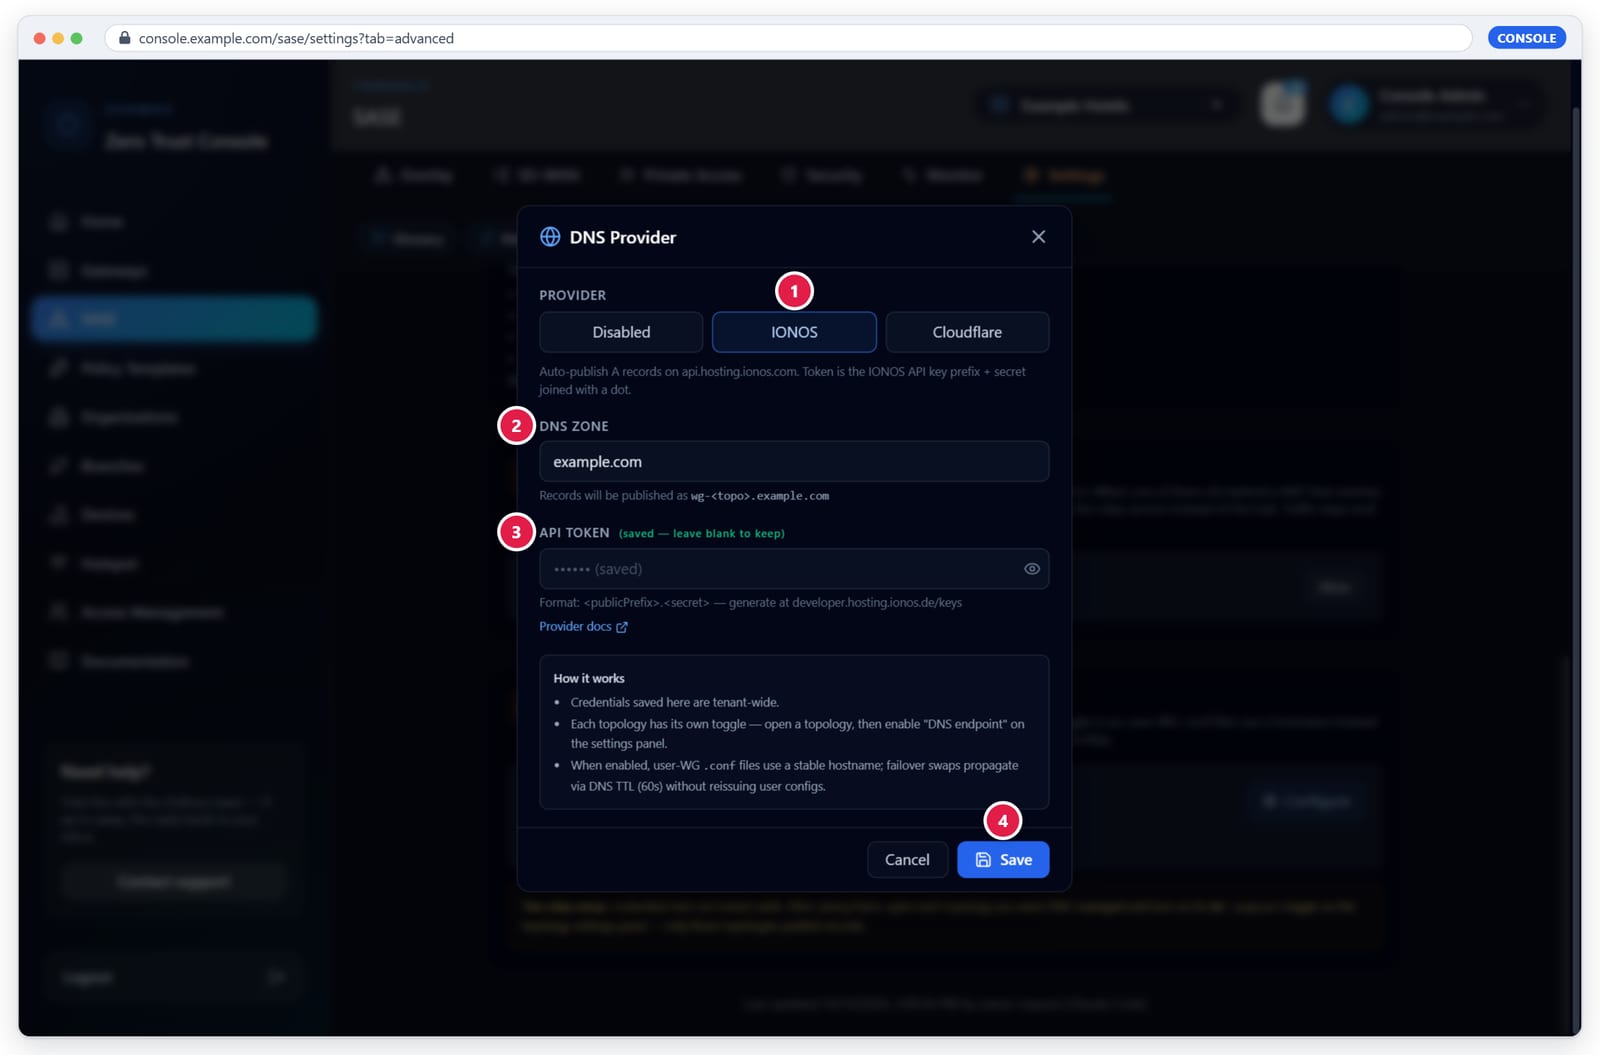
Figure 5.5 — DNS Provider. A saved token is never shown again; leave the field empty to keep it.
The link DNS provider and API key under the mode in Hotspot › Portal names opens these settings for the right organization. A user who holds only the Hotspot role cannot open SASE settings; the page tells them that an administrator of the organization sets the provider.
Choose the mode for Hotspot. Click Hotspot, pick the organization, open the Portal names tab, select DNS provider API (recommended) (1) and click Save (5).
Check the result. Under the mode you see the provider (2), the zone, "API key saved" and a green pill covers console.example.com. A red pill "does not contain …" means the zone does not hold the console domain: fix the zone in step 4.
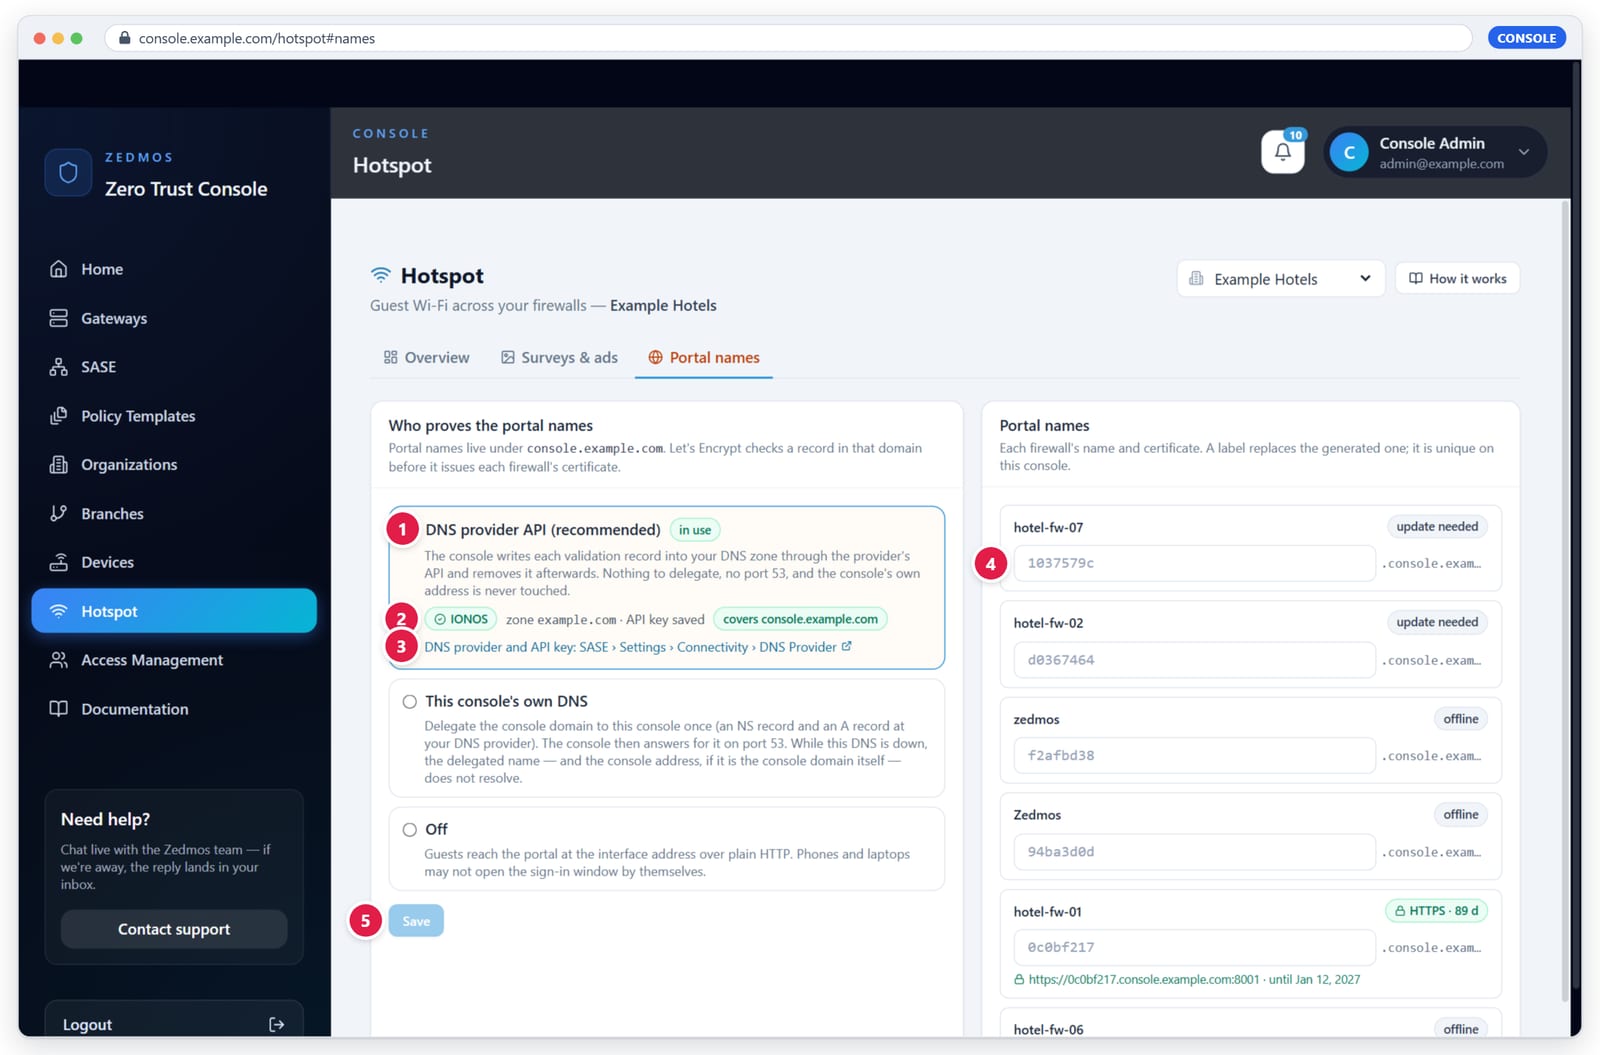
Figure 5.6 — Hotspot › Portal names. (1) The chosen mode, "in use". (2) The provider and the zone check. (3) The link to the DNS provider settings. (4) A firewall's label. (5) Save.
The firewalls pick the change up within the hour. To start at once, open Overview, click Details on the firewall and press Try now.
Note. The provider settings are shared with SASE: the same token also publishes hub records for SASE topologies that have their DNS endpoint switched on. For Hotspot you do not need that switch.
5.2 Procedure: this console's own DNS
With this choice the console answers DNS for its own domain on port 53. You delegate the console domain to the console once. The console then answers:
| Name | Answer |
|---|---|
console.example.com |
A / AAAA / NS / SOA: the console itself, so the console stays reachable |
ns.console.example.com |
A: the console's public address |
_acme-challenge.<label>.console.example.com |
TXT, only for the few minutes a certificate is being checked |
<label>.console.example.com |
does not exist publicly; guests resolve it on the firewall |
| anything else | refused; no recursion, no other zone |
Warning. Once the NS record is in place, the console's own name resolves only while the console's DNS runs. If the console's DNS is down, the console and every firewall's link to it stop resolving too. Add the records only after port 53 answers, and prefer the DNS provider API when you can.
Install or update the console with portal DNS. The installer's default is
--portal-dns builtin. Give the public IPv4 if the console is behind NAT:./install.sh --domain console.example.com --portal-dns builtin --public-ip 203.0.113.10The installer refuses to continue when another program already uses port 53 on the public address.
systemd-resolvedon loopback is fine.Open port 53. Allow 53/udp and 53/tcp from the internet on the console's host firewall and on any cloud security group, for example:
ufw allow 53/udp
ufw allow 53/tcp
Choose the mode. In Hotspot › Portal names, select This console's own DNS and click Save. The line Console DNS: running appears with the two records to add.
Test from outside before you delegate.
nslookup console.example.com 203.0.113.10The answer must be the console's address. If it times out, port 53 is blocked on the way in. Do not continue.
Add the two records at your DNS provider (the copy icon copies the value):
NS  console.example.com      ns.console.example.com
A   ns.console.example.com   203.0.113.10
Some providers call the A record of the name server glue. Keep the existing A record of
console.example.com.Press Check delegation. The console asks the public DNS for both records. Each line turns green when it is visible. Providers take minutes to an hour to publish. "Last verified" shows the date of the last success.
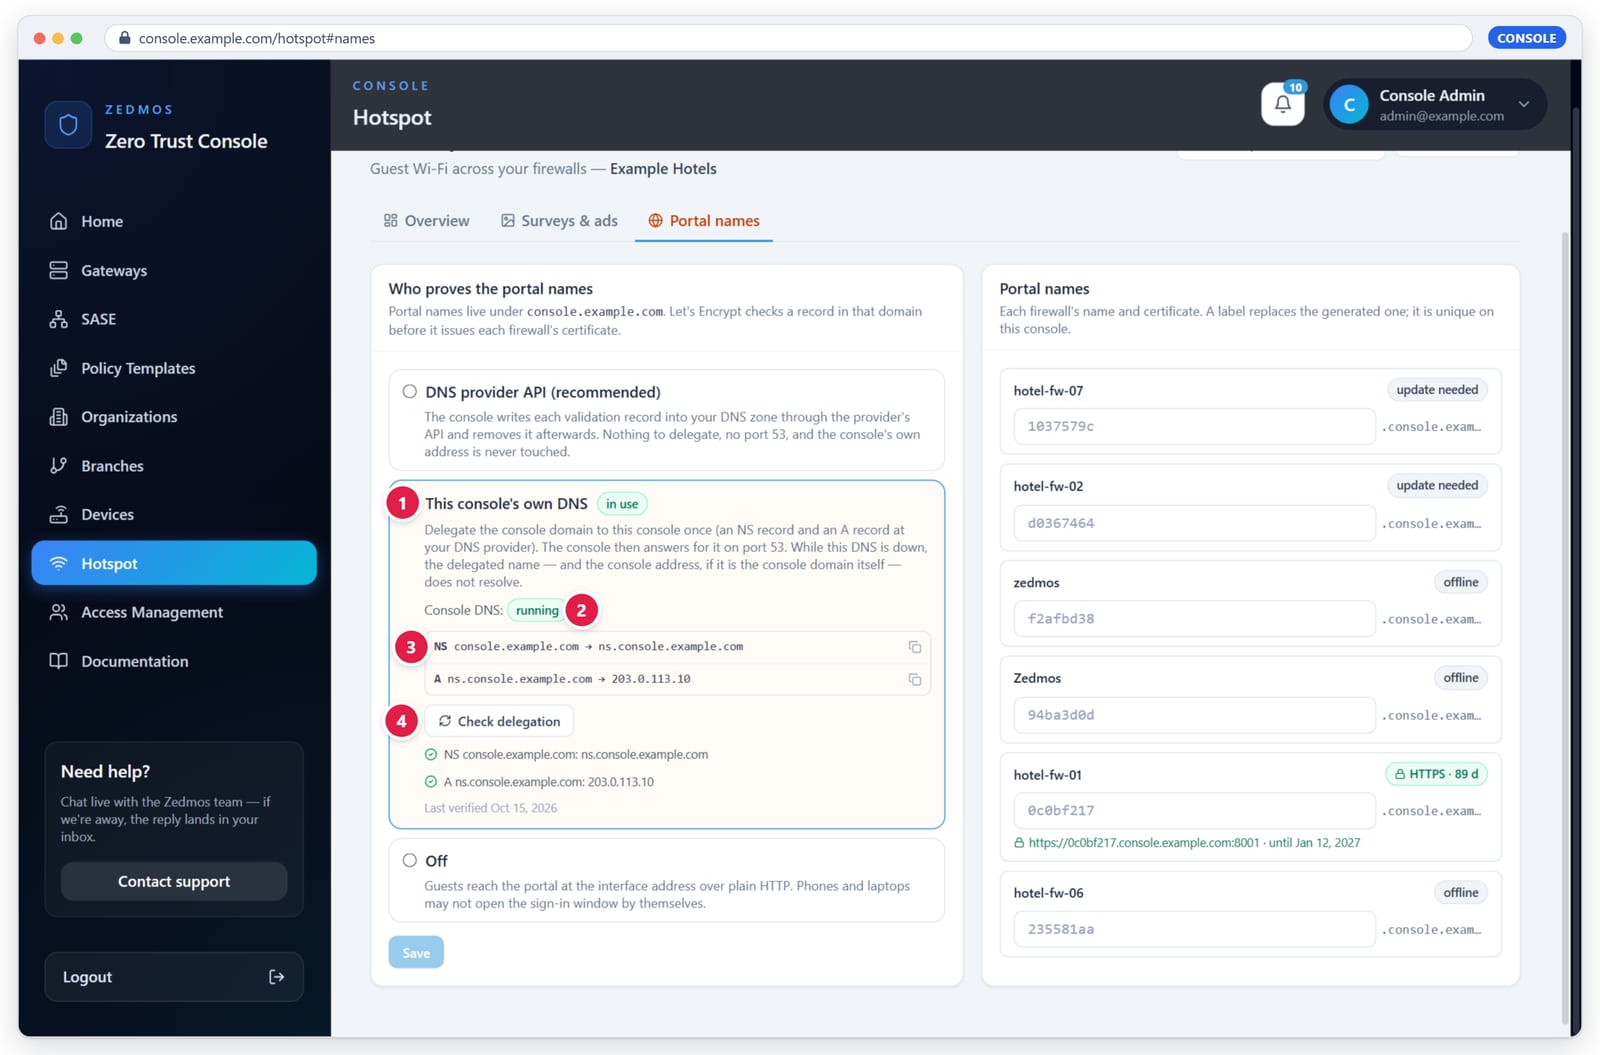
Figure 5.7 — (1) The mode in use. (2) The console's DNS is running. (3) The two records to add at your DNS provider. (4) Check delegation and its results.
5.3 Off
Select Off and click Save. Firewalls serve the sign-in page at the
zone's interface address over plain HTTP on port 8000, for example
http://10.2.2.1:8000. Guests can still sign in, but many devices do not open
the sign-in window by themselves.
5.4 Firewall labels
The Portal names card on the right lists every firewall of the organization with its name, its certificate state and a label field.
- Leave the field empty to keep the generated label (shown greyed).
- Type a label to replace it: 1 to 32 characters, lower-case letters, digits and hyphens, not starting or ending with a hyphen. The field drops anything else as you type.
- A label is unique on the whole console, across organizations, and may not be another firewall's generated label. "That label is already used by another organization on this console" means you must pick another.
- Click Save. The firewall requests a certificate for the new name.
When the certificate is ready, the card shows
https://<name>:8001 · until <date> with a padlock.
5.5 On the firewall: Portal address
Each zone has a Portal address setting on its General tab (chapter 06):
| Option | Effect |
|---|---|
| Automatic: console name over HTTPS (default) | The page is served at https://<name>:8001 with the certificate. Until the name is ready, guests use the interface address. |
| Interface address (HTTP) | Always http://<interface address>:8000. No name, no certificate. |
With Automatic, a status line under the setting tells you where the certificate stands:
| Status | Meaning | What to do |
|---|---|---|
| Guests sign in at https://… Certificate valid until … | Ready. | Nothing. |
| Requesting the certificate… | Let's Encrypt is checking the name. | Wait a minute. |
| This firewall is not connected to a console, so it has no portal name. | Not enrolled. | Connect it under Console and SASE › Console, then Try now. |
| The console does not give this firewall's organization portal names yet. | The organization's mode is Off. | Choose a mode in the console under Hotspot › Portal names (5.1 or 5.2), then Try now. |
| The last attempt failed: … Next attempt: … | The check failed. | Read the error, fix DNS, then Try now. |
| The name is requested once an enabled zone uses the automatic address. | No zone uses Automatic. | Set a zone to Automatic. |
The firewall checks its name with the console every hour, so a changed label or mode arrives within the hour. It renews the certificate by itself in the last third of its lifetime.
06
Set up a zone on the firewall
A zone is one guest network with its own sign-in methods, page design and time limits. Zones are set up on each firewall, in the firewall's own web interface, under Hotspot › Administration.
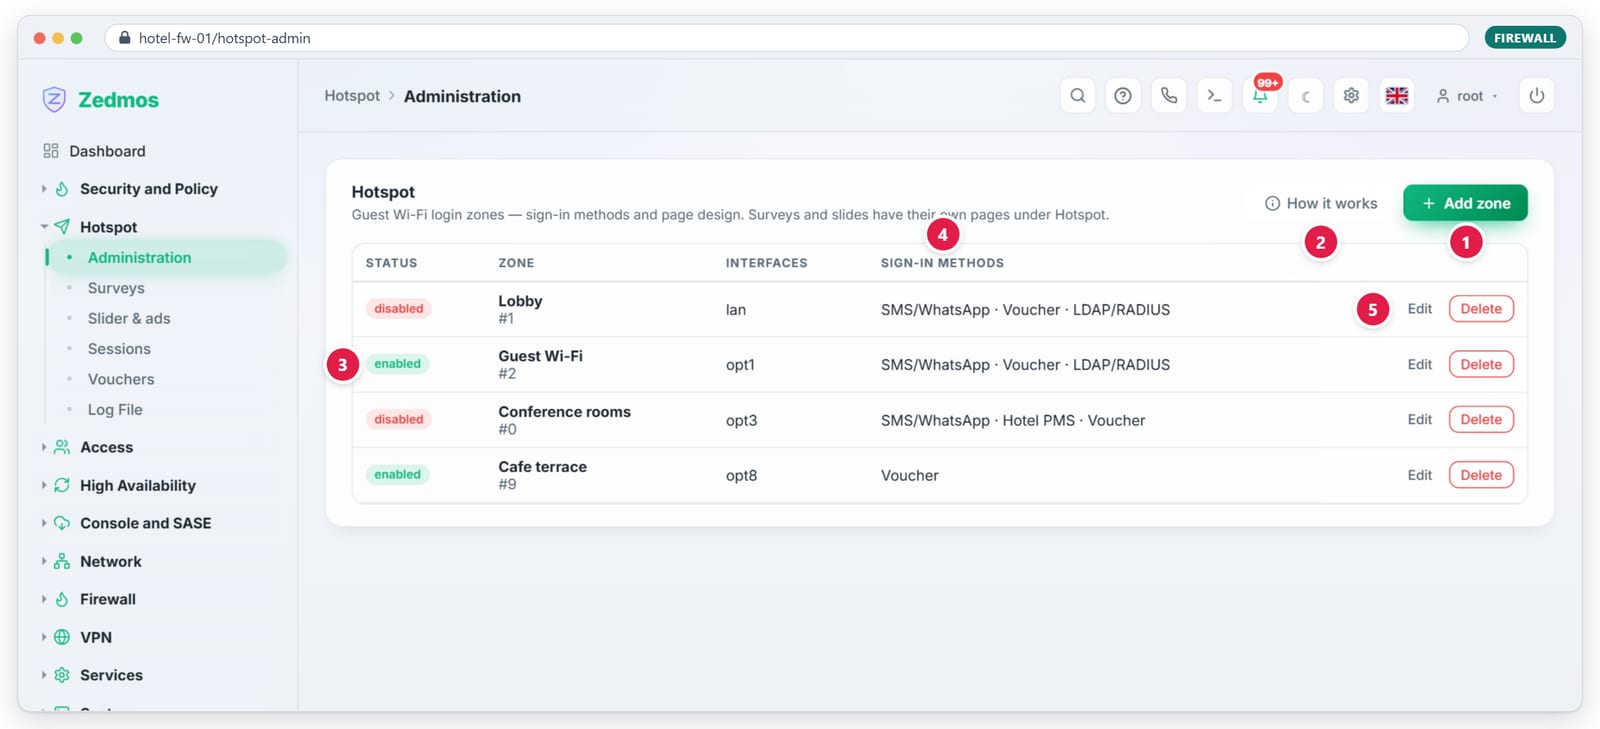
Figure 6.1 — Hotspot › Administration. (1) Add zone. (2) How it works, a built-in guide. (3) Click the status to switch a zone on or off. (4) The sign-in methods of each zone. (5) Edit or delete.
Procedure: create a zone
- Open the zone list. On the firewall, click Hotspot › Administration.
- Add a zone. Click Add zone. The editor opens with five tabs: General, Login methods, Login page, Survey & slider and Preview.
- Fill in General. Give the zone a description, pick the guest interface and set the time limits (6.1).
- Switch on the sign-in methods on Login methods (6.2 and chapter 07).
- Design the page on Login page (6.3).
- Check the Preview (6.5).
- Save. Click Save zone. The firewall applies the zone at once: devices on the interface that have not signed in are held at the page.
Tip. Test with one phone before you tell guests. Join the Wi-Fi; the sign-in window should open within a few seconds.
6.1 General
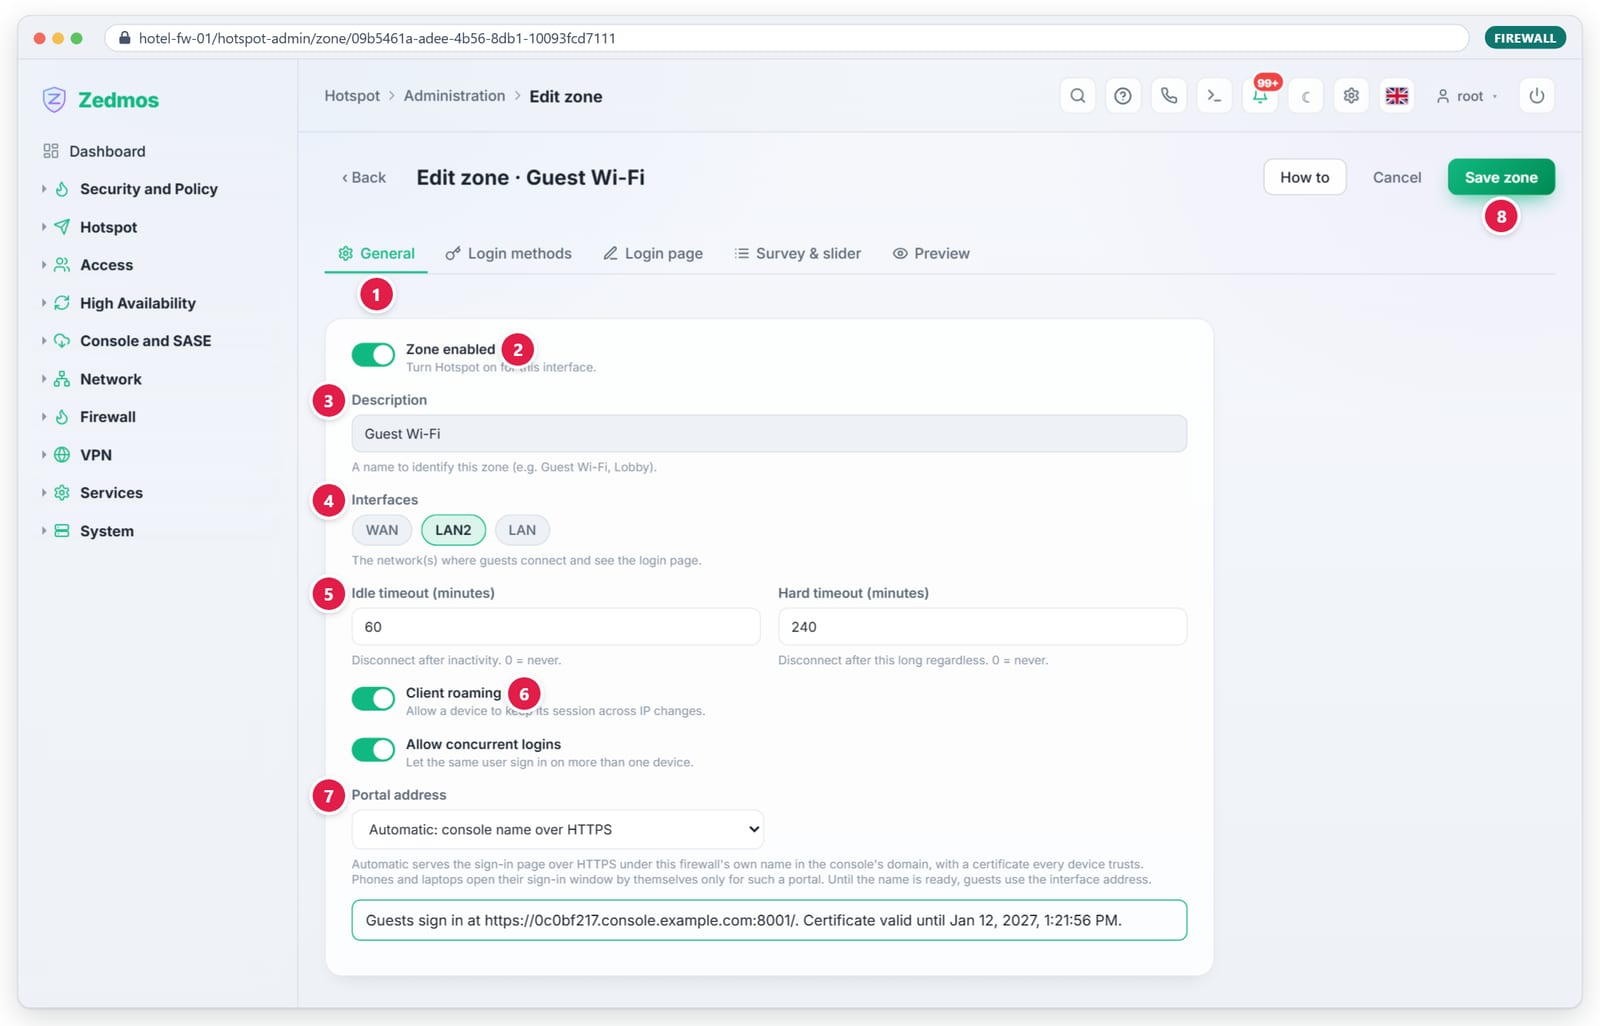
Figure 6.2 — General. The status line at the bottom shows the portal name and the certificate's end date.
| # | Control | Type | Default | What it does |
|---|---|---|---|---|
| 1 | General | tab | The zone's basic settings. | |
| 2 | Zone enabled | toggle | on | Turns the hotspot on for this zone's interfaces. Off, guests on the interface are not held. |
| 3 | Description | text | A name for the zone, for example "Guest Wi-Fi" or "Lobby". Required. | |
| 4 | Interfaces | chips | none | The network(s) where guests connect. An interface can be in one enabled zone only. |
| 5 | Idle timeout (minutes) | number | 0 | Signs a guest out after this long without traffic. 0 = never. Up to 10080 (a week). |
| Hard timeout (minutes) | number | 0 | Signs a guest out this long after sign-in, whatever they do. 0 = never. Up to 10080. | |
| 6 | Client roaming | toggle | on | A signed-in device's IPv6 addresses join its session, at sign-in and as new ones appear, so it can use IPv6 too. |
| Allow concurrent logins | toggle | on | Lets the same account sign in on more than one device. Needed for "Devices per code". | |
| 7 | Portal address | select | Automatic | Automatic: console name over HTTPS, or Interface address (HTTP). See 5.5. |
| Allowed addresses | list | none | Devices or networks that reach the internet without signing in, one per line: an address (10.2.2.50) or a network (10.2.2.0/28). For printers, payment terminals and the like. Their traffic is not attributed to any guest. |
|
| Allowed MAC addresses | list | none | Devices that skip sign-in by their hardware address, one per line (00:11:22:33:44:55). Its owner can change a MAC address; prefer allowed addresses where you can. |
|
| 8 | Save zone | button | Saves and applies the zone. |
Example. A hotel lobby: Description Guest Wi-Fi, Interfaces LAN2
(opt1), Idle timeout 60, Hard timeout 240, roaming and concurrent logins
on, Portal address Automatic. A guest gets four hours and is signed out after
an hour without use. The reception printer at 10.2.2.50 goes under
Allowed addresses, so it works without anyone signing it in.
Note. The two Allowed lists appear under Portal address in firewall releases after 26.10.125; the picture above was taken before.
6.2 Login methods
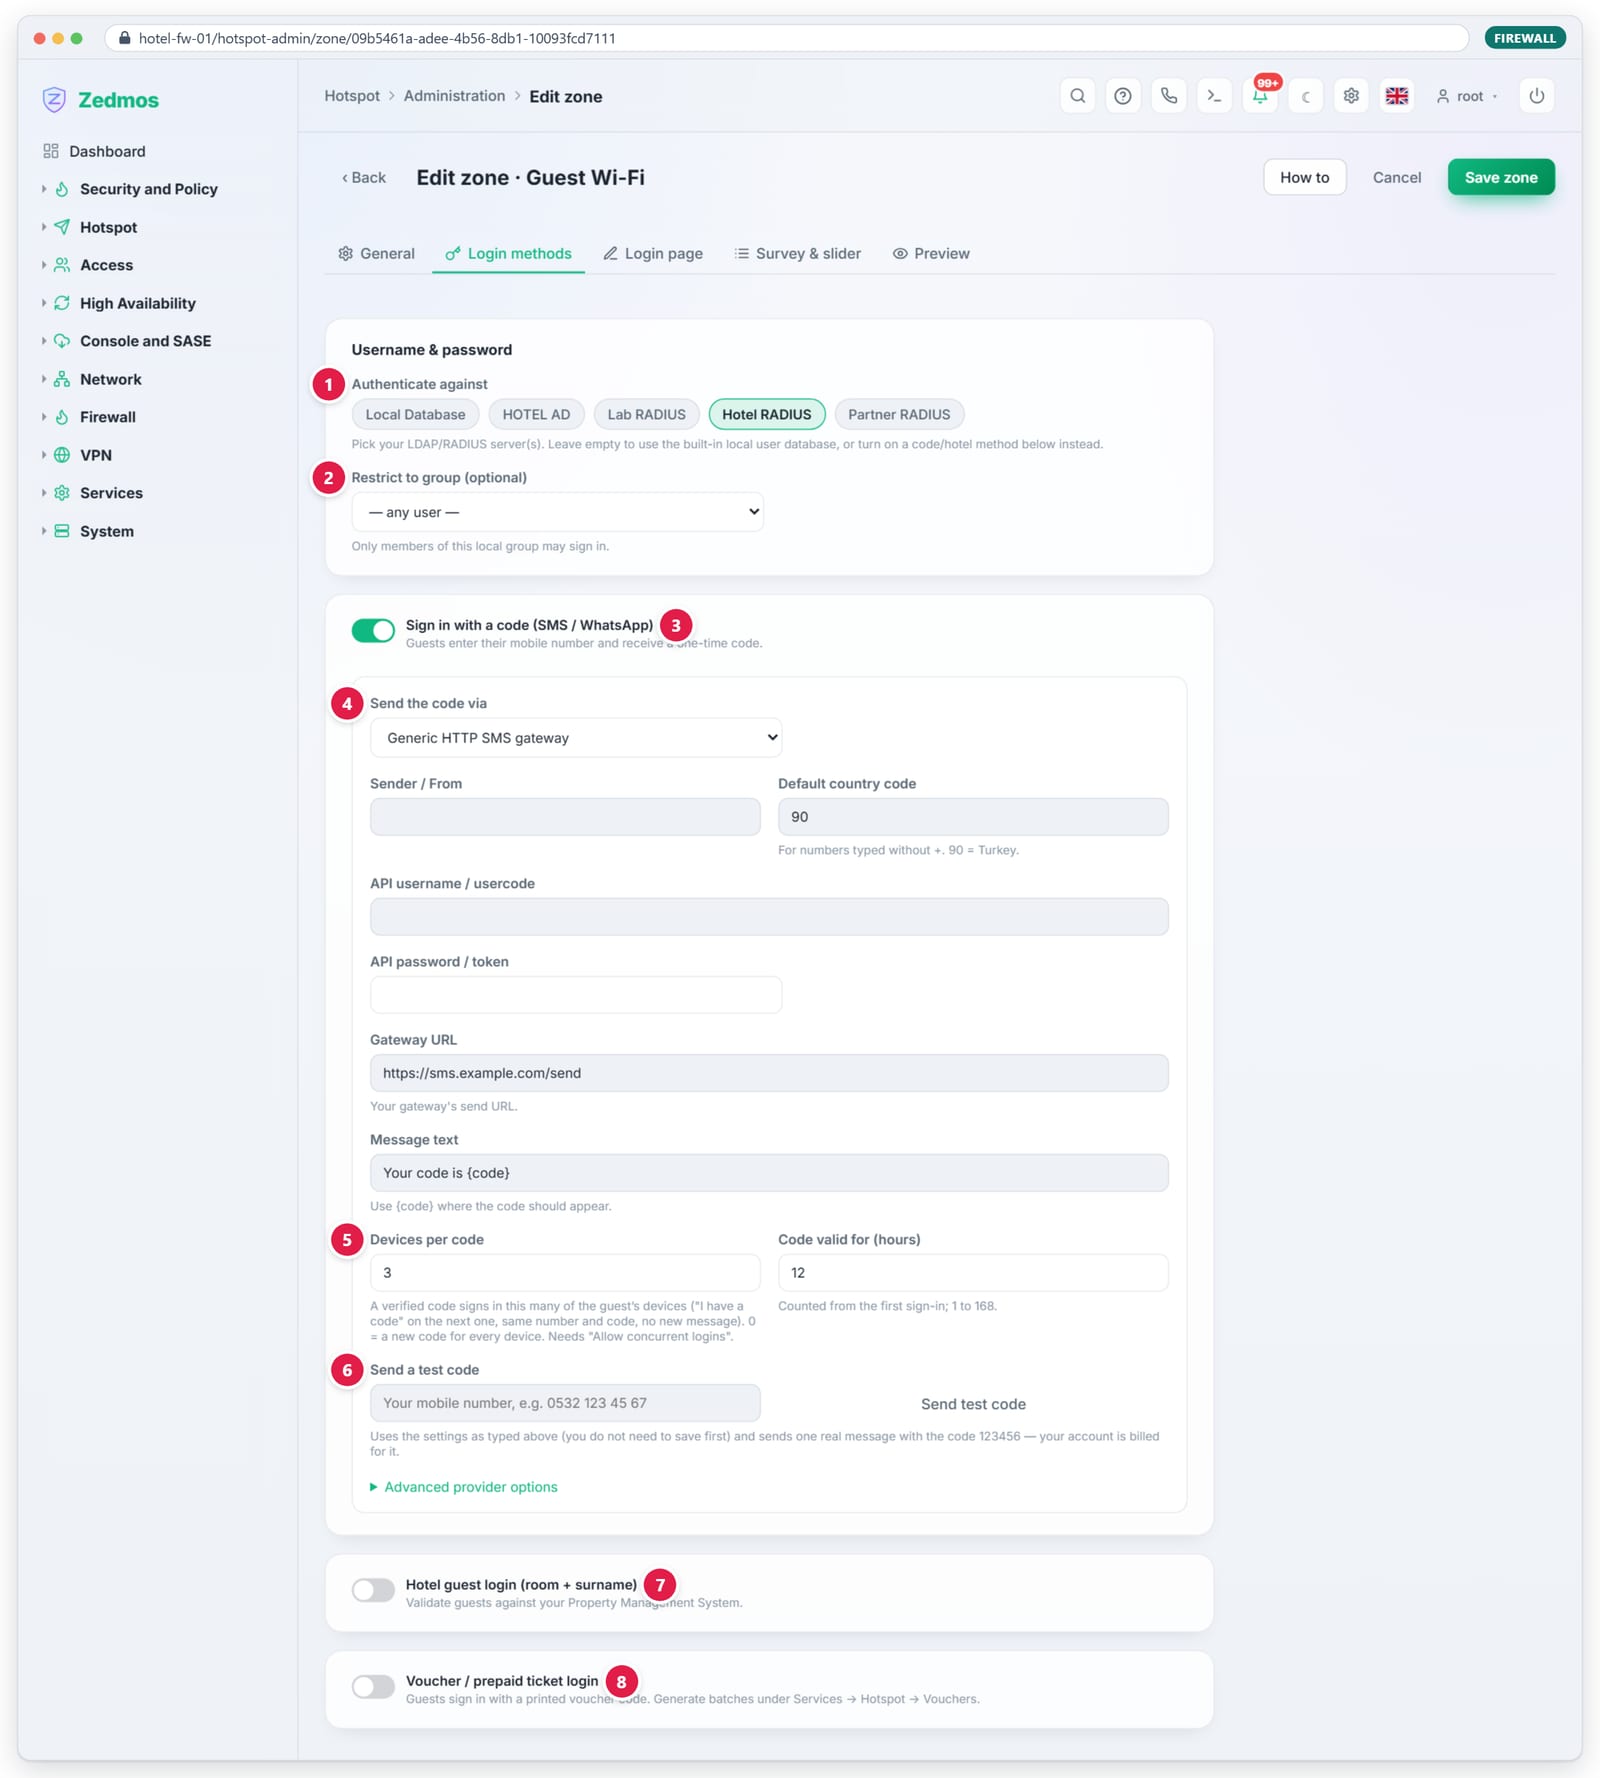
Figure 6.3 — Login methods. (1–2) Account sign-in. (3–6) Sign in with a code by SMS or WhatsApp. (7) Hotel room. (8) Vouchers.
The tab has four cards, one per method. Chapter 07 explains each method and its fields. In short:
| # | Card | Turns on |
|---|---|---|
| 1–2 | Username & password | "Account": local users, LDAP or RADIUS. Used when you pick a server, or when no other method is on. |
| 3–6 | Sign in with a code (SMS / WhatsApp) | "SMS / WhatsApp" and "I have a code". |
| 7 | Hotel guest login (room + surname) | "Hotel guest". |
| 8 | Voucher / prepaid ticket login | "Voucher". |
6.3 Login page
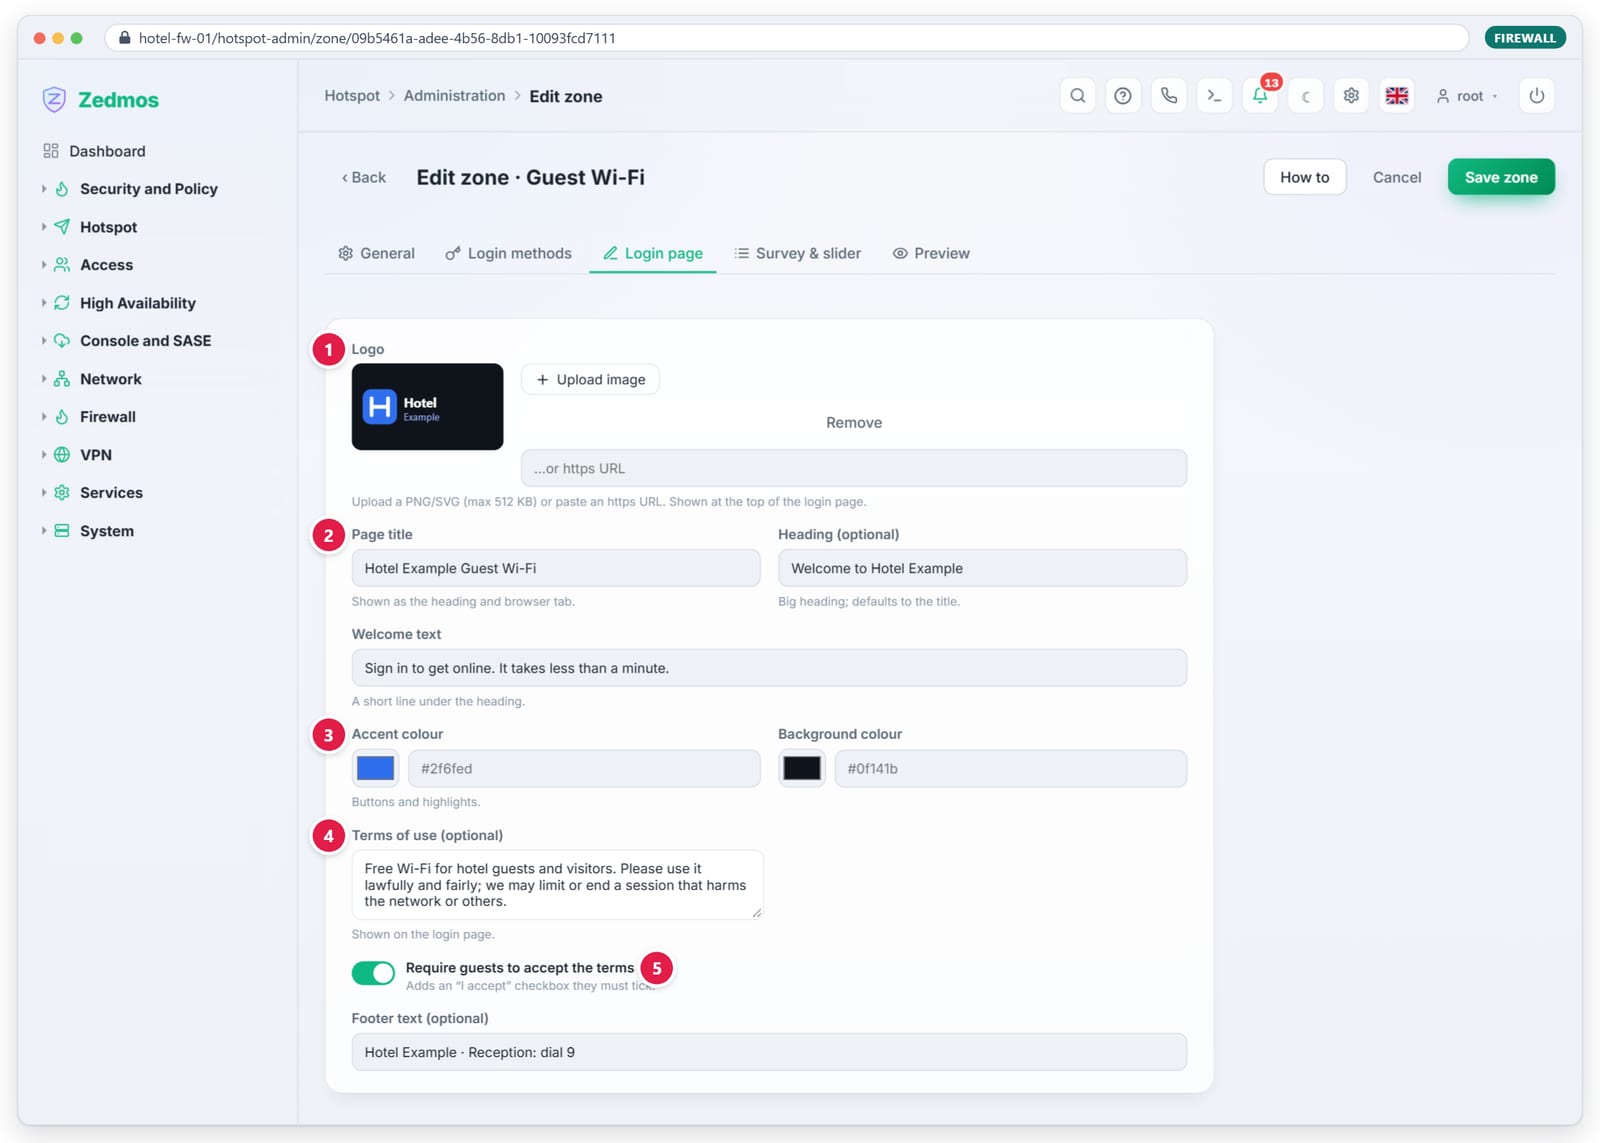
| # | Control | Type | Default | What it does |
|---|---|---|---|---|
| 1 | Logo | upload / URL | none | A PNG or SVG up to 512 KB, shown at the top. Uploaded pictures load before sign-in; an https URL must be reachable before sign-in. |
| 2 | Page title | text | Wi-Fi Access | The heading and the browser tab's title. |
| Heading (optional) | text | the title | A larger heading, if it should differ from the title. | |
| Welcome text | text | One line under the heading, for example "Sign in to get online." | ||
| 3 | Accent colour | colour | #2f6fed | Buttons and highlights. |
| Background colour | colour | #0f141b | The page background. | |
| 4 | Terms of use (optional) | text area | Shown on the page, above the button. | |
| 5 | Require guests to accept the terms | toggle | off | Adds "I have read and accept the terms of use." that must be ticked. |
| Footer text (optional) | text | A line at the bottom, for example "Reception: dial 9". |
The page is translated for the guest. Its fixed texts follow the language the guest picked at the bottom of the page, else the device's own language, among English, Turkish, German, Arabic, Persian and Urdu. Your own texts (title, welcome, terms) are shown as you wrote them.
6.4 Survey & slider
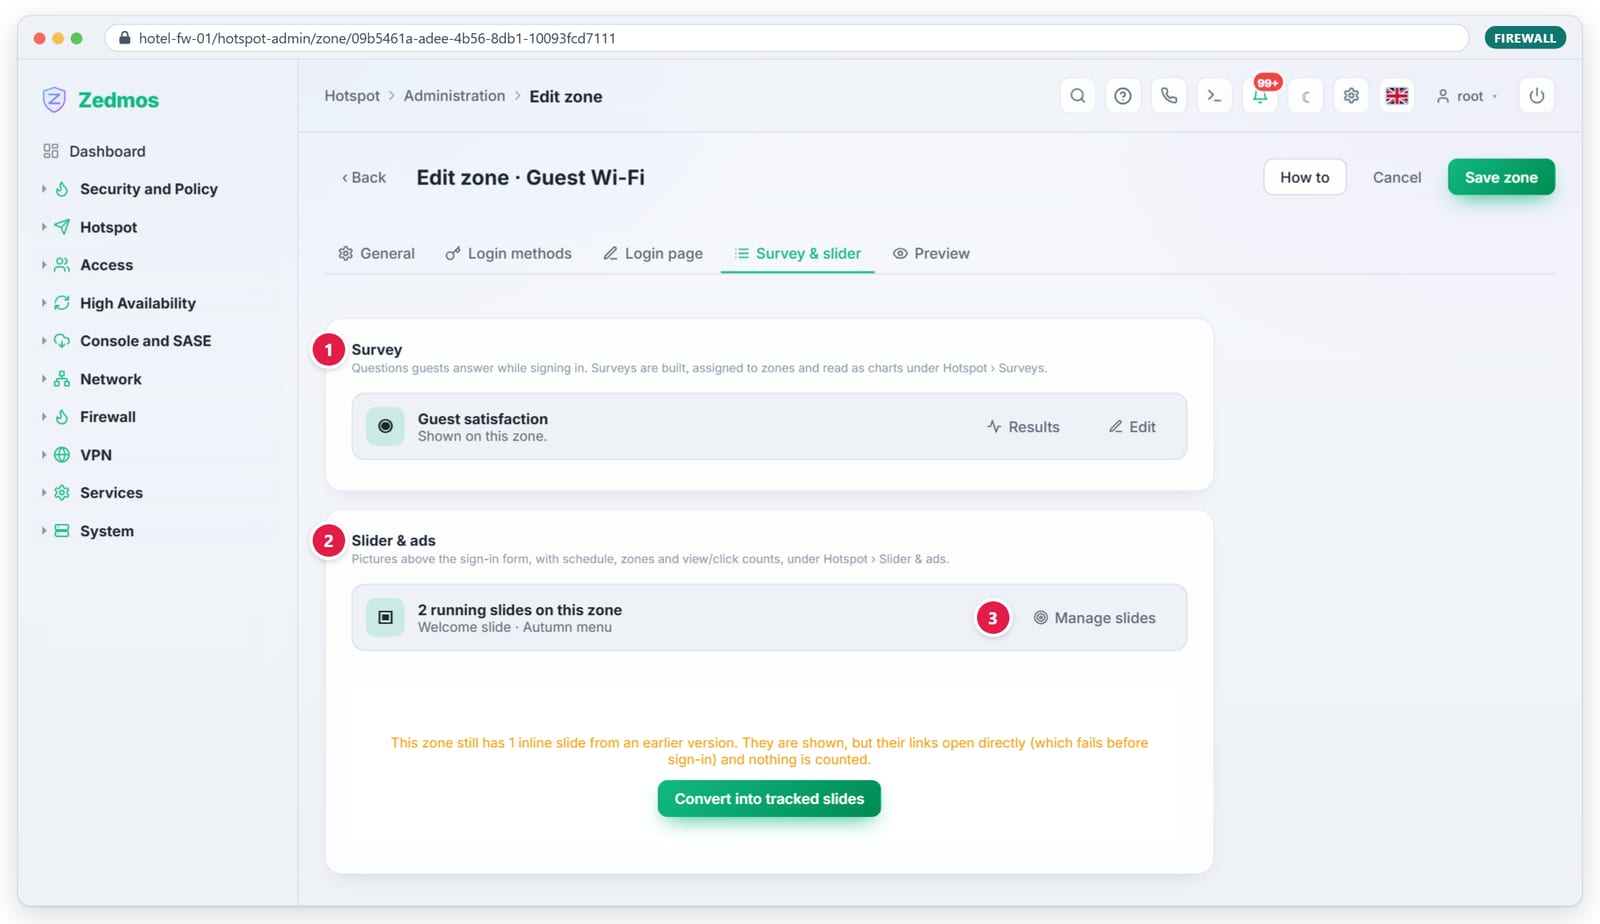
Figure 6.5 — Which survey and which slides this zone shows. Surveys and slides are made on their own pages (chapter 09) or in the console (chapter 10).
A zone shows one survey and any number of slides. This tab shows what is assigned (1, 2), with links to Results, Edit and Manage slides (3).
A zone set up with an earlier release may still carry inline slides or an inline survey. They are shown to guests, but their links open directly (which fails before sign-in) and nothing is counted. Press Convert into tracked slides or Convert into a survey once to turn them into normal slides and surveys with statistics.
6.5 Preview
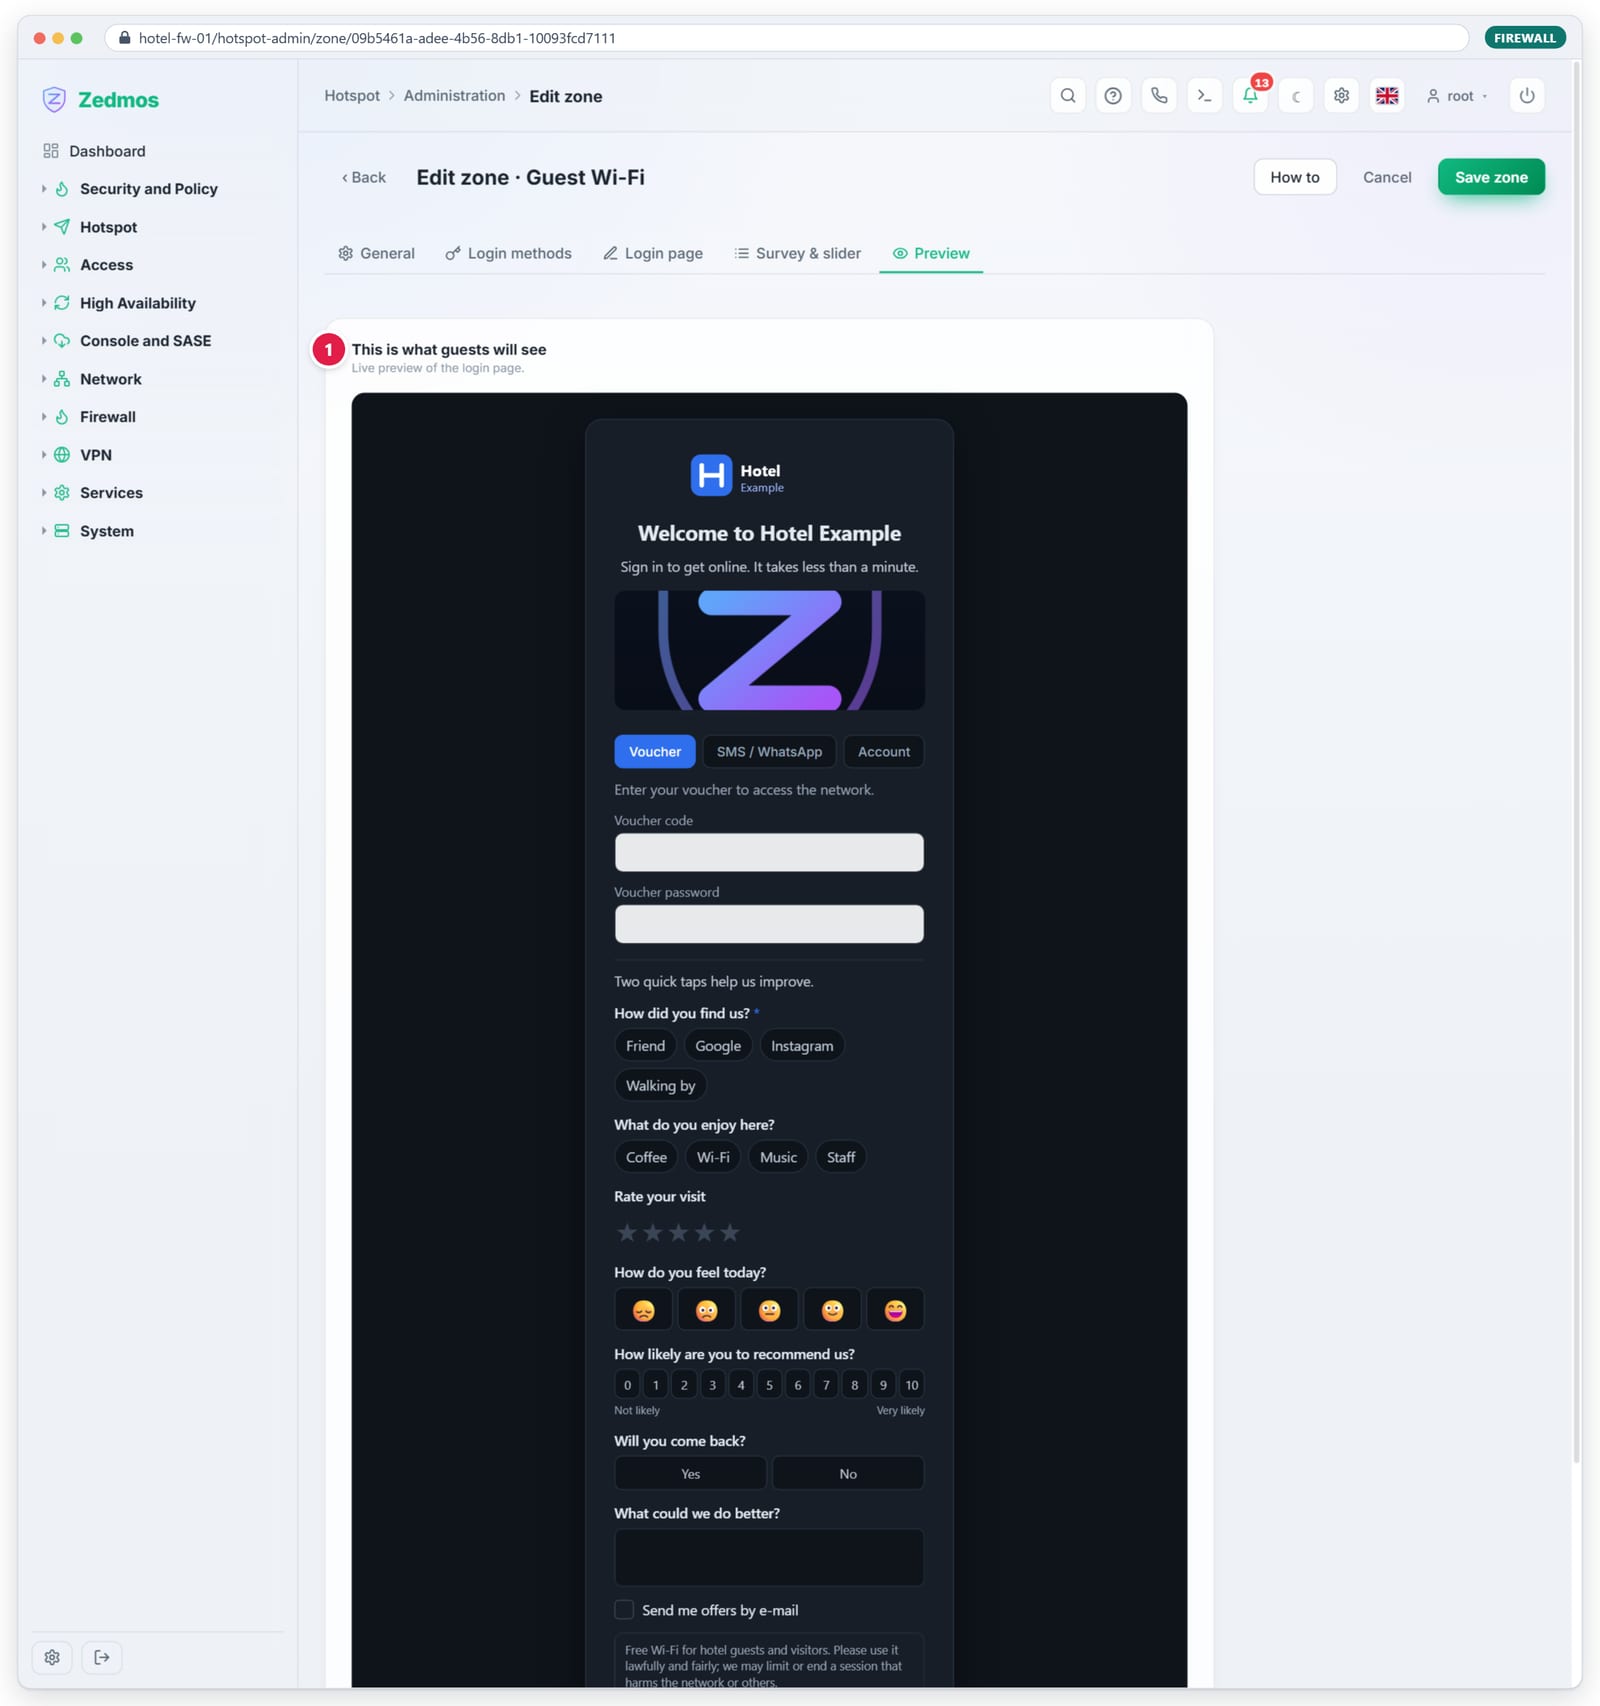
Figure 6.6 — Preview: the page as a guest will see it, with your texts, colours, survey and the method tabs.
07
Sign-in methods
You can switch on several methods in one zone. The guest sees one tab per method, in this order: Voucher, SMS / WhatsApp, I have a code, Hotel guest, Account. A zone with one method shows no tabs.
7.1 Account (username and password)
The guest signs in with a username and password.
| Control | Type | What it does |
|---|---|---|
| Authenticate against | chips | Local Database (users on the firewall) and the LDAP or RADIUS servers added under Access › Servers. Several can be picked; they are tried in turn. Empty = local users. |
| Restrict to group (optional) | select | Only members of this local group may sign in. "— any user —" = no restriction. |
Example. A conference centre gives every attendee an account in the
events group of a RADIUS server. Pick the RADIUS server and set Restrict to
group to the matching local group.
With RADIUS, the firewall sends accounting start and stop records, so the RADIUS server sees how long each guest was online.
7.2 SMS / WhatsApp code
The guest types a mobile number and receives a code by SMS or WhatsApp.
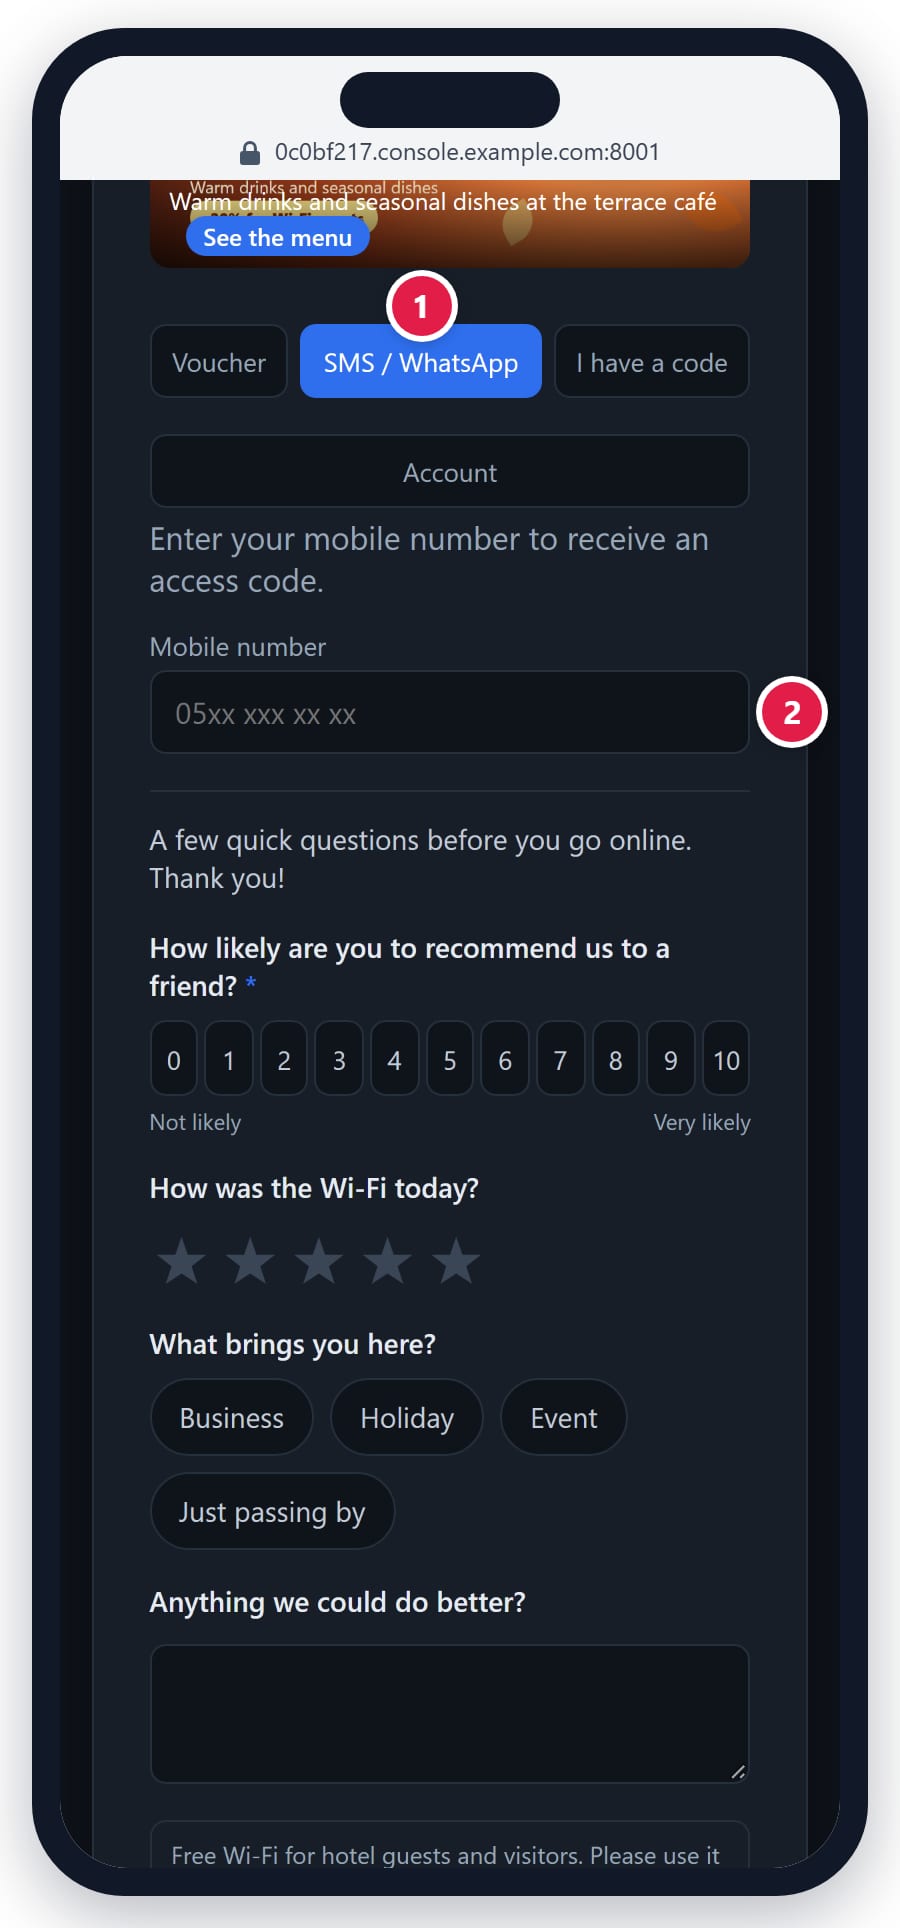
Procedure
- On the Login methods tab, switch on Sign in with a code (SMS / WhatsApp).
- Pick the provider in Send the code via and fill in its fields (table below).
- Write the Message text with
{code}where the code goes, for exampleYour Wi-Fi code is {code}. - Set Devices per code and Code valid for (hours).
- Under Send a test code, type your own mobile number and press Send
test code. You receive the code
123456. This uses the settings as typed, before saving, and your account is billed for the message. - Click Save zone.
| Provider | Fields |
|---|---|
| Generic HTTP SMS gateway | Sender / From, Default country code, API username / usercode, API password / token, Gateway URL. Extra parameters such as method=POST or success_contains=OK. |
| JSON REST API gateway | The same fields, plus a Provider preset. The preset Kareli İletişim (Karel SMS GW) fills the address and request shape; you add the Customer UUID, the sender ID and the API user's e-mail and password. |
| Netgsm | Usercode, Password, Message header (the approved sender title), Default country code, Gateway URL (optional). |
| Twilio (SMS/WhatsApp) | Account SID (starts with AC), Auth token, Channel (SMS or WhatsApp), From (your Twilio number, +E.164), Default country code. |
| WhatsApp Business Cloud API | Phone-number ID, Access token (a permanent System User token), Template name (an approved Authentication template), Template language (for example tr, en_US, de), Default country code. |
Default country code is added to numbers typed without +. For Turkey it
is 90: a guest who types 0532 123 45 67 receives the code at
+90 532 123 45 67.
One code, several devices. With Devices per code set to 3 (the
default) and Code valid for 12 hours, a guest who verified a code can
sign in two more devices with the same number and code on the I have a
code tab, without a new message. Set Devices per code to 0 to send a
new code for every device. This needs Allow concurrent logins.
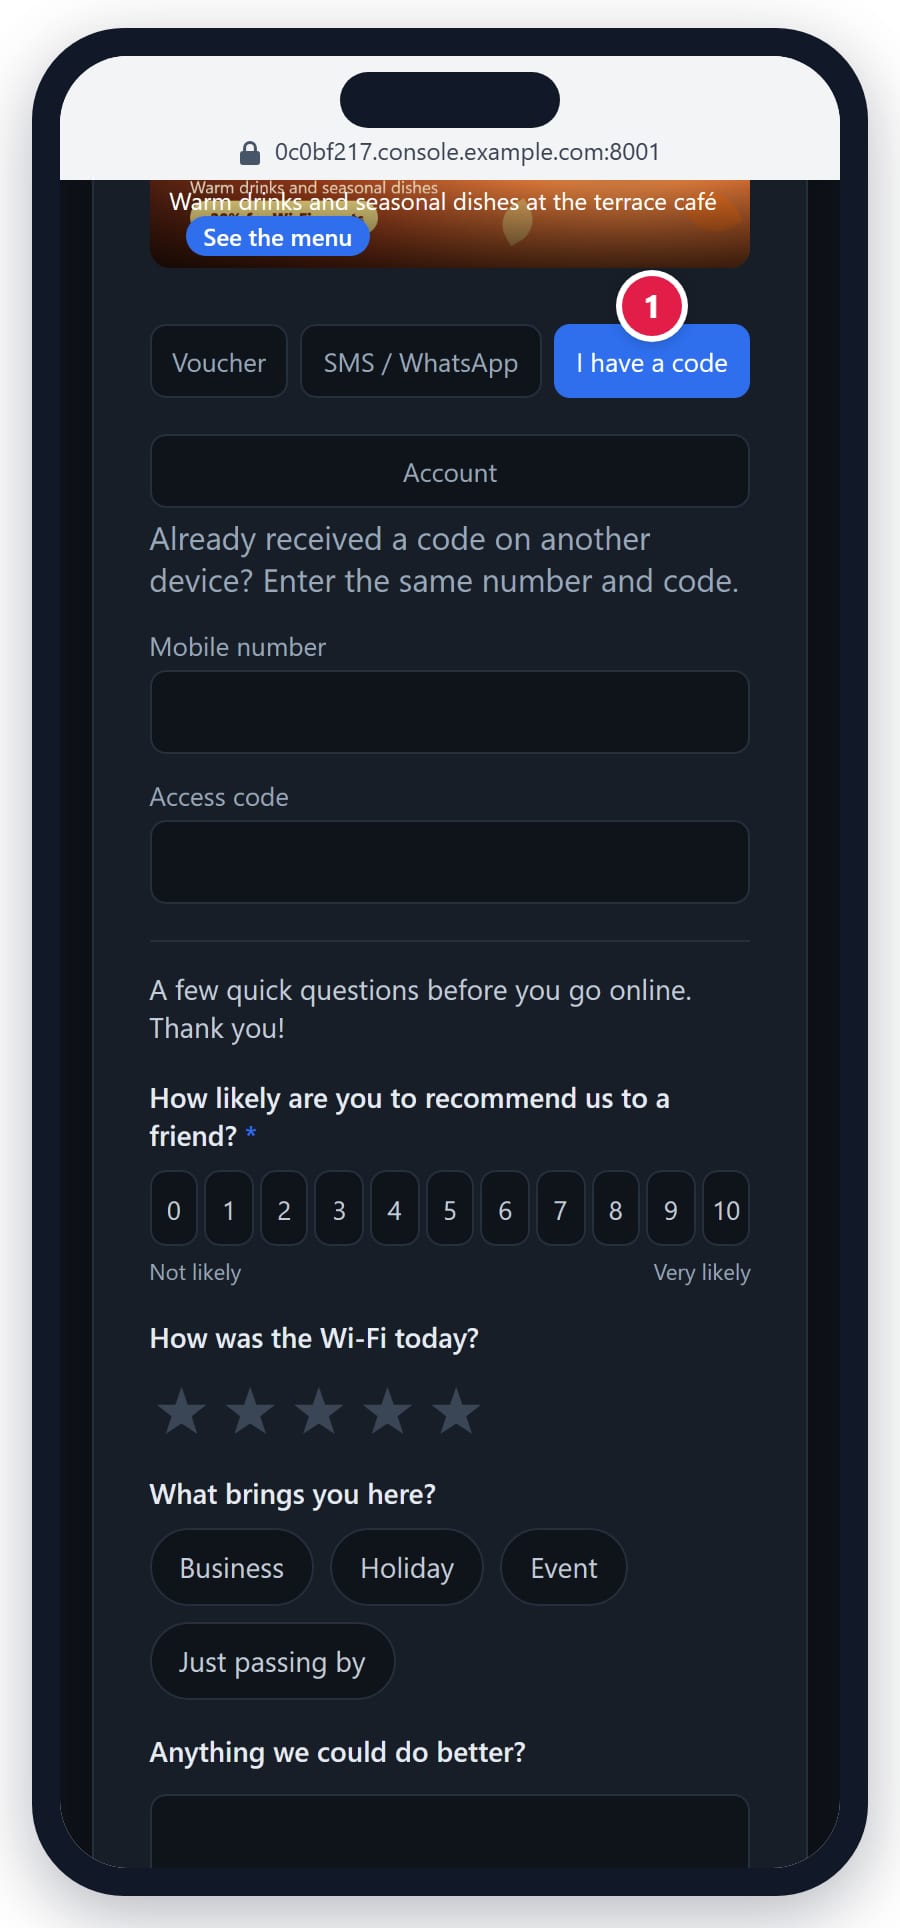
Figure 7.2 — "I have a code": a second device signs in with the same number and code.
Protection against abuse. The firewall limits how often a code can be requested for one number and from one address, and how many wrong codes may be tried. Guests then see, for example, "a code was just sent to this number; please wait before requesting another" or "too many incorrect attempts — request a new code".
7.3 Vouchers
A voucher is a printed username and password with a time allowance. Use them at a reception desk, a café counter or an event.
Procedure: enable vouchers on a zone
- On Login methods, switch on Voucher / prepaid ticket login.
- Optionally set Voucher group, for example
lobby. The zone then accepts only vouchers of that group. Leave it empty to accept any group. - Click Save zone.
Procedure: make vouchers
- Click Hotspot › Vouchers.
- Under Generate vouchers, enter the Group (1), the Count, the Validity (hours) (2) and Expires in (hours, 0=never) (3). Keep Easy-to-read ticked for codes without confusable characters.
- Click Generate (4).
- Copy or click Download CSV (5) at once. The passwords are not stored in clear and cannot be shown again.
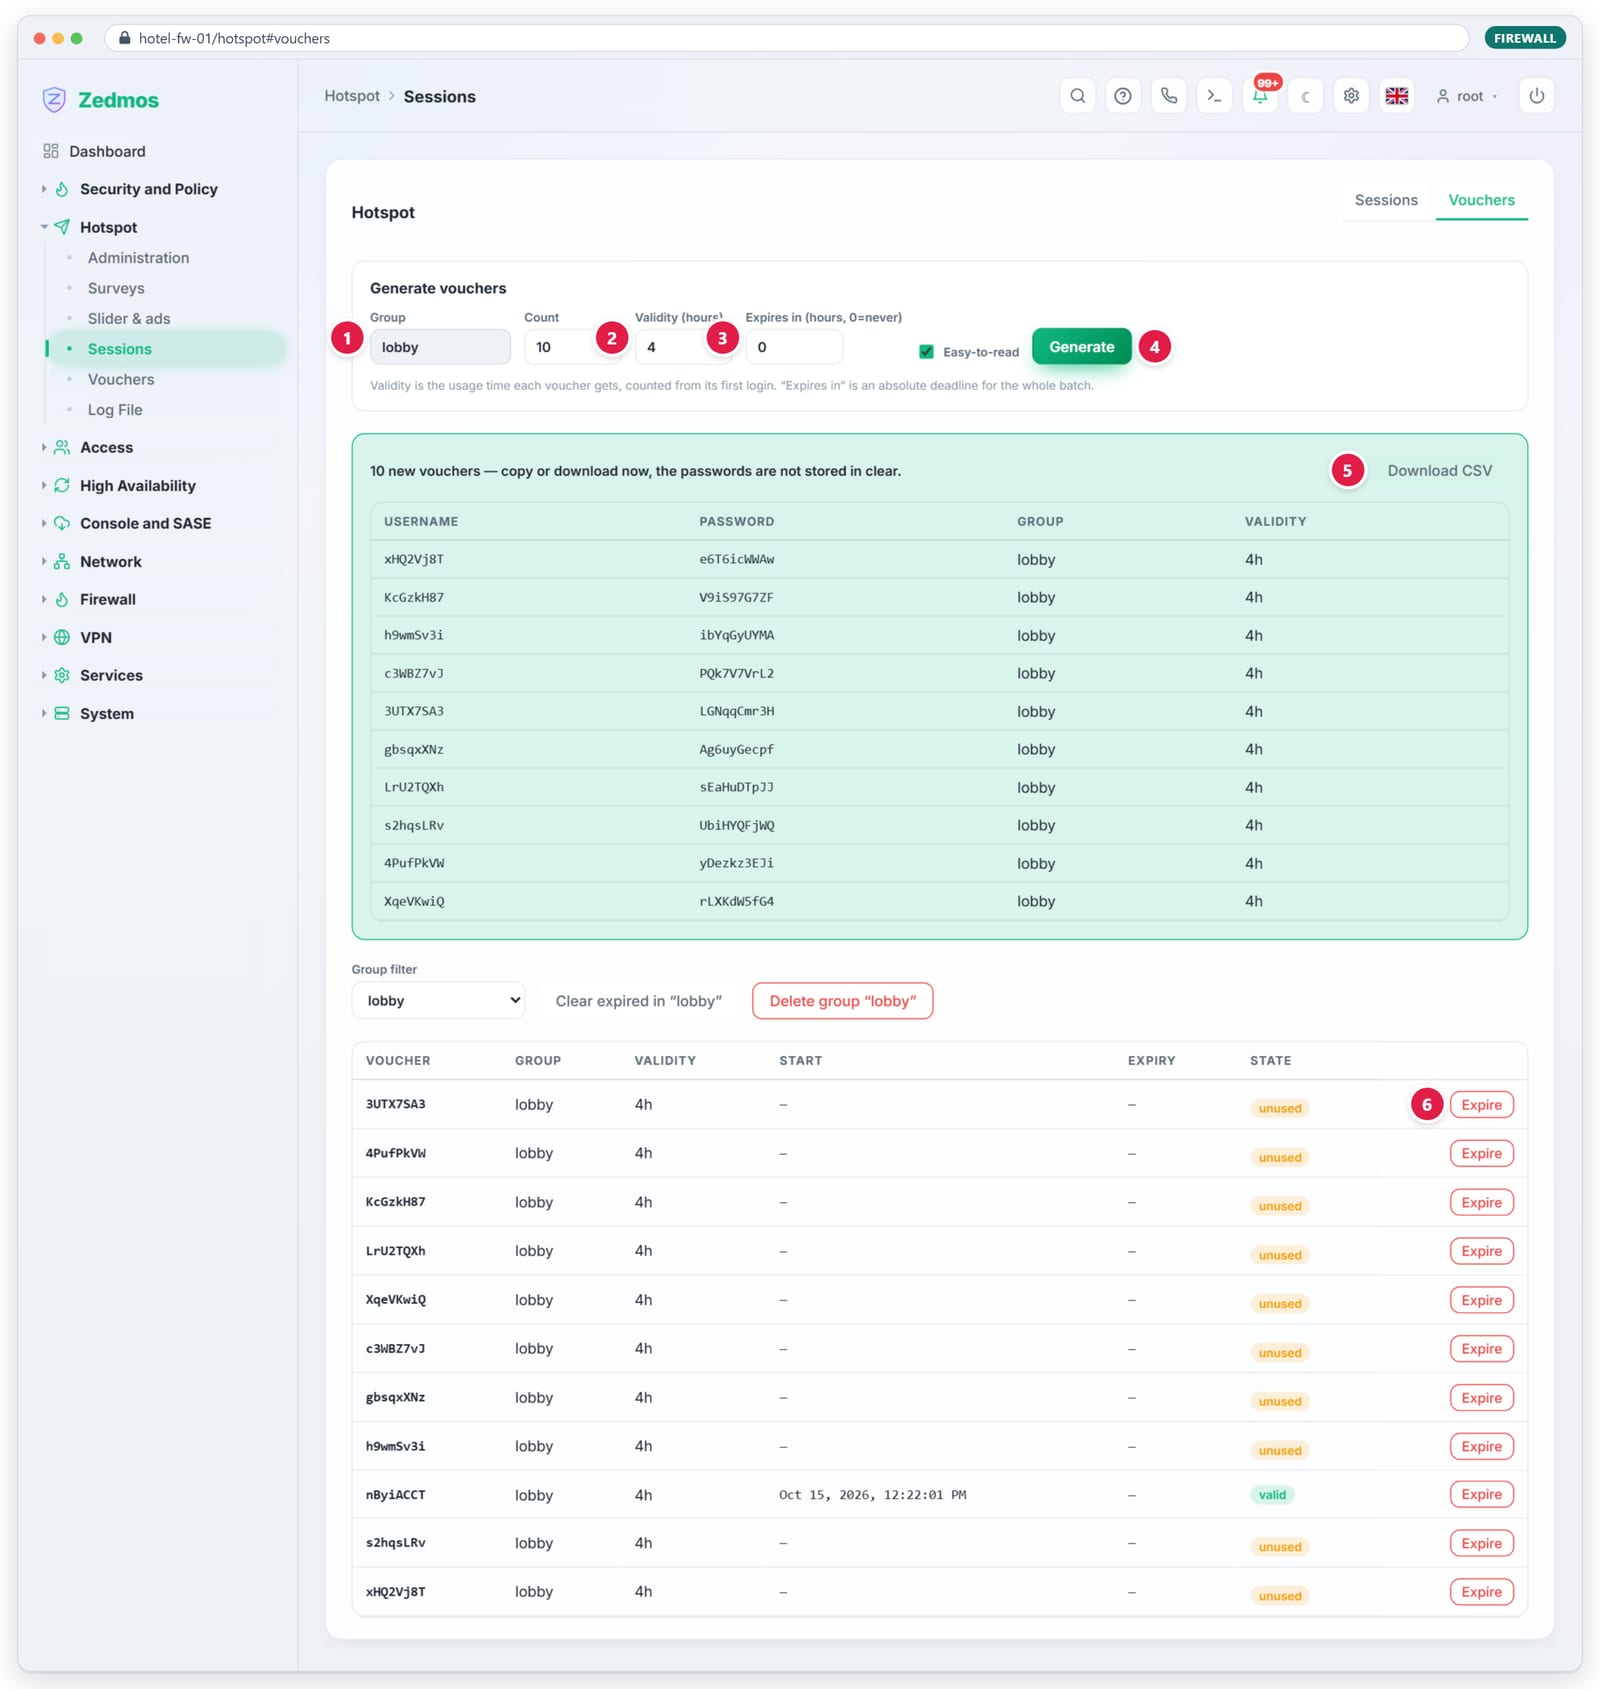
Figure 7.3 — Ten vouchers for the group "lobby", four hours each. The list shows each voucher's state: unused, valid (in use) or expired. (6) Expire ends a voucher at once.
| Field | Meaning | Example |
|---|---|---|
| Validity (hours) | Usage time of each voucher, counted from its first sign-in. 0 = unlimited. | 4: four hours from the first sign-in. |
| Expires in (hours) | A deadline for the whole batch, counted from now. 0 = never. | 720: unused vouchers stop working in 30 days. |
With a group selected in Group filter, Clear expired in "…" removes the expired vouchers of that group, and Delete group "…" removes the whole group. Neither asks for confirmation.
7.4 Hotel room (property management system)
The guest types the room number and surname. The firewall asks your property management system (PMS) whether that guest is staying.
| Control | Type | Example |
|---|---|---|
| PMS endpoint URL | text | https://pms.hotel.example/guest/lookup |
| Request method | select | GET or POST |
| Success = this JSON field is true | text | reservation.status |
| API username / password (optional) | text | the PMS API credentials |
| Advanced: Room parameter name | text | room (default) |
| Advanced: Surname parameter name | text | name (default) |
| Advanced: Or success = body contains | text | an alternative to the JSON rule |
| Advanced: Guest-name / Checkout JSON path | text | reservation.guest, reservation.checkout |
| Advanced: Extra parameters | text area | apikey=…, hotelid=… |
Example. With GET, the firewall calls
https://pms.hotel.example/guest/lookup?room=214&name=Smith and admits the
guest when the reply has "reservation": {"status": true}. A success rule is
required; without one the method stays off.
7.5 Terms and the survey during sign-in
If you switched on Require guests to accept the terms, the guest must tick the box. If the zone shows a survey, required questions must be answered. When a sign-in is refused (wrong password, a missing answer), the page keeps what the guest typed and ticked, except the password.
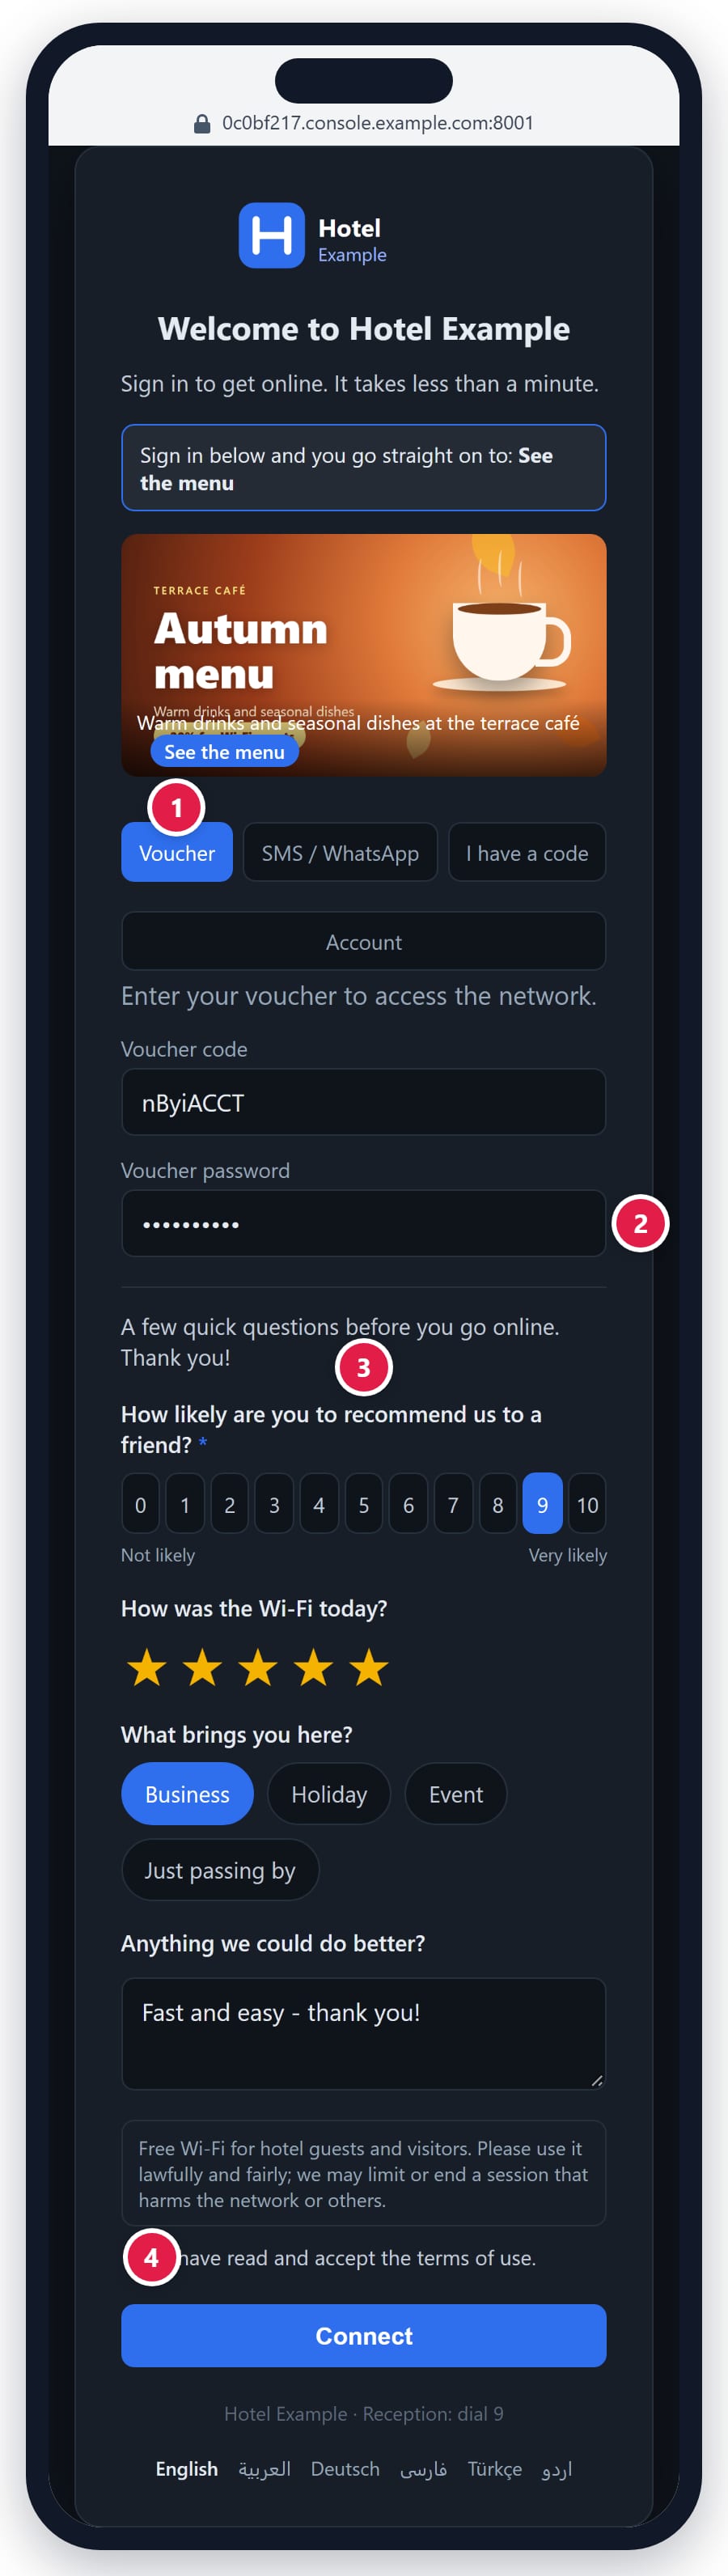
Figure 7.4 — A voucher sign-in: (1) the Voucher tab, (2) the voucher's password, (3) the survey, (4) the terms.
08
Sessions, time limits and signing out
A session starts when a guest signs in and ends when one of these happens:
| Ends the session | When |
|---|---|
| Hard timeout | The zone's Hard timeout after sign-in. Enforced within 10 seconds. |
| Voucher validity | The voucher's time is used up, if that comes before the hard timeout. |
| Idle timeout | No traffic for the zone's Idle timeout. Checked every minute, per connection. |
| Disconnect | The guest presses Disconnect on the "You are connected" page. |
| Administrator | You click Disconnect under Hotspot › Sessions. |
Sessions are kept on disk. A firewall restart does not sign guests out; each session is restored when the same device (same address and MAC address) comes back, and expired ones are dropped.
The "You are connected" page
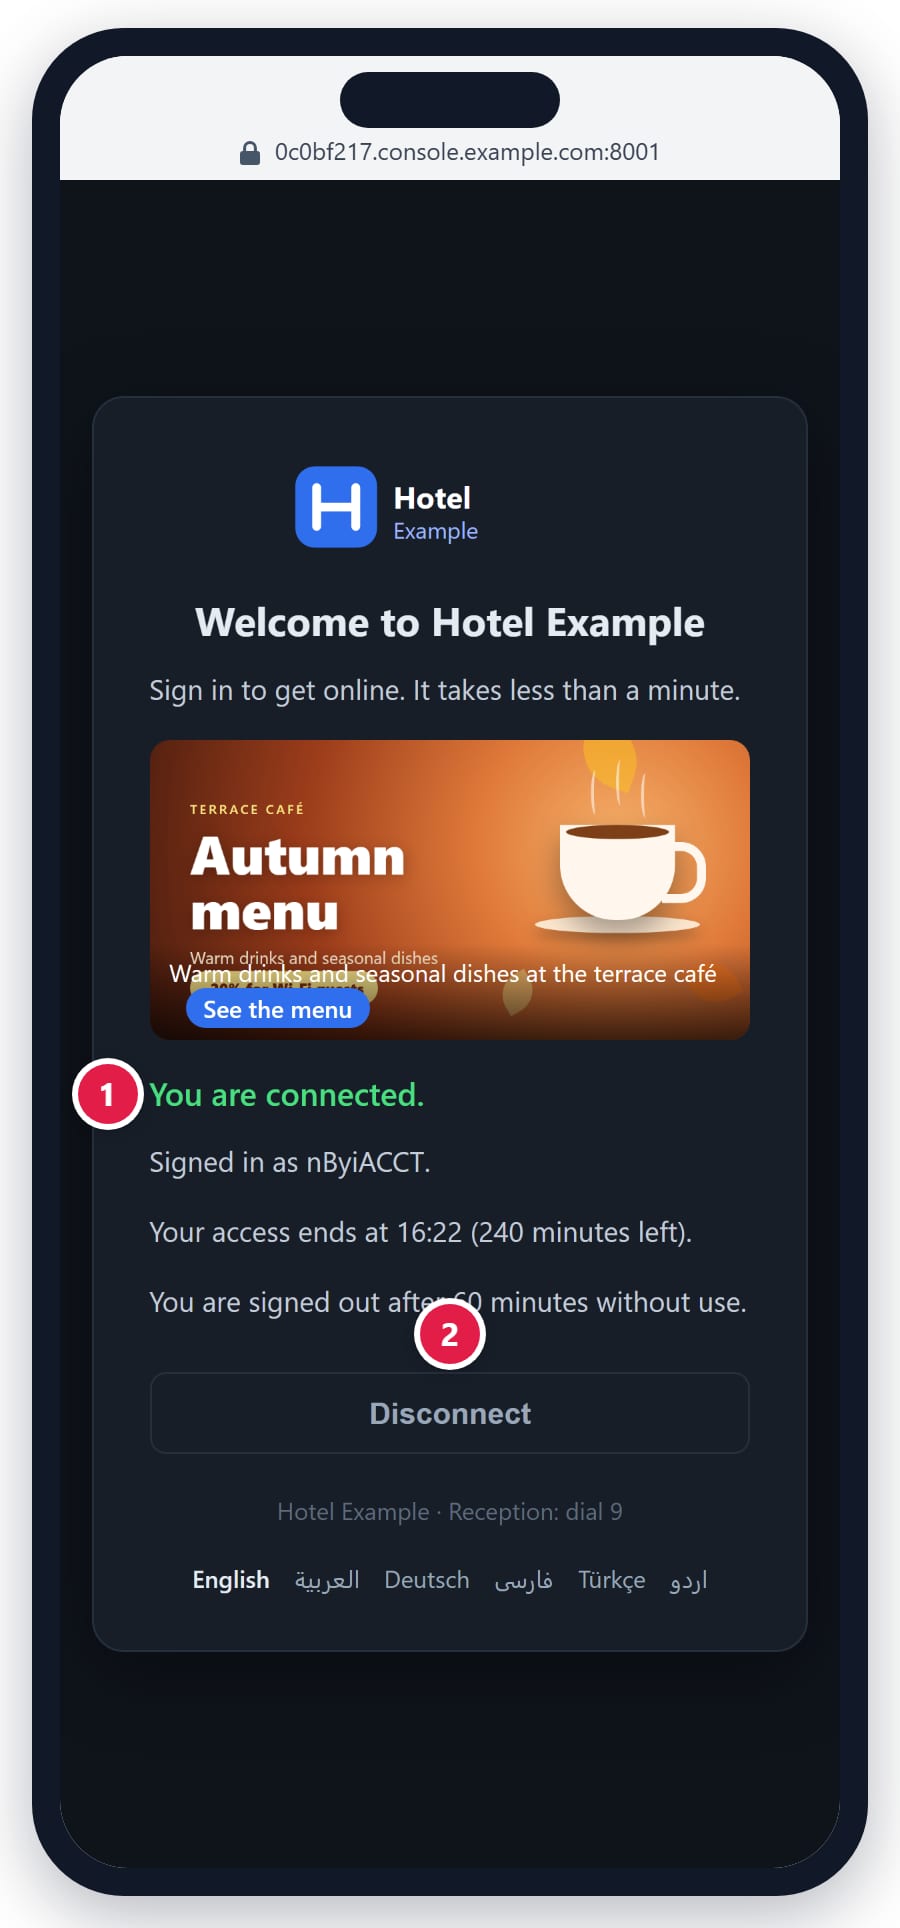
Figure 8.1 — (1) Who is signed in, when access ends and the idle rule. (2) Disconnect.
The page shows the sign-in name (a phone number is partly hidden), the time access ends with the minutes left, and the idle rule. It refreshes itself and turns into the sign-in page when the session has ended. Its automatic refresh does not count as use for the idle timer.
Signing out safely
Disconnect signs out only when pressed on the page itself. A link to the sign-out address from anywhere else, or a page loaded in the background, shows a question first, so no website can sign a guest out.
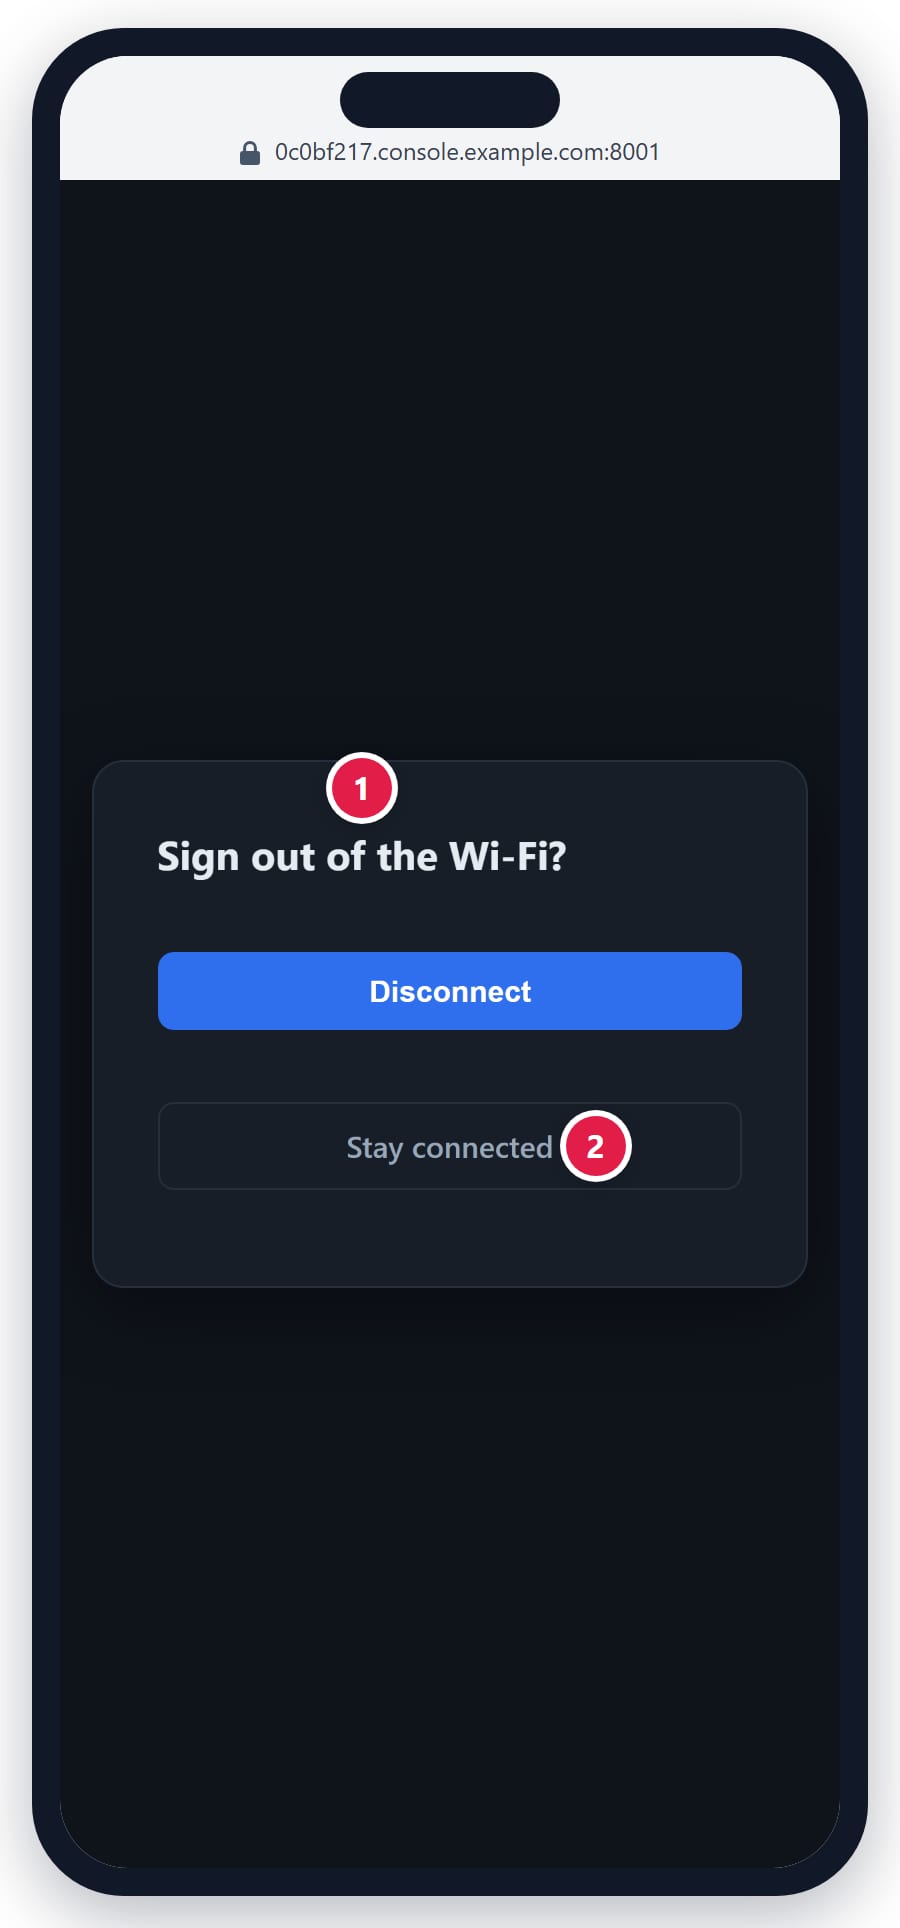
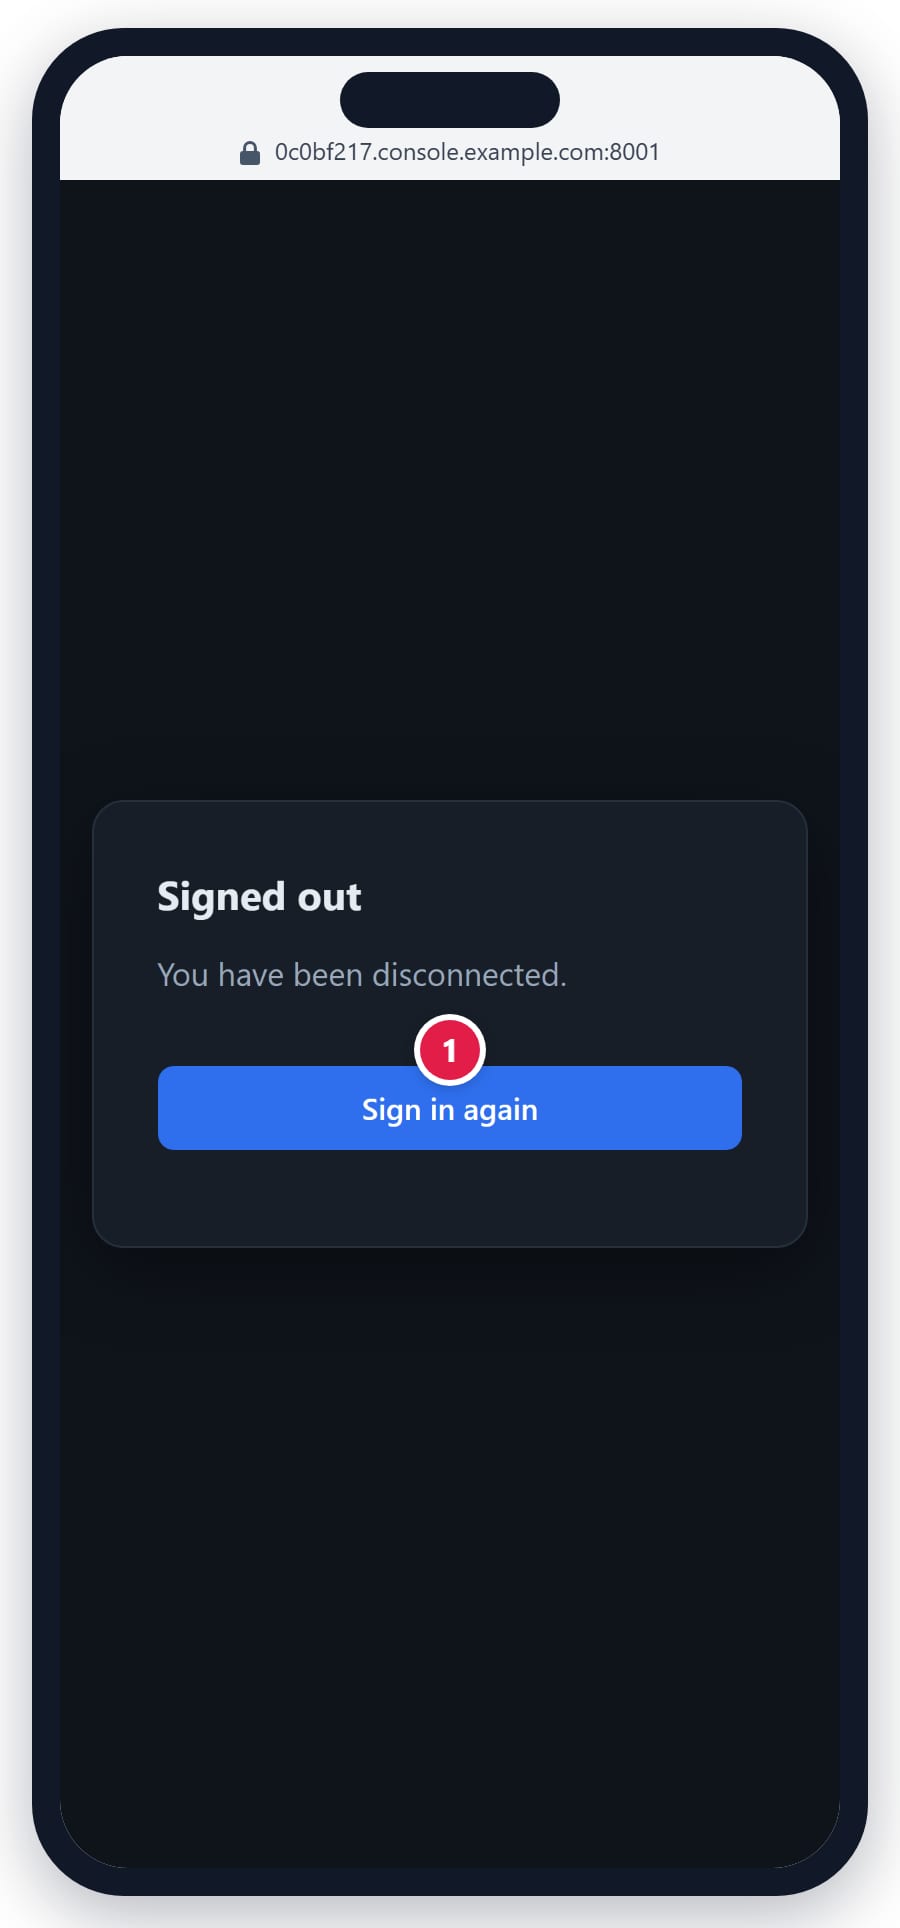
Figure 8.2 — Left: "Sign out of the Wi-Fi?" with Disconnect and (2) Stay connected. Right: after signing out, (1) Sign in again.
Hotspot › Log File
Hotspot › Log File lists what the hotspot did, newest first: each guest
let in (zone, address, name, method), each sign-in turned down (the method,
the name typed or a partly hidden phone number, and the reason the guest was
shown; never a password), each session ended and why (User-Request when the
guest pressed Disconnect, Admin-Reset when you did, Session-Timeout,
Idle-Timeout), and each code sent by SMS or WhatsApp. Filter by text,
period and severity, or export the file. (Firewall releases after 26.10.125.)
Hotspot › Sessions
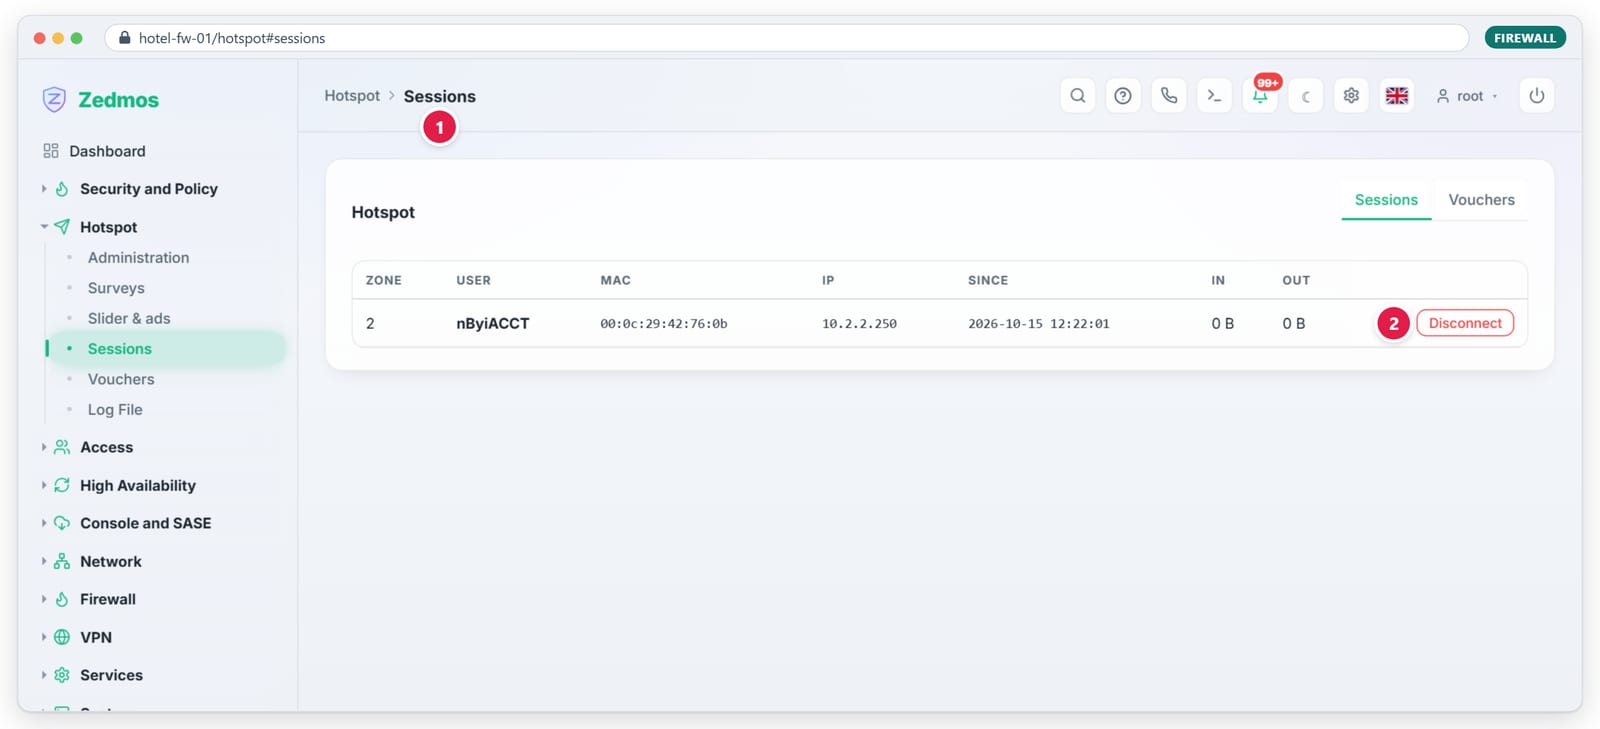
Figure 8.3 — Hotspot › Sessions: every guest online, with zone, user, MAC address, IP address, start time and traffic. (2) Disconnect ends a session at once, without asking. A RADIUS server receives the end as Admin-Reset.
09
Surveys and ads on the firewall
Surveys and slides (ads) can be made on each firewall, or once in the console and published to many firewalls (chapter 10). Both show on the sign-in page the same way, and their numbers are counted on the firewall.
9.1 Surveys
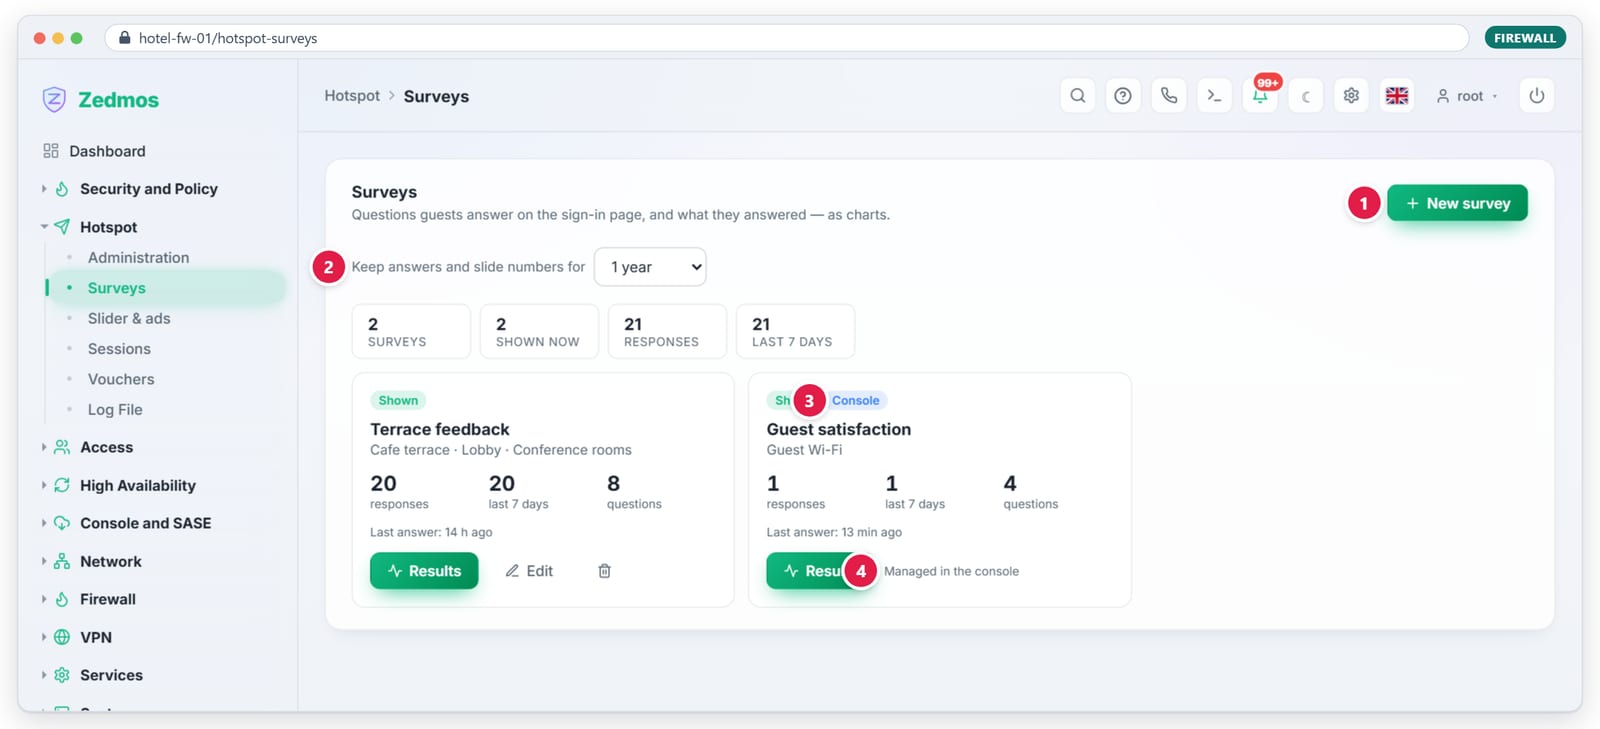
Figure 9.1 — Hotspot › Surveys. (1) New survey. (2) How long answers and ad numbers are kept. (3) A survey published from the console carries the "Console" badge and (4) can only be changed in the console.
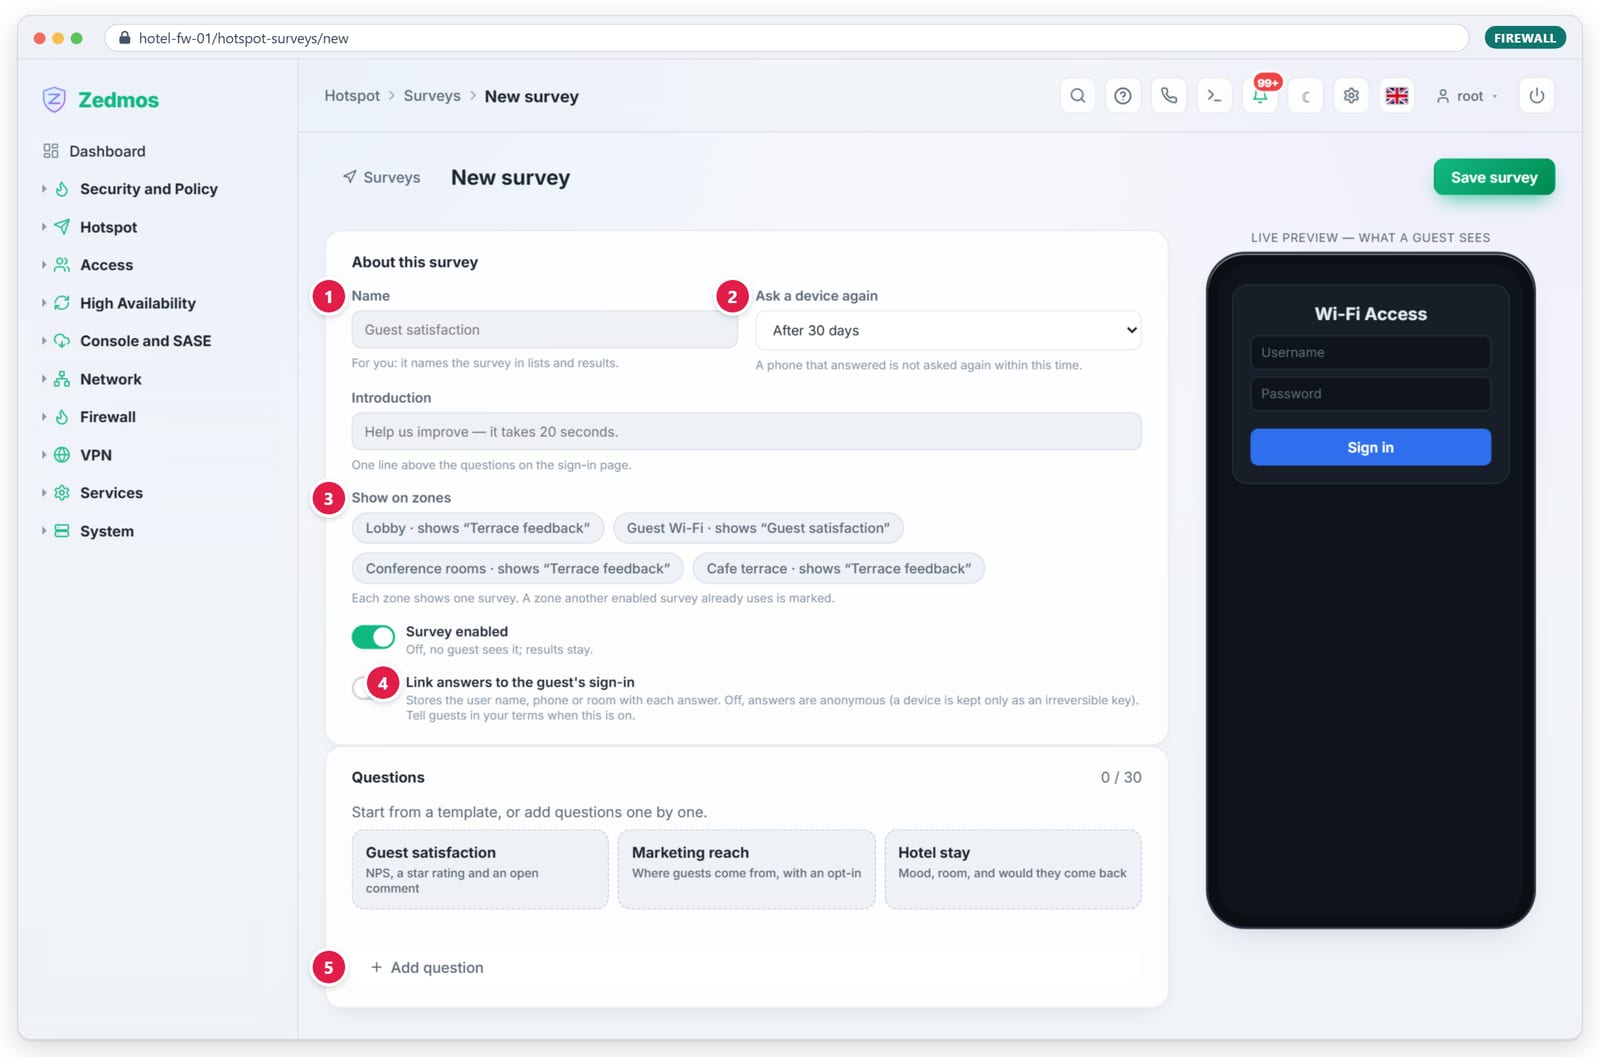
Procedure: create a survey
- Click Hotspot › Surveys › New survey.
- Start from a template (Guest satisfaction, Marketing reach, Hotel stay) or add questions one by one.
- Give it a Name, choose Ask a device again and write an Introduction.
- Pick the zones under Show on zones. A zone shows one survey; a zone that already shows another survey is marked.
- Decide Link answers to the guest's sign-in. Off, answers are anonymous. On, each answer stores the user name, phone number or room; mention this in your terms.
- Click Save survey.
The 14 question types
| Type | Guest sees | Options |
|---|---|---|
| Single choice | answer cards, one pick | 2 to 30 answers |
| Multiple choice | answer cards, several picks | at least / at most |
| Dropdown | a list, one pick | 2 to 30 answers |
| Yes / No | two buttons | |
| Star rating | 3 to 10 stars | number of stars |
| Emoji scale | five faces, sad to happy | |
| Net Promoter Score | 0 to 10 | end labels |
| Numbered scale | for example 1 to 5 | from, to, end labels |
| Short text | one line | up to 200 characters |
| Long text | a text box | up to 1000 characters |
| Number | a number field | lowest and highest |
| an address, checked | ||
| Date | a date | |
| Consent box | one tick box, for example a newsletter opt-in | can be required |
A survey holds up to 30 questions. Keep required questions few: each one stands between the guest and the internet.
Results. Results shows responses per day, by zone, by sign-in method and per question, with the Net Promoter Score where there is an NPS question. Export CSV downloads every answer. Reset results deletes all stored answers of the survey. Answers are deleted nightly after the retention period you set on the Surveys page (default one year).
9.2 Slider & ads
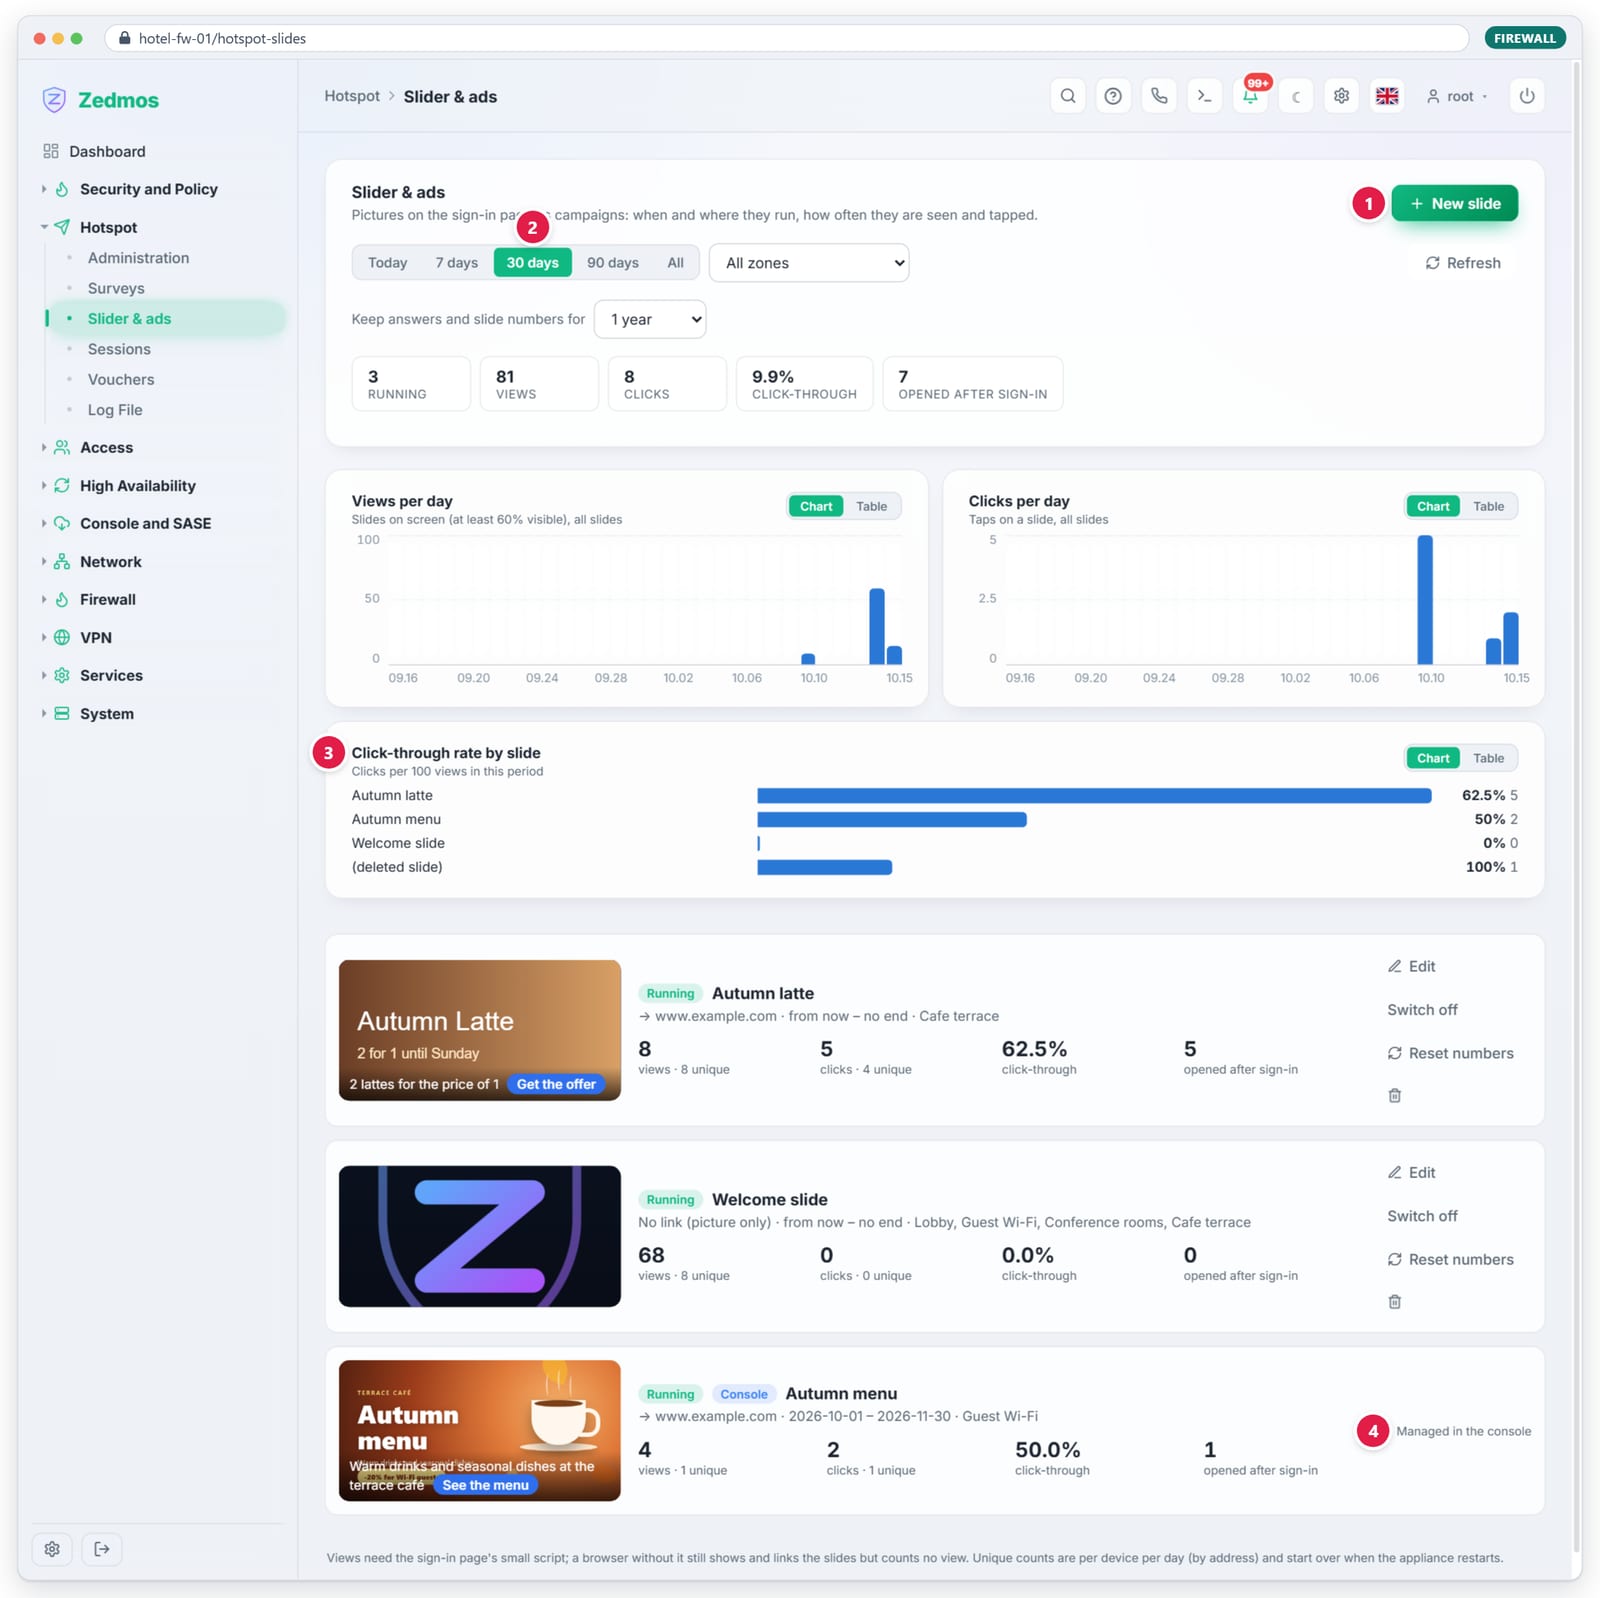
Figure 9.3 — Hotspot › Slider & ads. (1) New slide. (2) Period. (3) Click- through rate per slide. (4) A slide published from the console is managed there.
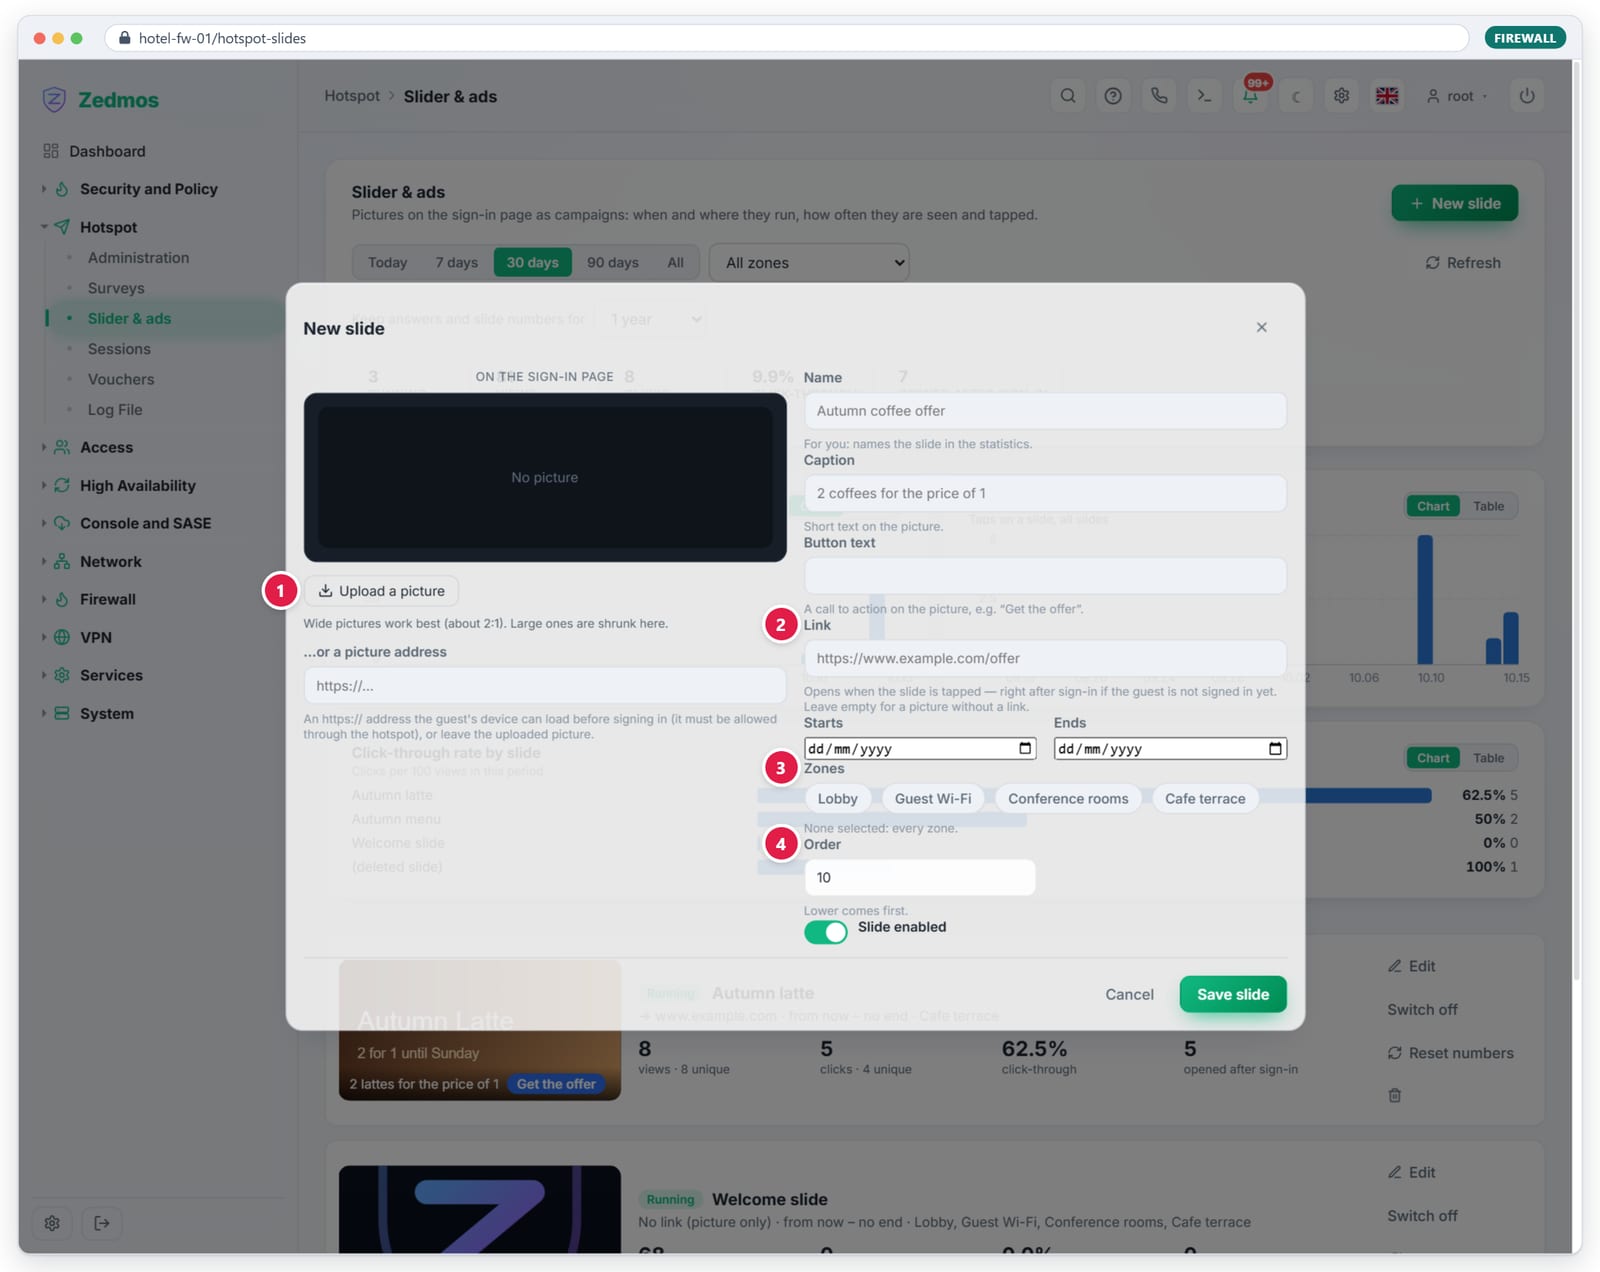
Procedure: create a slide
- Click Hotspot › Slider & ads › New slide.
- Upload a picture. Wide pictures work best, about 2:1. Large pictures are shrunk to 1200 pixels wide.
- Fill in Name (for your statistics), Caption, Button text and Link.
- Set Starts and Ends for a campaign, the Zones (none = every zone) and the Order (lower comes first).
- Click Save slide.
What the numbers mean
| Number | Meaning |
|---|---|
| Views | The slide was on screen, at least 60% visible. |
| Clicks | The slide was tapped. |
| Click-through | Clicks per 100 views. |
| Opened after sign-in | The guest tapped the slide before signing in and its link opened after sign-in. |
| Unique | Counted once per device per day. |
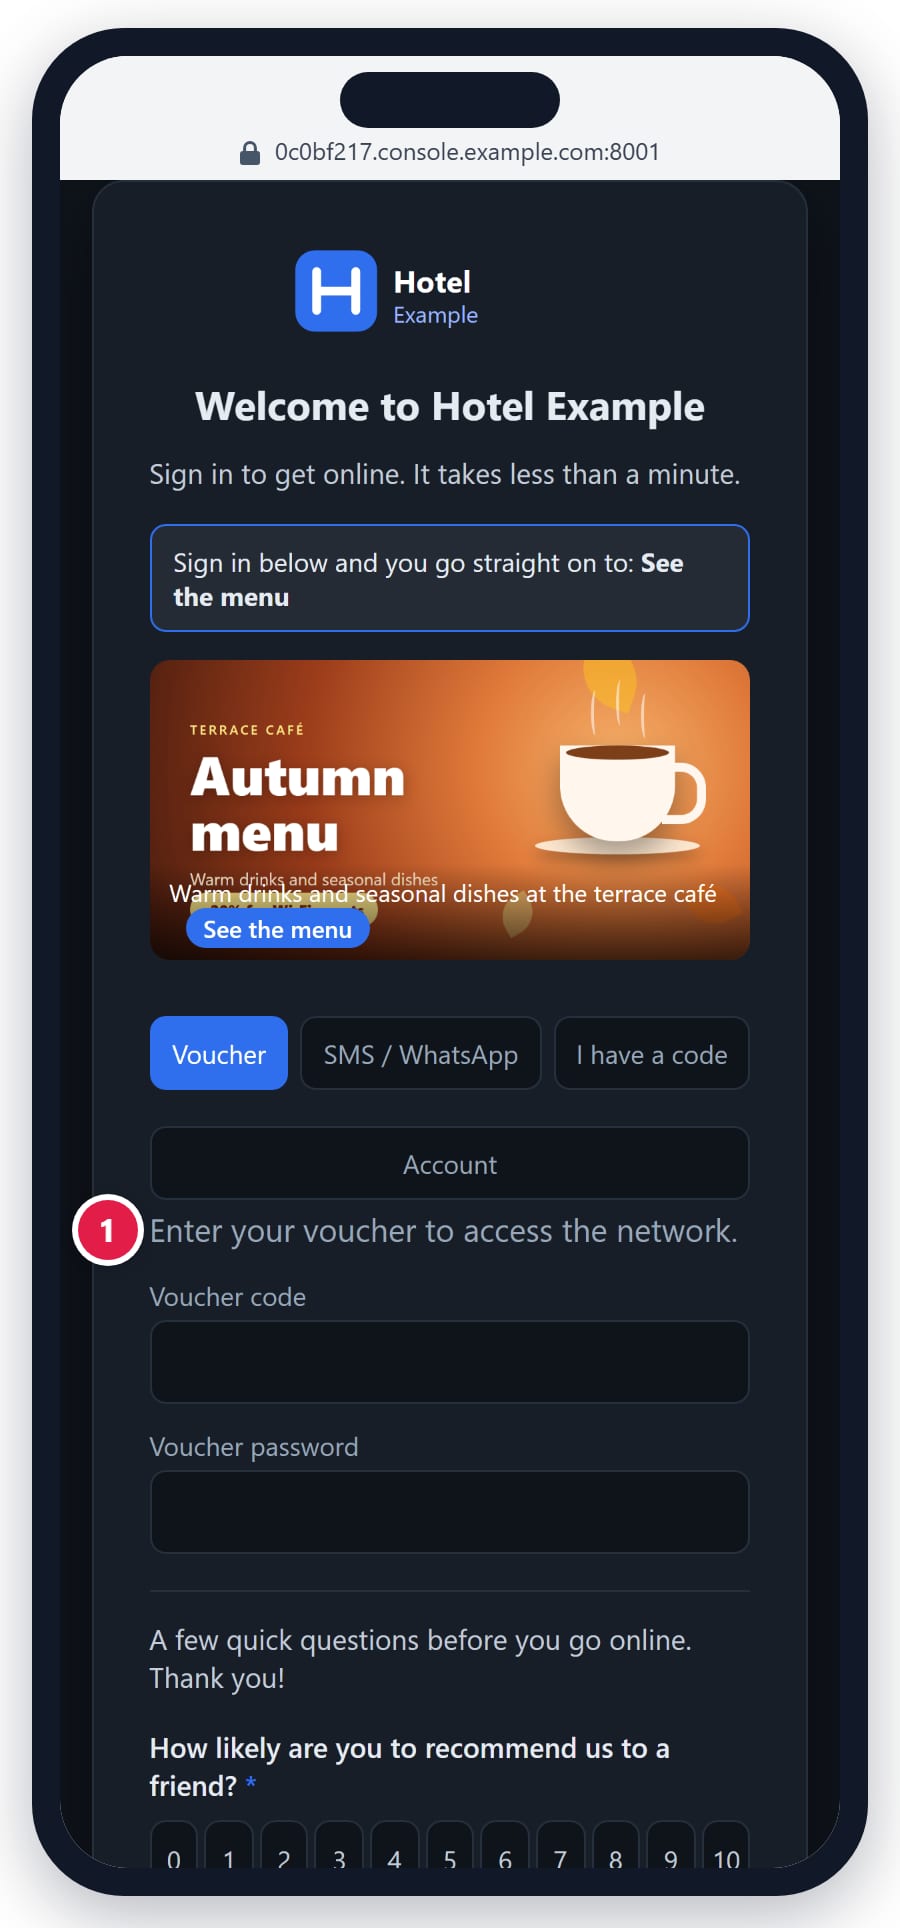
Tapping an ad before sign-in. A guest who taps an ad before signing in sees "Sign in below and you go straight on to: …". After sign-in, the ad's link opens.
10
Manage all hotspots from the console
The console's Hotspot page has three tabs: Overview, Surveys & ads and Portal names. The selector at the top right picks the organization; a user with more than one organization also gets All organizations.
10.1 Overview
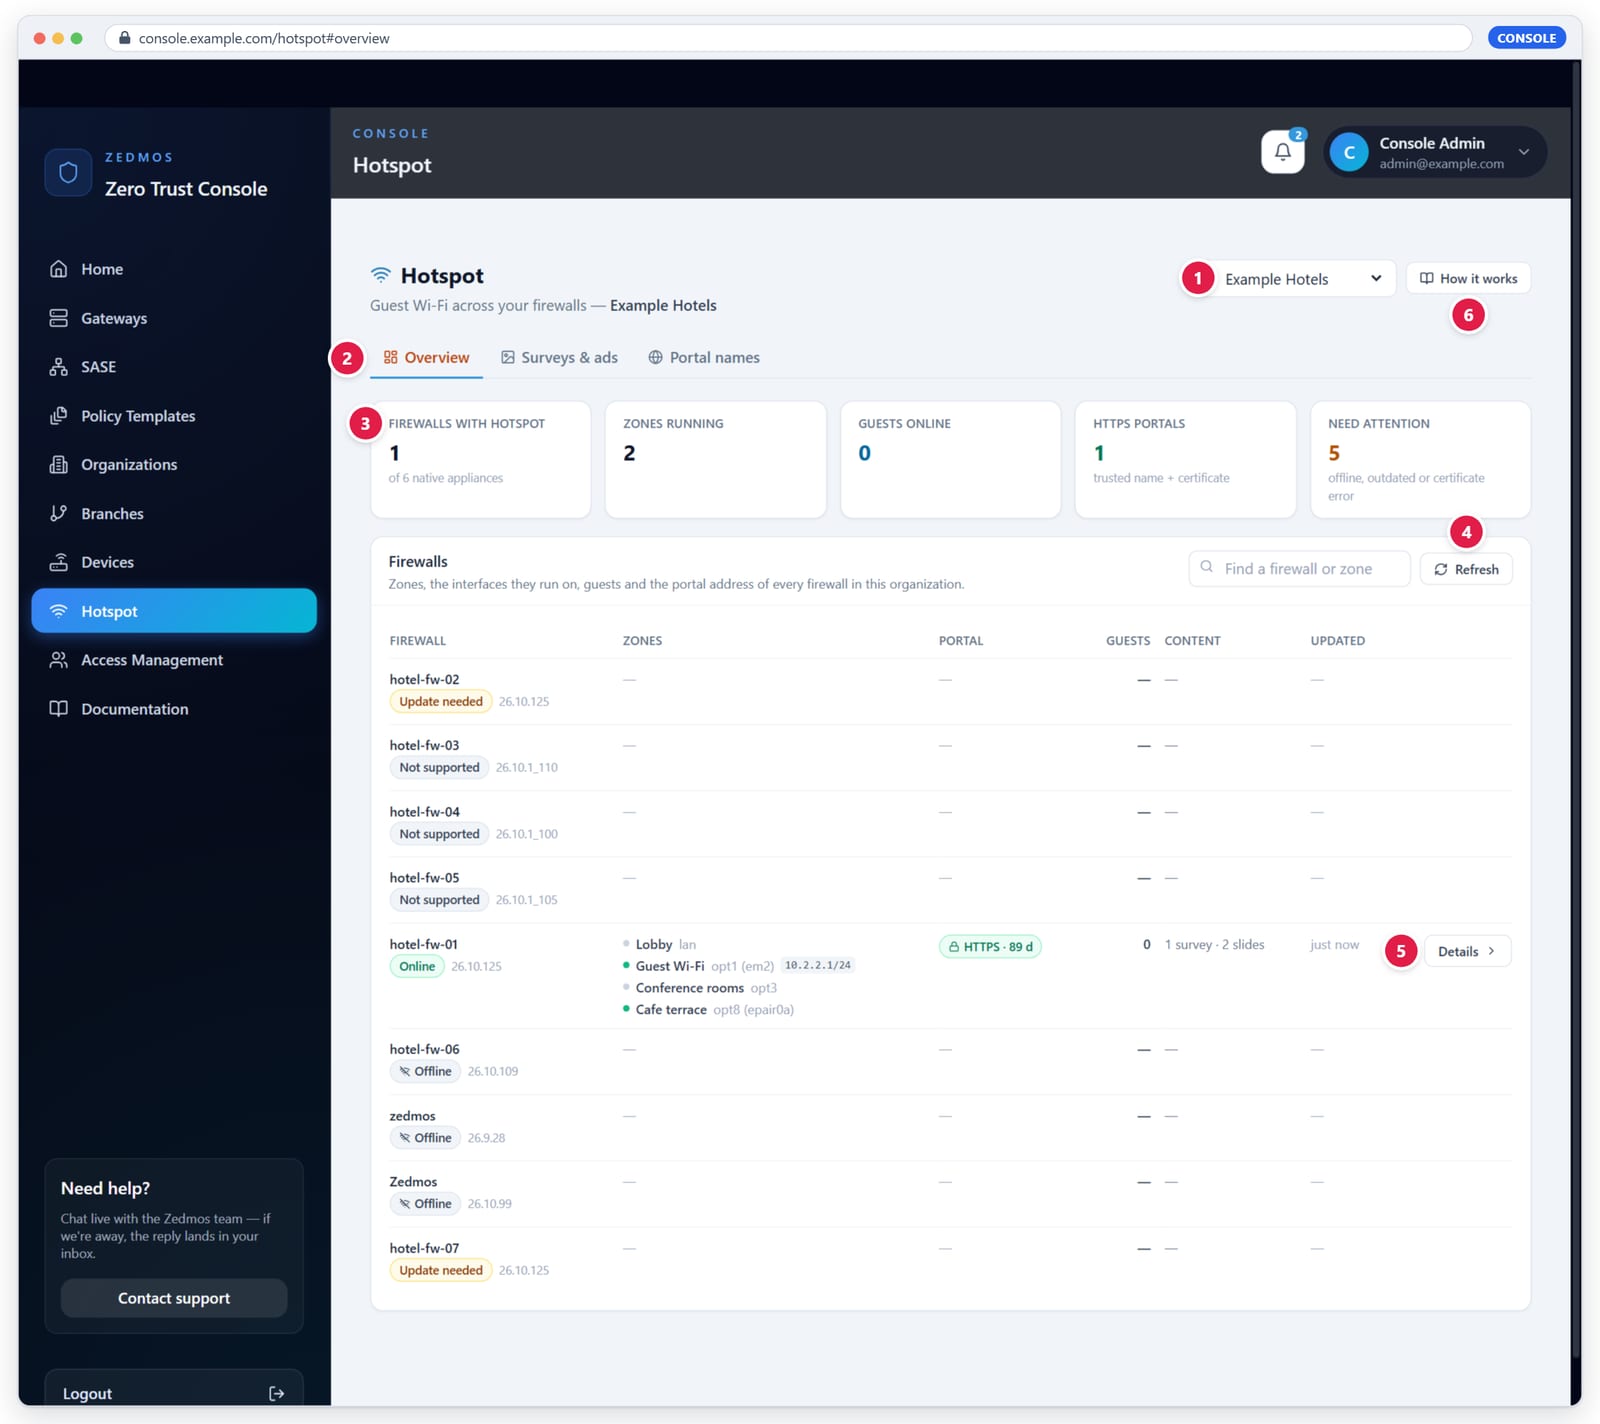
Figure 10.1 — Hotspot › Overview for Example Hotels. (1) Organization. (2) Tabs. (3) Summary tiles. (4) Refresh. (5) Details of a firewall. (6) The built-in guide.
| Tile | Counts |
|---|---|
| Firewalls with hotspot | firewalls with at least one enabled zone, of all native appliances |
| Zones running | enabled zones that run |
| Guests online | sessions right now |
| HTTPS portals | firewalls with a ready certificate and a named zone |
| Need attention | firewalls that are offline, need an update, or have a certificate error |
Firewall state
| State | Meaning |
|---|---|
| Online | Reporting now. |
| Offline | Not connected; the row shows what it reported last. |
| Update needed | The firewall's release cannot report its hotspot. Update the firewall. |
| Not supported | Not a Zedmos firewall (for example an OPNsense or pfSense agent). |
| Error | The firewall answered with an error; hover for the text. |
Certificate state
| Pill | Meaning |
|---|---|
| HTTPS · 89 d | Ready, 89 days left. Amber below 14 days. |
| Issuing… | Let's Encrypt is checking. |
| Certificate error | Hover for the error; fix DNS and use Try now. |
| No portal domain | The organization's mode is Off. |
| Not enrolled | The firewall is not connected to a console. |
| HTTP (address) | No zone uses the automatic portal address. |
Details opens the firewall's hotspot in full: zones, interfaces, sign-in methods, portal address, guests, and the surveys and slides each zone shows. Items marked Console came from the console; On the firewall were made there. When the certificate is not ready, Try now asks the firewall to request it at once.
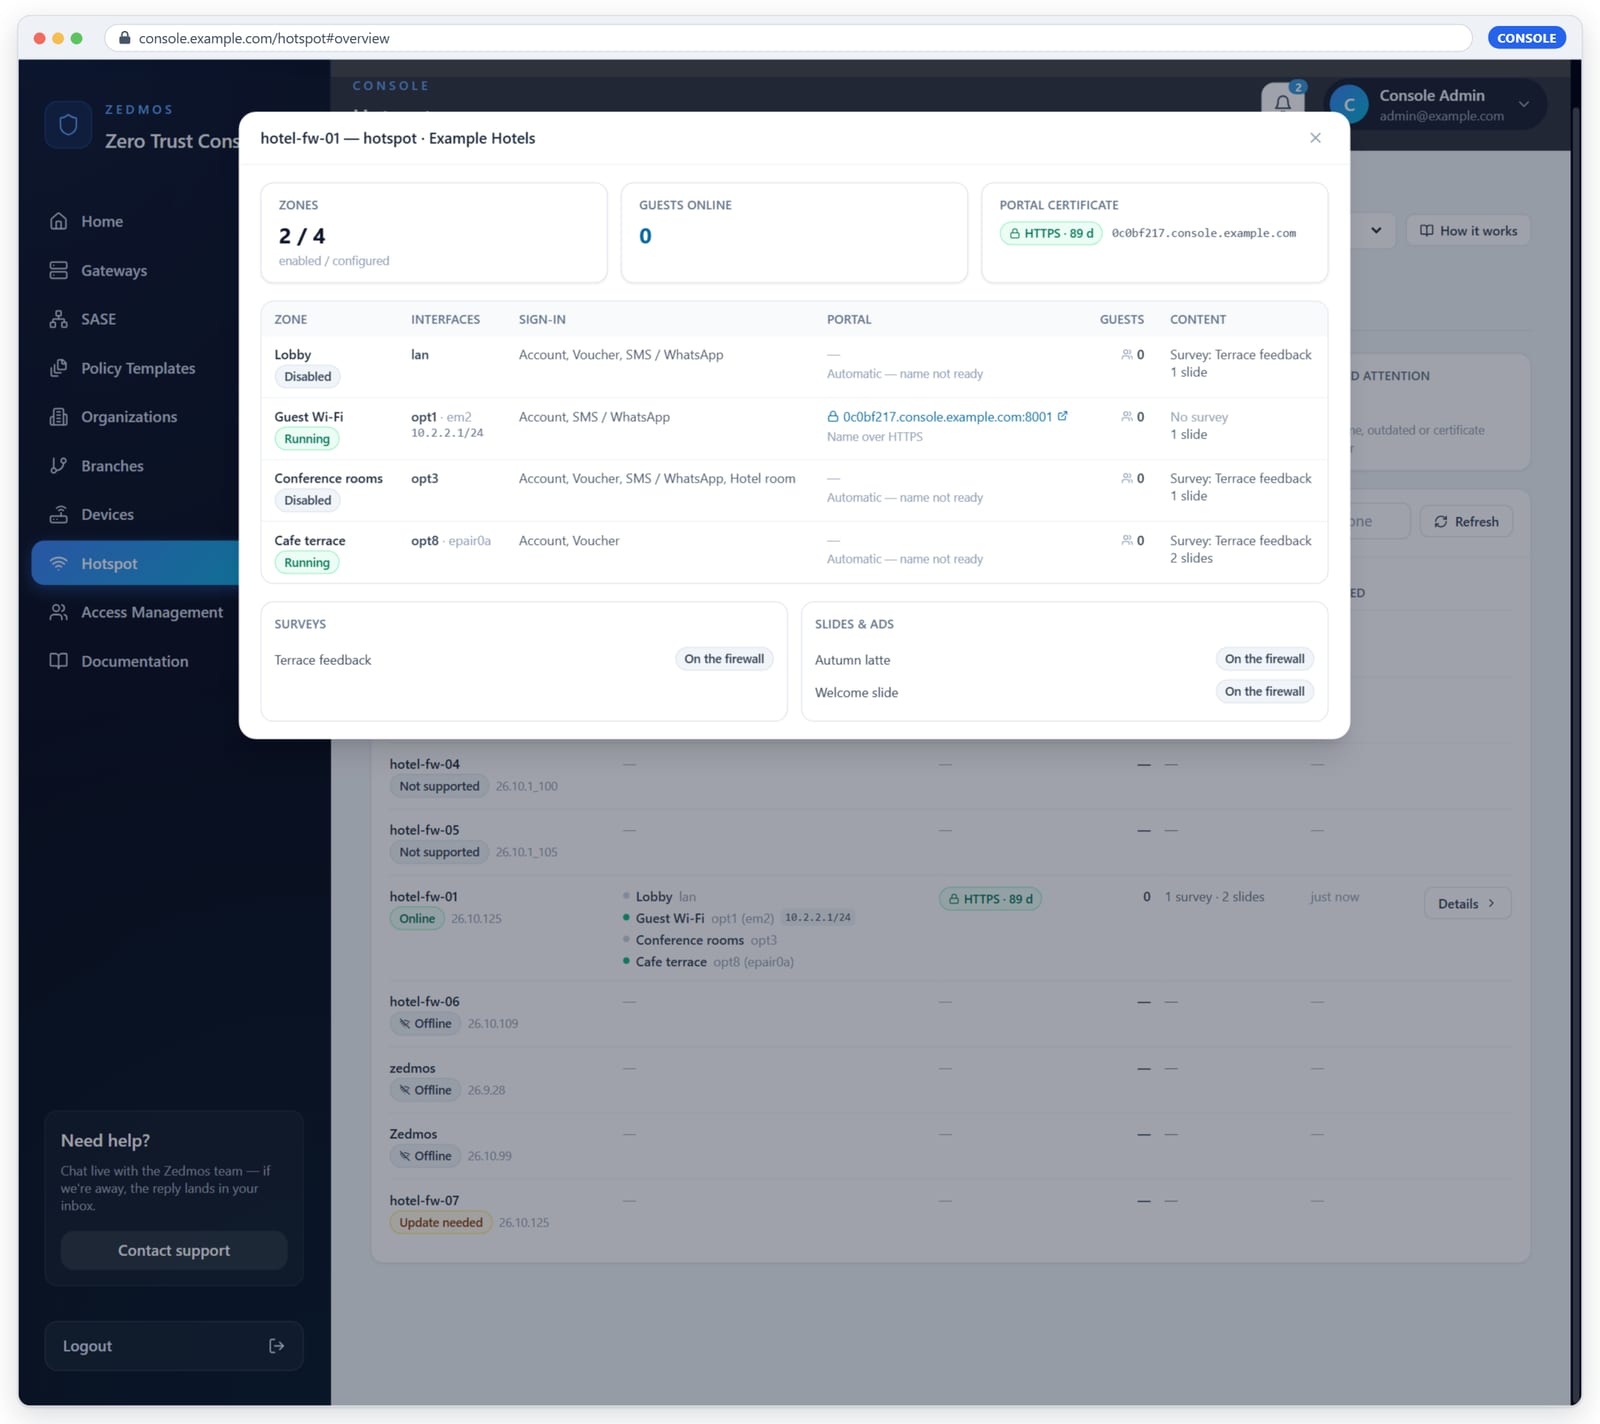
Figure 10.2 — Details. (1) The portal certificate and name. (2) Sign-in methods per zone. (3) Portal address of each zone. (4) Surveys and slides, with their origin.
With All organizations, firewalls are grouped by organization:
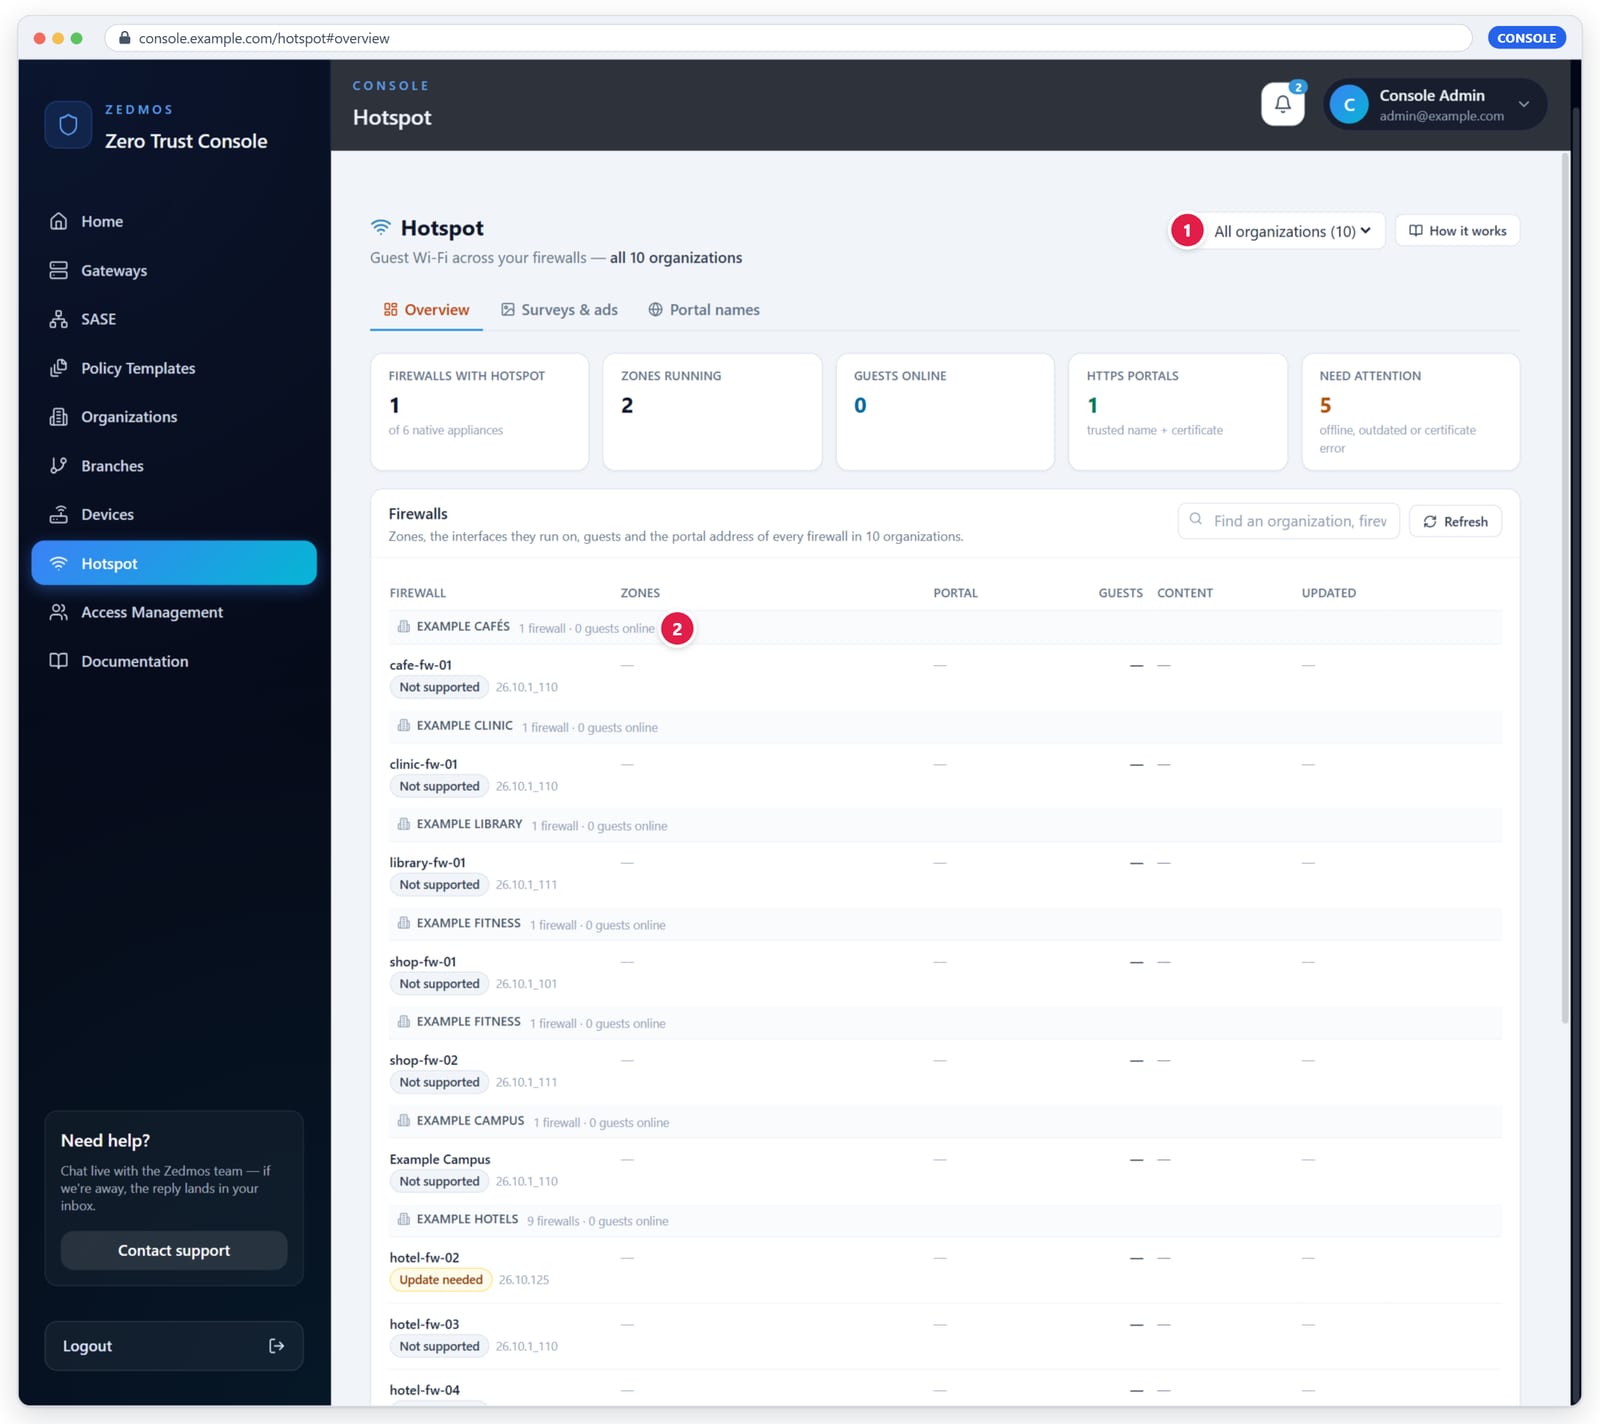
10.2 Surveys & ads
Make a slide or a survey once, choose the firewalls and zones, and publish it to all of them at once.
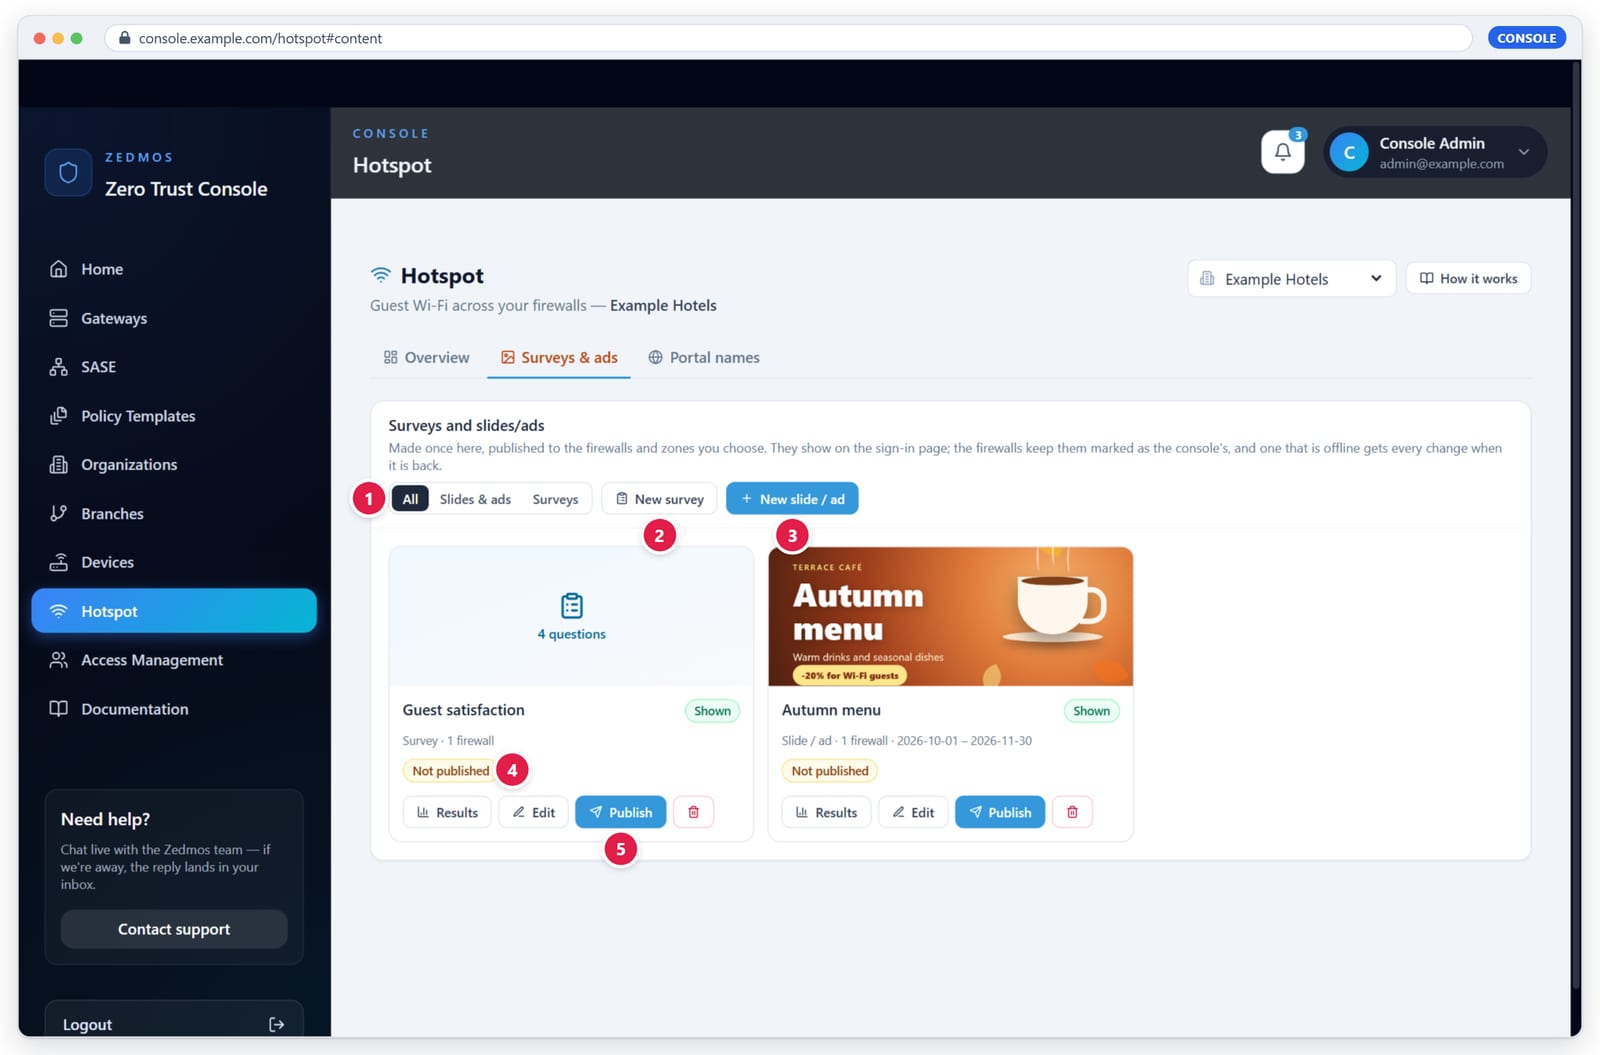
Figure 10.4 — (1) Filter. (2) New survey. (3) New slide / ad. (4) Not published yet. (5) Publish.
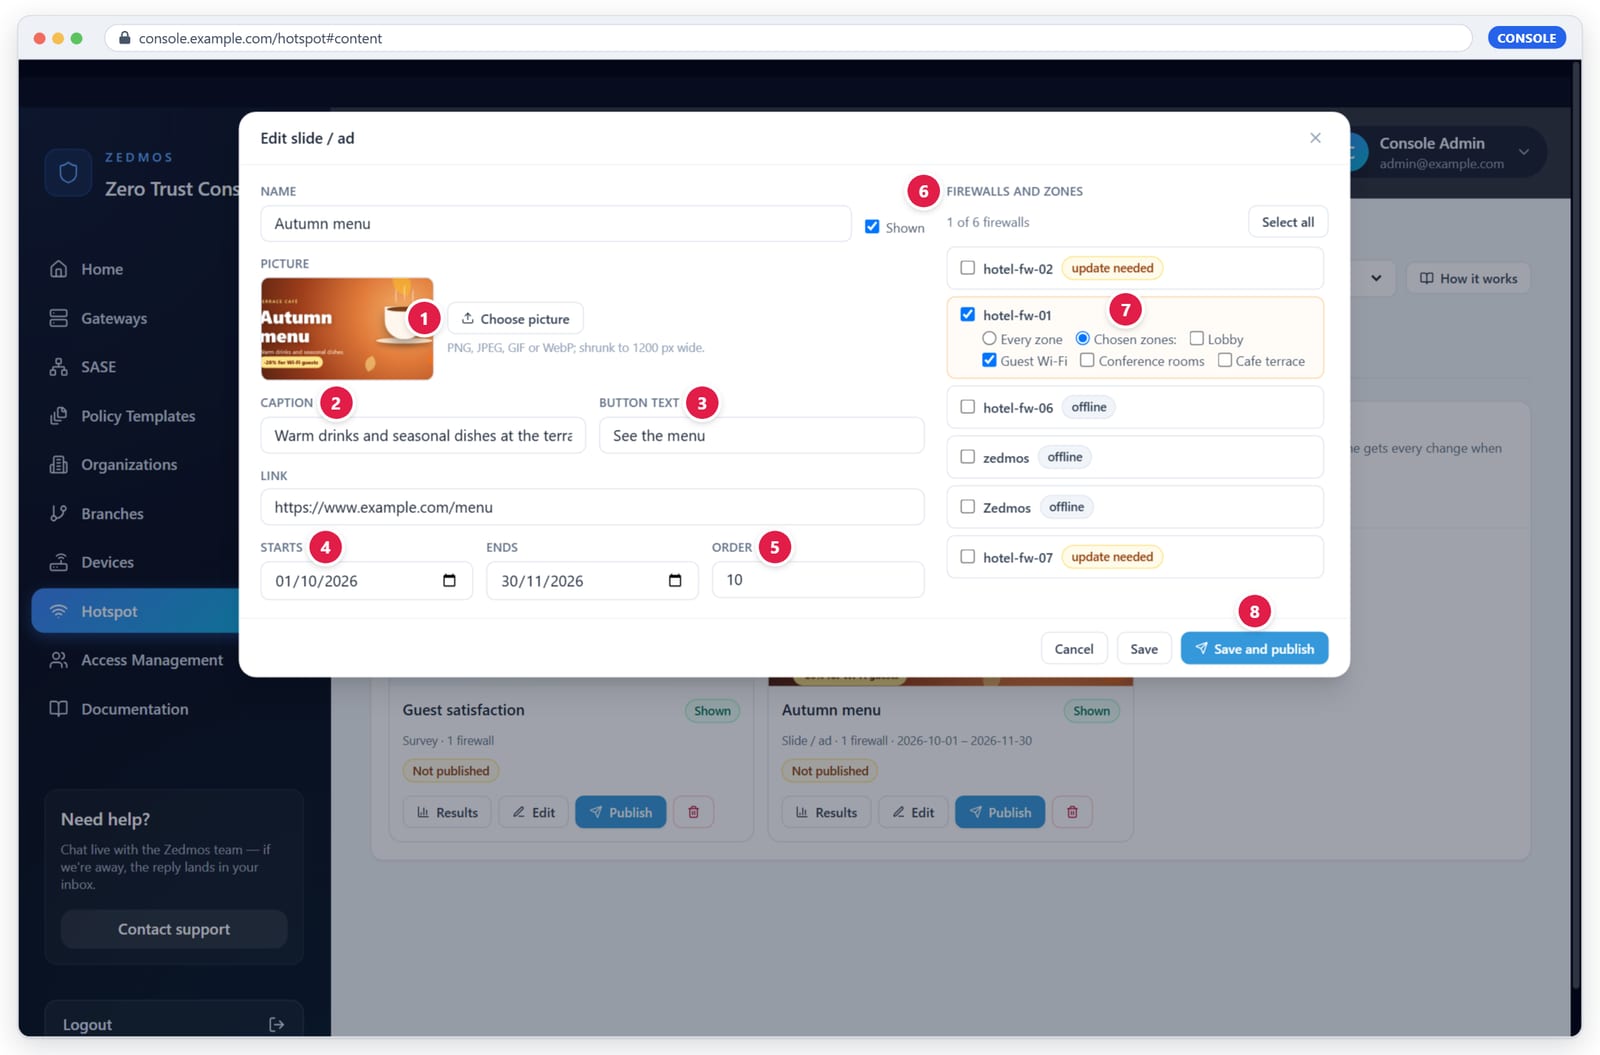
Procedure: publish an ad
- Click Hotspot › Surveys & ads › New slide / ad.
- Give it a Name, for example
Autumn menu, and keep Shown ticked. - Choose picture (1): PNG, JPEG, GIF or WebP; it is shrunk to 1200 pixels wide in your browser.
- Write the Caption (2), the Button text (3), for example "See the
menu", and the Link, for example
https://www.example.com/menu. - Set Starts and Ends (4) and the Order (5).
- Under Firewalls and zones (6), tick the firewalls. For each, choose Every zone or Chosen zones and tick the zones (7). Firewalls that are offline or need an update are marked.
- Click Save and publish (8), or Save to publish later.
Procedure: publish a survey
- Click New survey. A new survey starts with one NPS question.
- Write the Introduction, decide Link answers to the guest's sign-in name (2) and Ask the same device again after (days) (3).
- Add questions: pick the type (4), tick Required (5) where needed and write the question. Choice types take one answer per line. Add question (6) adds more, up to 30.
- Choose the firewalls and zones, then Save and publish.
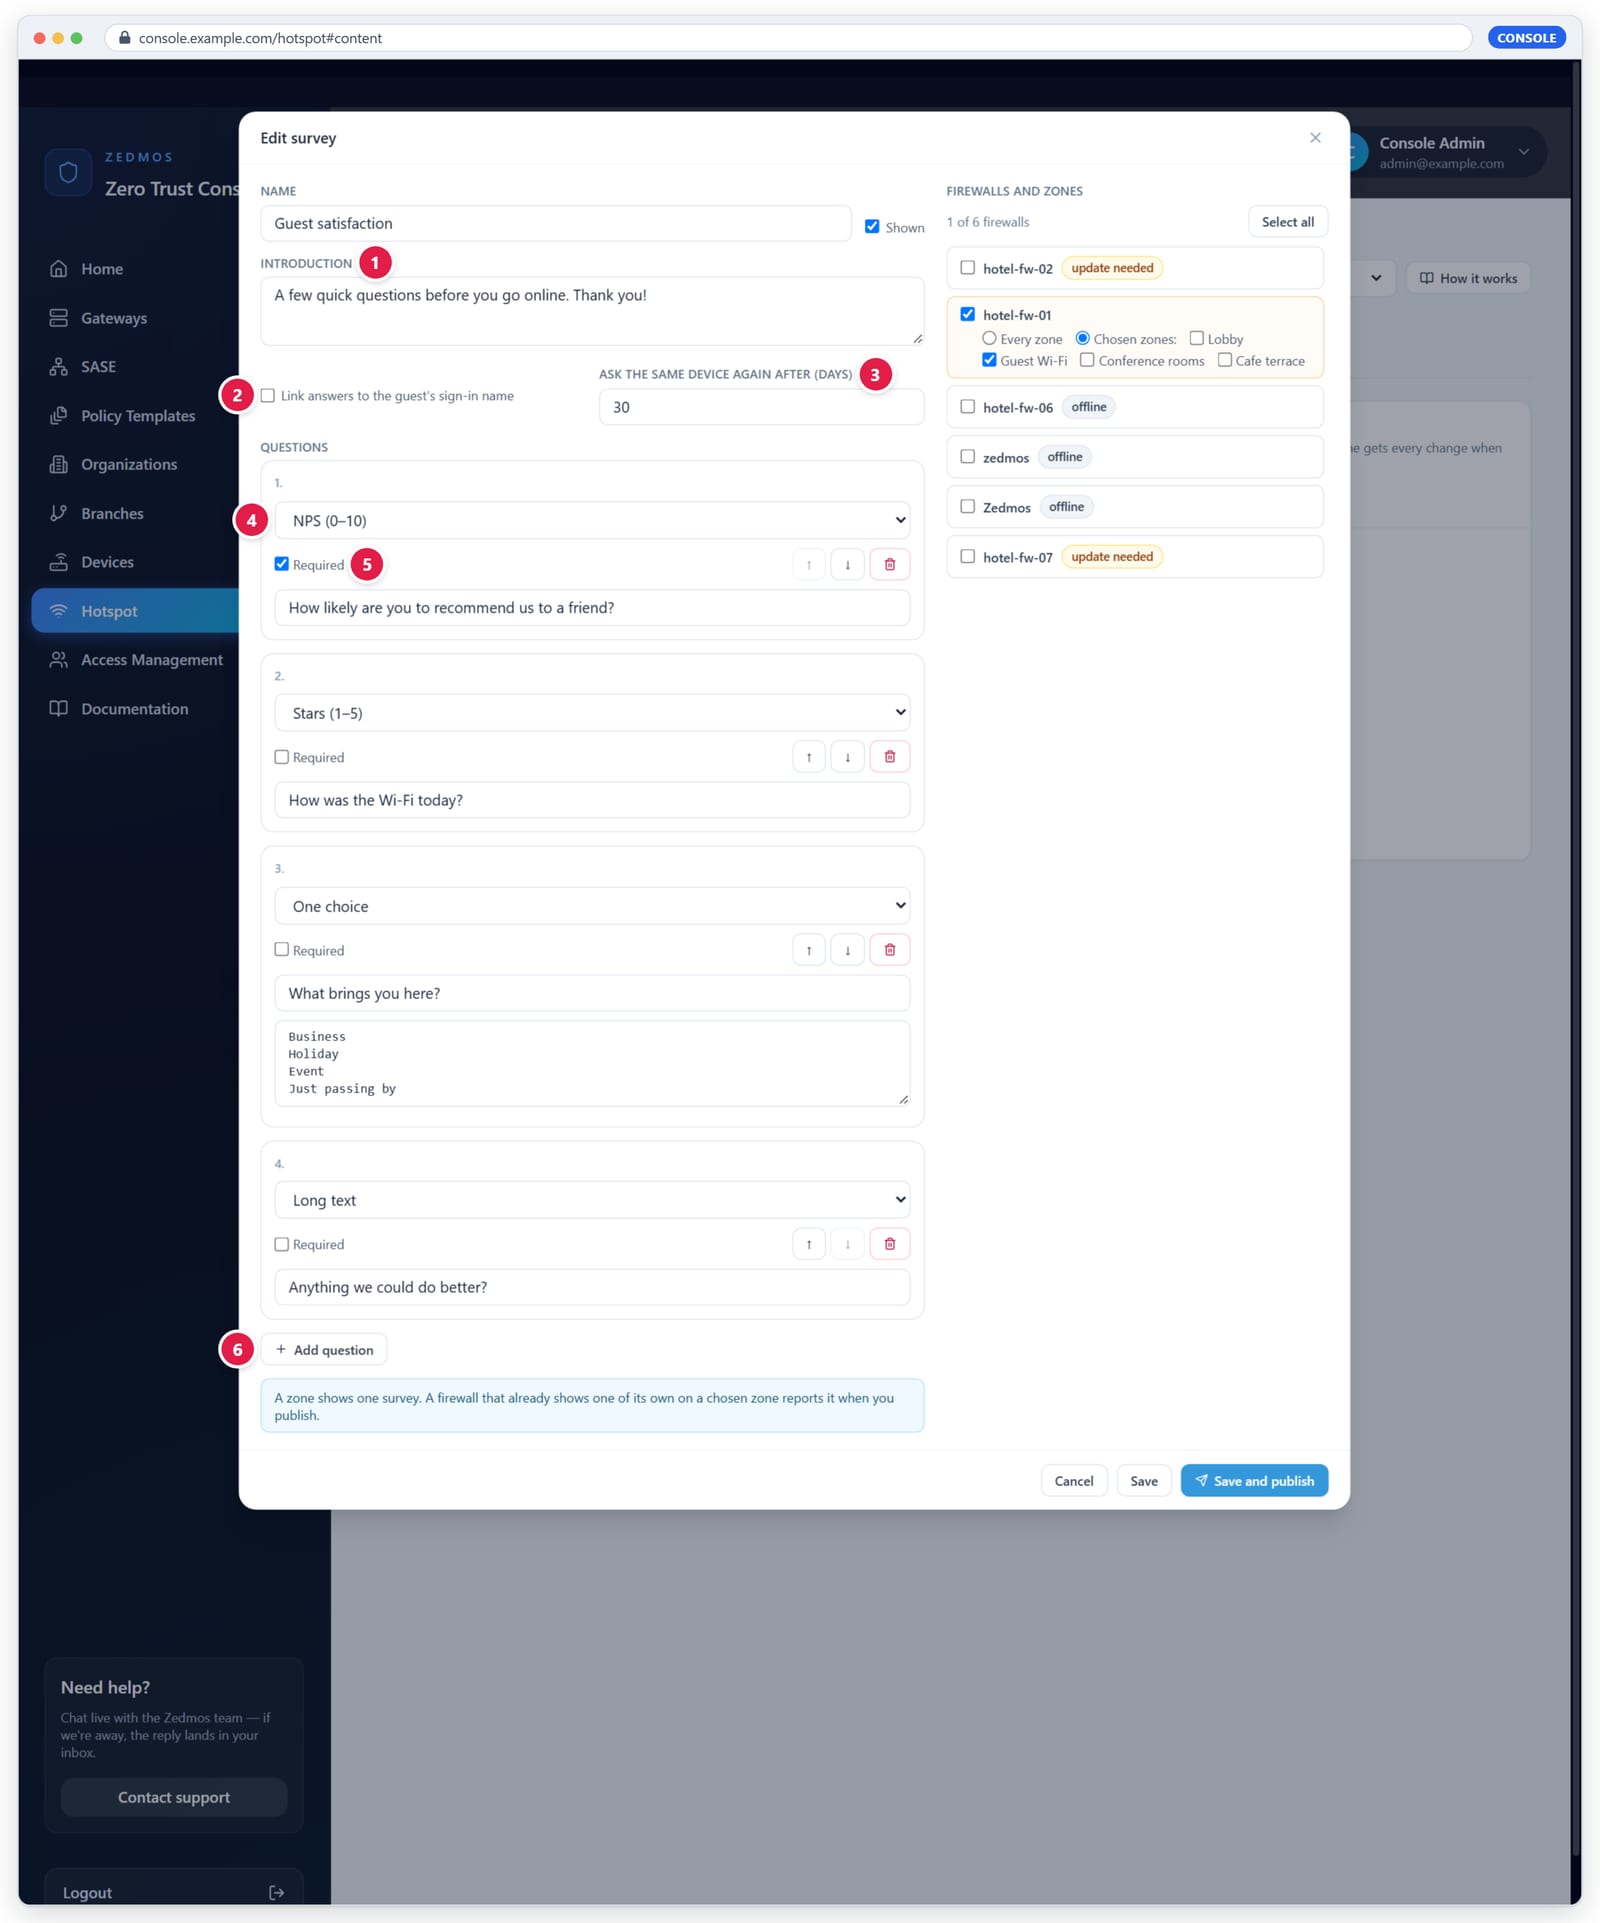
Figure 10.6 — The survey editor. A zone shows one survey: if a firewall already shows a survey of its own on a chosen zone, it reports this when you publish.
What publishing does
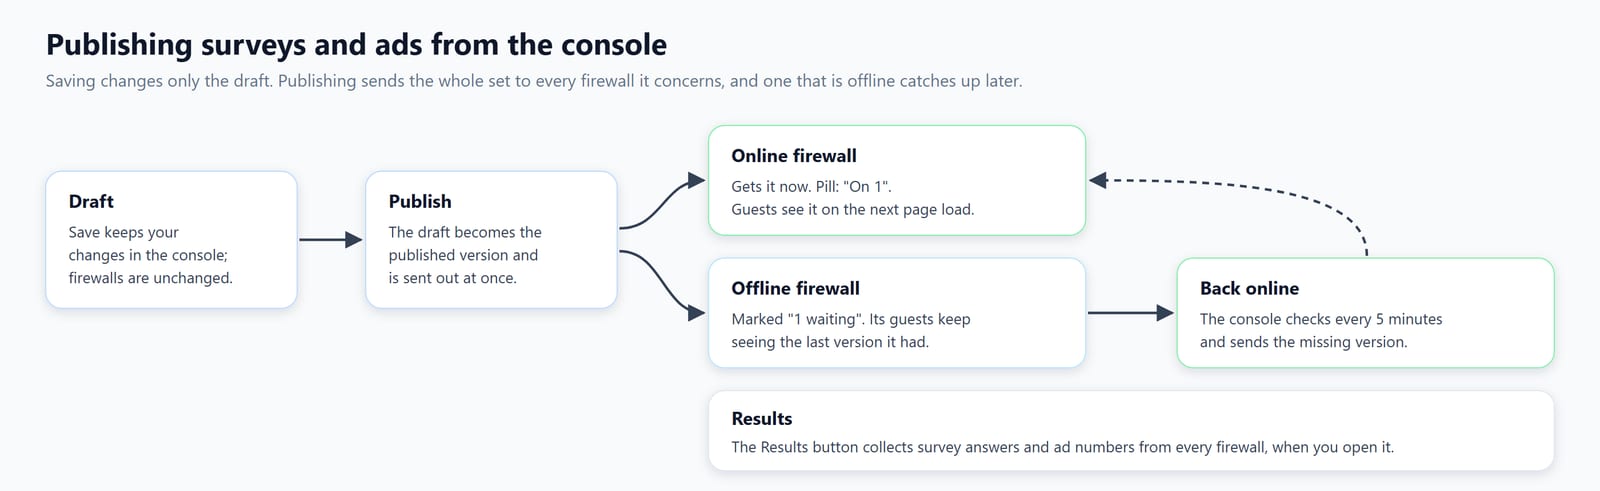
- Save keeps the change in the console. The firewalls keep the last published version, and the card says Changes not published.
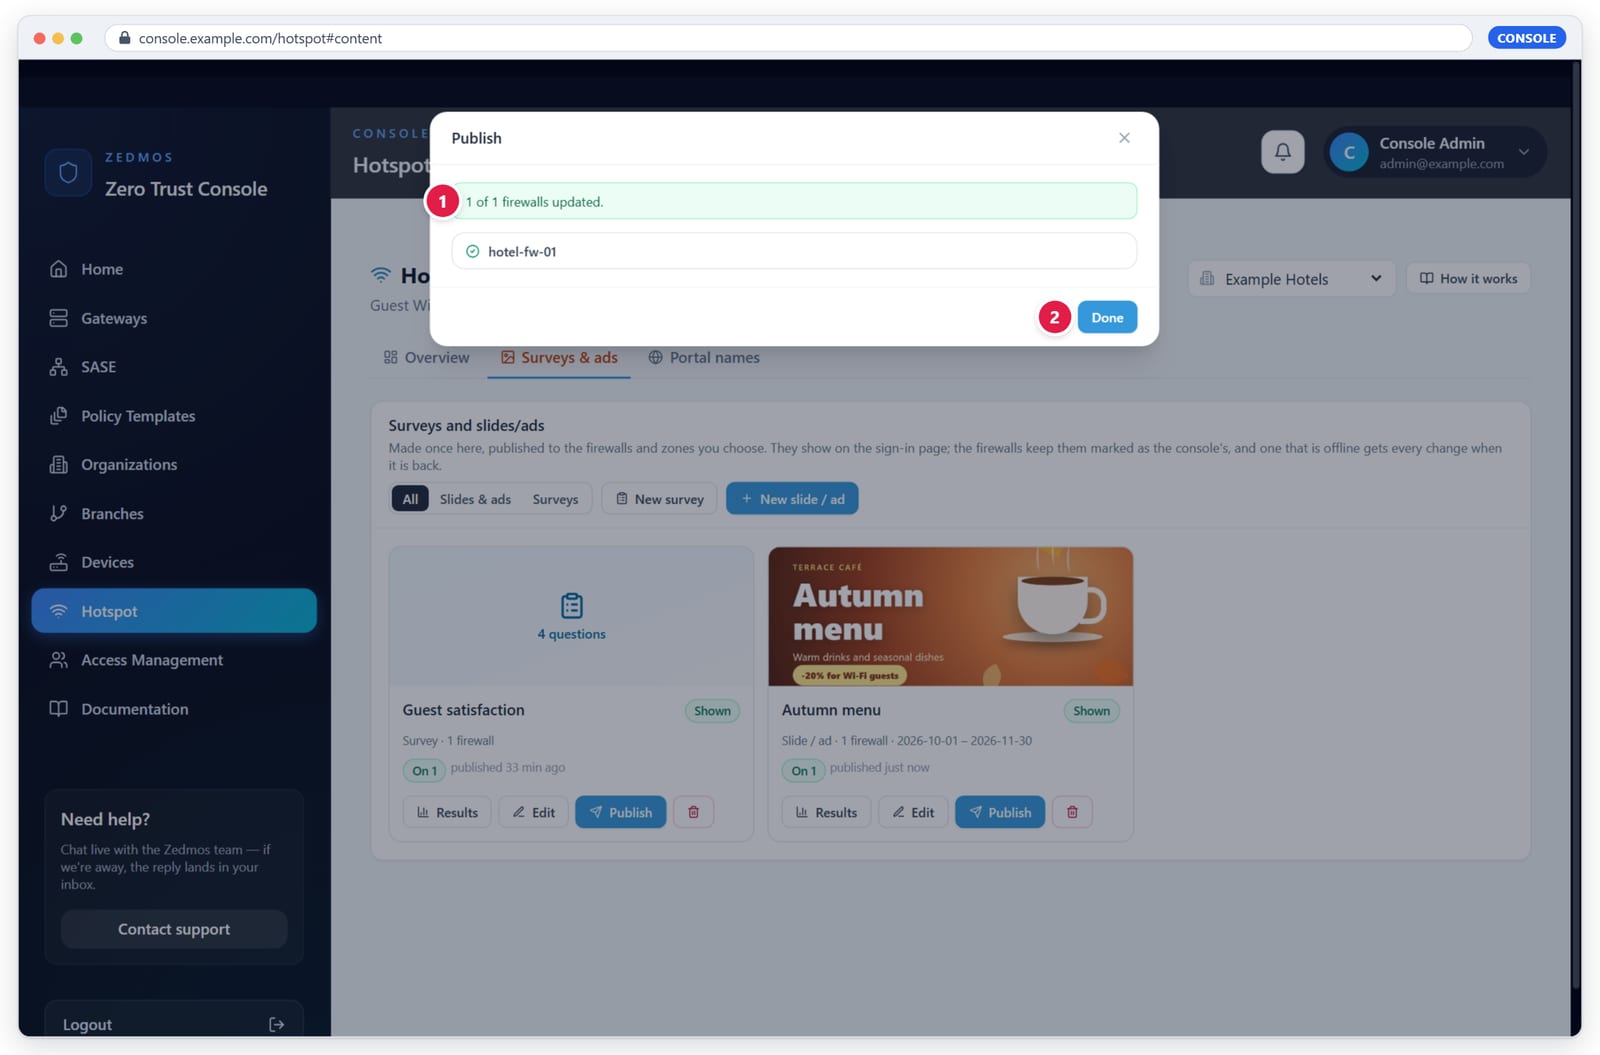
- Publish sends the item to every firewall it concerns, including those you removed from its targets, which withdraw it.
- A firewall that is offline gets the pill 1 waiting. The console checks every 5 minutes and sends the missing version when the firewall is back. A failed delivery is retried after an hour.
- Pictures travel once per firewall. The firewall stores them and serves them from the sign-in page itself, so they load before the guest is online.
- On the firewall, items from the console carry the Console badge and can only be changed in the console.
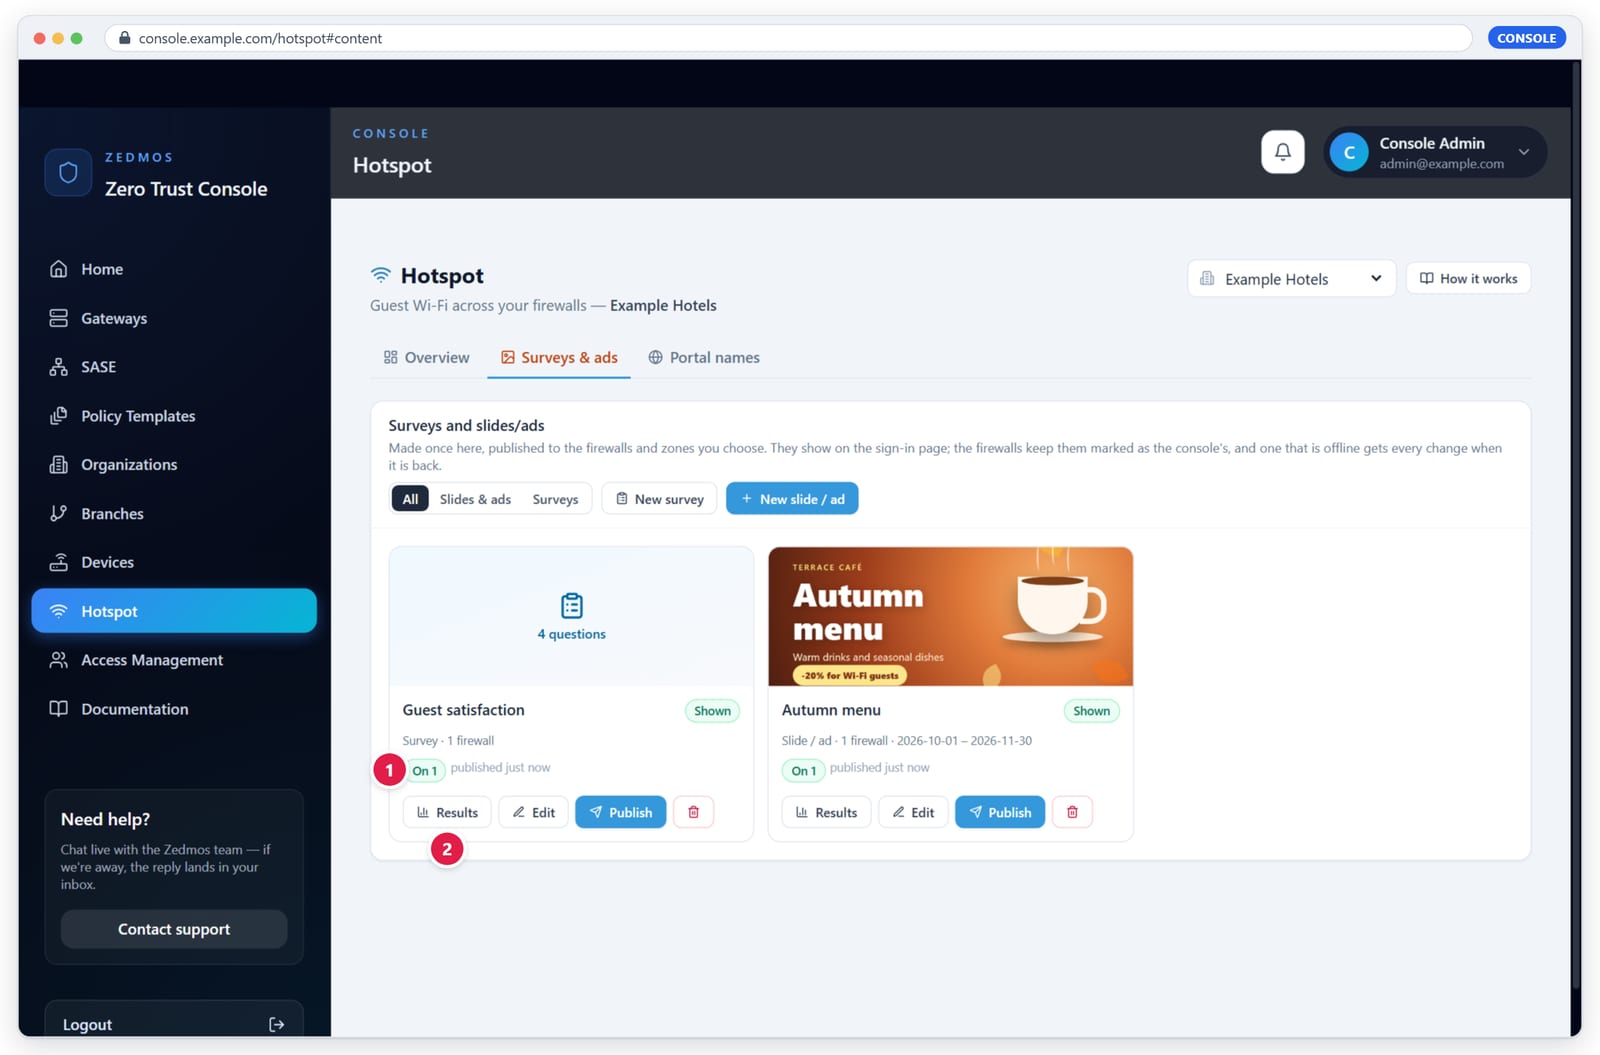
Delete withdraws the item from every firewall and deletes it. An item that also reaches organizations you do not manage is read-only for you.
10.3 Results
Results collects the numbers from every firewall the item reaches, for Today, 7 days, 30 days, 90 days, 365 days or All time.
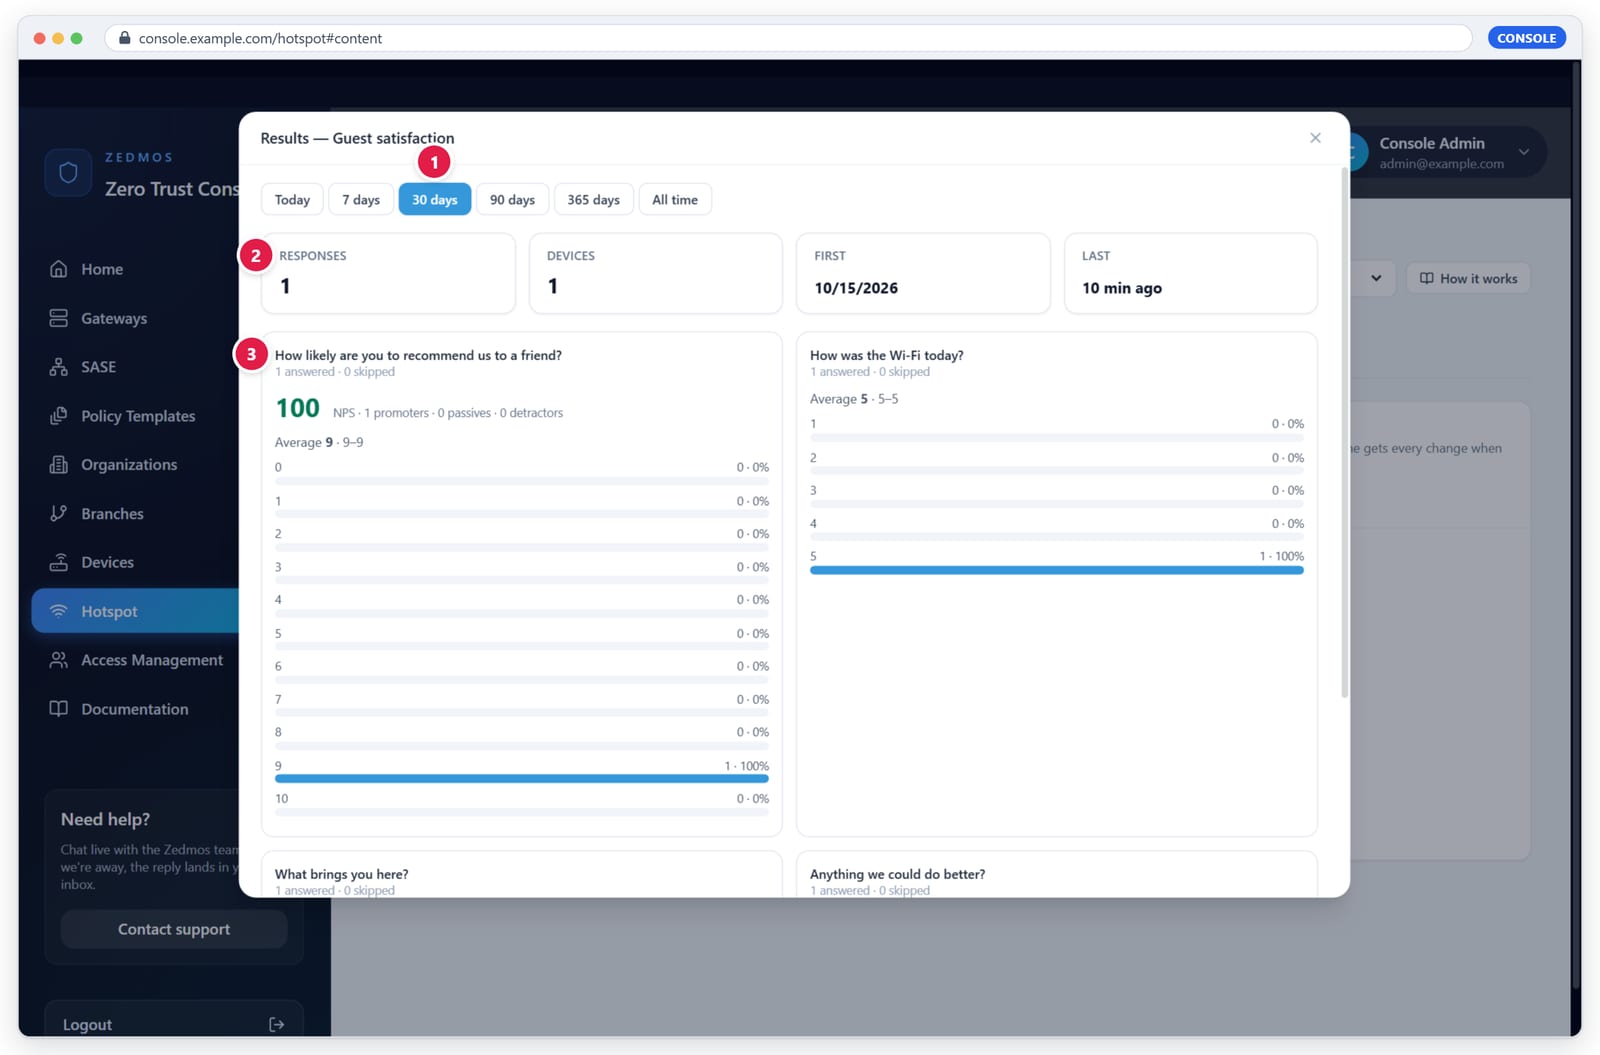
Figure 10.10 — Survey results: (1) period, (2) responses and devices, (3) one card per question with the NPS, averages and the share of each answer. Free-text answers show with the firewall they came from.
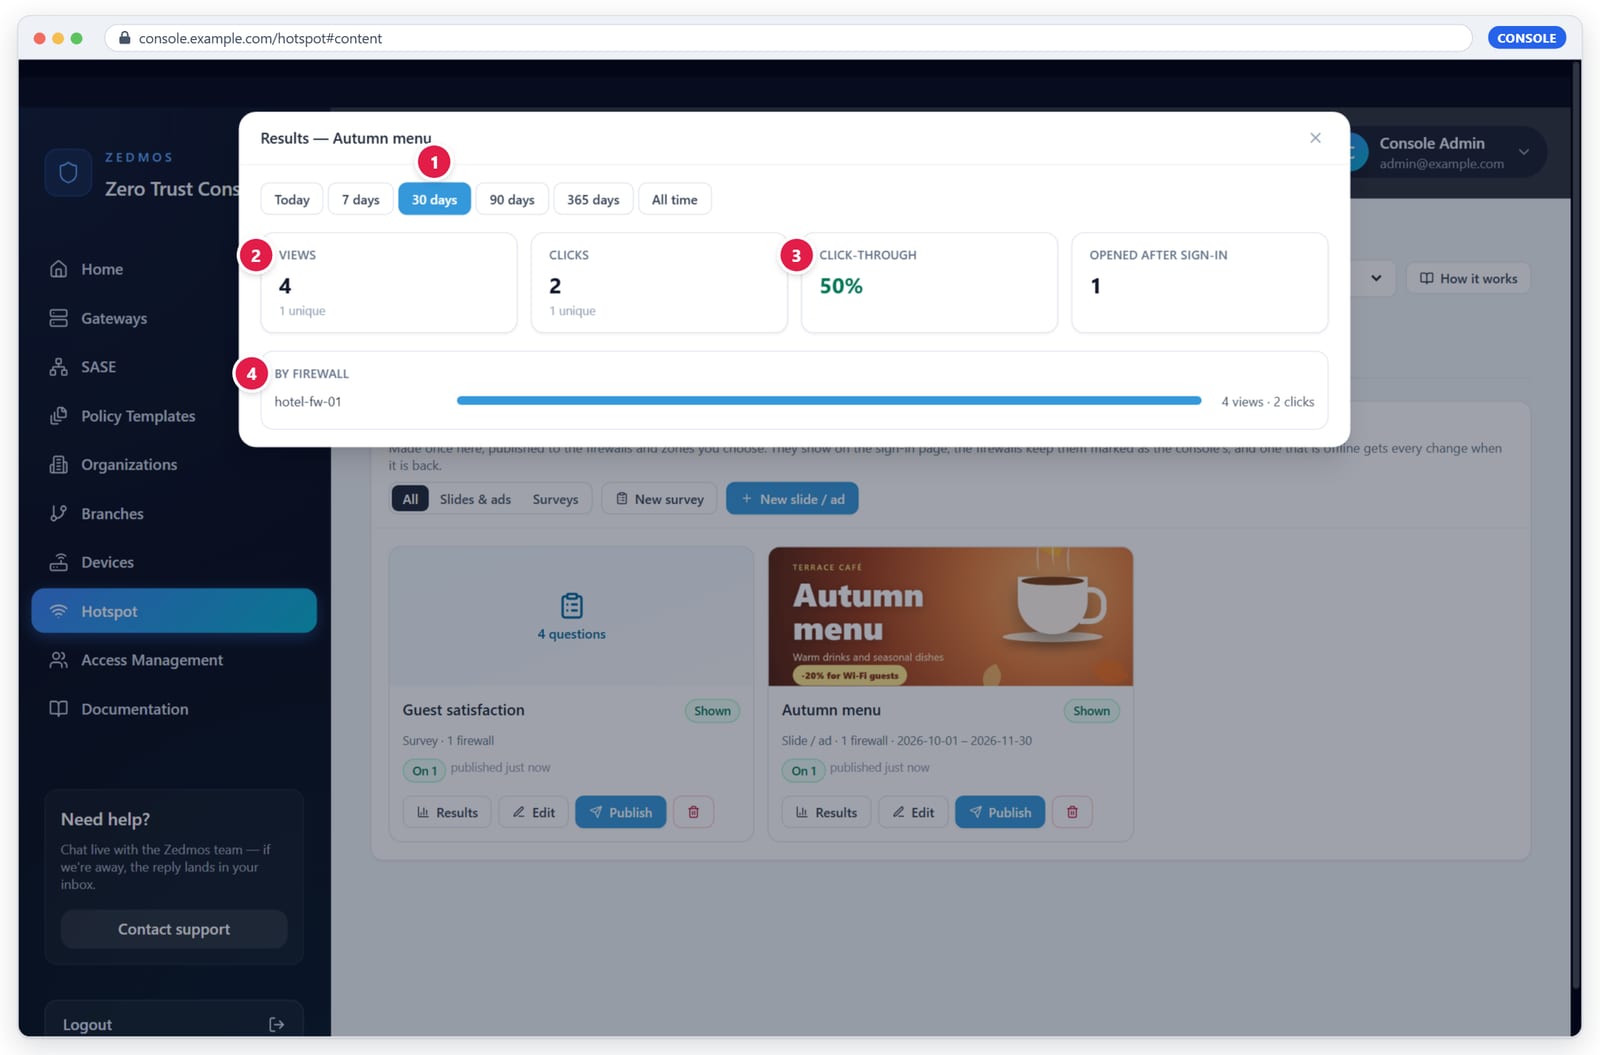
Figure 10.11 — Ad results: (1) period, (2) views, clicks, click-through and opened after sign-in, (4) the share of each firewall.
Results come from the firewalls that are online when you open them. An offline firewall shows "offline" in the list. Its numbers stay on the firewall and are included the next time you open Results while it is online.
10.4 Portal names
See chapter 05. The tab holds the mode for the organization, and the label and certificate of every firewall.
11
DNS from end to end
Three different DNS questions are involved. Keep them apart.
| Question | Who answers | What you set up |
|---|---|---|
A guest asks for the portal name 0c0bf217.console.example.com |
The firewall's own DNS (Unbound or Dnsmasq) answers with the zone's interface address, for example 10.2.2.1. |
Nothing. The firewall adds this answer itself for its guest interfaces. The guest network's DHCP must give the firewall as DNS server. |
Let's Encrypt asks for _acme-challenge.0c0bf217.console.example.com (TXT) |
Your DNS provider (API mode) or the console's DNS (own-DNS mode), only while a certificate is checked. | Chapter 05: the API token, or the delegation. |
Anyone asks for console.example.com |
Your DNS provider (API mode) or the console's DNS (own-DNS mode). | The console's own A record, which you set when you installed the console. |
Before sign-in, every DNS question of a guest, to any server, is answered by the firewall. After sign-in, the guest's device uses whatever DNS server it likes.
Checks you can run
From a device on the guest Wi-Fi:
nslookup 0c0bf217.console.example.com
The answer must be the zone's address, for example 10.2.2.1.
From anywhere on the internet, while a firewall requests its certificate (press Try now first):
dig TXT _acme-challenge.0c0bf217.console.example.com
With the console's own DNS, ask it directly:
dig TXT _acme-challenge.0c0bf217.console.example.com @ns.console.example.com
A timeout means port 53 is blocked on the way to the console.
12
Security and privacy
- Before sign-in a guest reaches only DHCP, DNS and the sign-in page. All other traffic is refused, so a device cannot reach the internet or your networks before it signs in.
- Guests are never HTTPS-inspected. The engine's TLS proxy is not applied to a zone's interfaces: a guest device does not trust the firewall's own certificate, so inspection would only break its connections. Everything else the engine does, such as application control, threat lists and intrusion detection, still applies to guests.
- The sign-in page uses HTTPS with a public certificate when the portal name is in use, so guests type passwords and codes over an encrypted connection to a verified name.
- Signing out needs the guest's own click on the page (chapter 08).
- Voucher passwords are shown once, when they are made, and are not stored in clear.
- Provider passwords and tokens (SMS, WhatsApp, PMS) stay on the firewall. The console's Hotspot page does not show them.
- Survey answers are anonymous unless you switch on "Link answers to the guest's sign-in". Tell guests in your terms when it is on.
- Retention. Survey answers and ad numbers are deleted nightly after the retention period you choose on the firewall (default one year).
- Compliance. If a compliance profile on the firewall requires proof of a
phone number (System › Compliance), the sign-in page offers only the
SMS / WhatsApp method, and every sign-in is recorded as a
session.startunder System › Compliance › Records. - Console access follows the roles in chapter 04. Every change made in the Hotspot area is recorded in the console's audit log with the user's e-mail.
- Client isolation belongs on the access points: guests should not see each other's devices.
13
Troubleshooting
| Symptom | Likely cause | What to do |
|---|---|---|
| The sign-in window does not open by itself | The portal name is not ready, or the mode is Off. | Check the certificate pill in Overview and the status line in the zone's General tab. Use Try now. |
| The window opens but shows a certificate warning | The device does not use the firewall as DNS, or reached the page by address. | Make DHCP hand out the firewall as DNS server. Open the portal by its name. |
| "No hotspot zone is configured for your network." | The device is not on a zone's interface, or the zone is disabled. | Check the zone's Interfaces and that it is enabled. |
| A signed-in guest has no internet | The guest network has no NAT, or a firewall rule blocks it. | Check outbound NAT for the guest network and the rules on its interface. |
| Certificate error: "provider_zone_mismatch" or "does not contain …" | The DNS provider's zone does not hold the console domain. | Fix the zone in SASE › Settings › Connectivity › DNS Provider. |
| Certificate error in own-DNS mode | Port 53 blocked, or the delegation is missing. | Run the dig … @ns.console.example.com check (chapter 11). Press Check delegation. |
| "NS: none" after Check delegation | The NS record is missing or not yet published. | Add it, wait up to an hour, check again. Some providers list it under the parent domain. |
| The console itself stopped resolving after adding the NS record | The console's DNS is not answering. | Remove the NS record, or switch to the DNS provider API. |
| "Update needed" in Overview | The firewall's release predates console management. | Update the firewall. |
| "1 waiting" stays for long | The firewall is offline. | It gets the change within 5 minutes of coming back. |
| A survey is "left off" on a zone | The zone already shows another survey. | A zone shows one survey: remove the other one from the zone. |
| SMS codes do not arrive | Wrong provider settings, no credit, or the sender name is not approved. | Use Send test code in the zone; read the error it shows. |
| "this code has signed in its limit of devices" | Devices per code is used up. | The guest requests a new code, or raise Devices per code. |
| A guest is signed out too early | The idle timeout is short, or the voucher's validity ended. | Check the zone's timeouts and the voucher's validity. |
| A label cannot be saved | It is used by another organization or is another firewall's generated label, or has invalid characters. | Pick another label: lower-case letters, digits and hyphens, up to 32 characters. |
| "Your role in this organization is read-only." | You are a viewer. | Ask an owner or admin for the Hotspot role. |
Appendix A
Ports and addresses
| From | To | Port | Purpose |
|---|---|---|---|
| Guest device | Firewall | 67/udp | DHCP |
| Guest device | Firewall | 53/udp+tcp | DNS (before sign-in, all DNS is answered here) |
| Guest device | Firewall | 80/tcp | Web requests before sign-in, redirected to the portal |
| Guest device | Firewall | 8000/tcp | Sign-in page over HTTP (interface address) |
| Guest device | Firewall | 8001/tcp | Sign-in page over HTTPS (portal name) |
| Firewall | Console | 443/tcp | The firewall's link to the console (outbound) |
| Firewall | Let's Encrypt | 443/tcp | Certificate orders |
| Console | DNS provider API | 443/tcp | Proof records (API mode) |
| Internet | Console | 53/udp+tcp | Only in own-DNS mode |
Appendix B
Limits and defaults
| Item | Value |
|---|---|
| Hard and idle timeout | 0 (never) to 10080 minutes |
| Devices per code | 0 to 10, default 3 |
| Code valid for | 1 to 168 hours, default 12 |
| Vouchers per batch | 1 to 1000 |
| Logo | up to 512 KB |
| Slide picture | up to 1.5 MB, shrunk to 1200 px wide |
| Survey | 1 to 30 questions, question text up to 300 characters |
| Choice answers | 2 to 30 |
| Label | 1 to 32 characters, a–z, 0–9, hyphen |
| Certificate | Let's Encrypt, renewed in the last third of its lifetime; the name is checked hourly |
| New certificates | at most 50 per registered domain per week (Let's Encrypt) |
| Console re-checks firewalls | every 5 minutes; failed deliveries retried after 1 hour |
| Results retention on the firewall | default one year (30 days to 5 years) |
Appendix C
Glossary
| Term | Meaning |
|---|---|
| Zone | One guest network on the firewall, with its own methods, page and limits. |
| Portal | The sign-in page a guest sees. |
| Portal name | The firewall's name under the console domain, for example 0c0bf217.console.example.com. |
| Label | The first part of the portal name; generated or set by you. |
| Console domain | The domain the console runs at, for example console.example.com. |
| Session | The time a signed-in device is online. |
| Hard timeout | The longest a session can last. |
| Idle timeout | How long a device may be silent before it is signed out. |
| Voucher | A printed username and password with a time allowance. |
| Voucher group | A batch name; a zone can accept one group only. |
| PMS | Property management system: the hotel's reservation software. |
| NPS | Net Promoter Score: % promoters (9–10) minus % detractors (0–6). |
| Click-through | Clicks per 100 views of a slide. |
| Hotspot role | A console permission for the guest Wi-Fi of an organization only. |
| Delegation | NS and A records that hand a domain's DNS to another server. |
| DHCP option 114 | The standard option that tells a device the sign-in page's address. |
Dasselbe Handbuch als bebildertes PDF – zum Drucken oder Offline-Lesen.